In progress Windows installations 10 on the computer you are voluntarily/forced to come up with a PIN code to log into your account. You won't be able to skip or ignore this setup step, but luckily, you can remove that annoying pin code later. Although I would not recommend leaving your computer unprotected if you have any important data stored there. But this is a completely separate topic, and today we will find out how to remove PIN and password in Windows 10.
How to remove PIN code in Windows 10
You can, of course, remove the PIN code in Windows 10 in different ways(although not a fact, I just don’t rule it out). But I'll show you how I did it. You should like this method because it is simple and straightforward.
However, it is worth reminding you once again that by removing the PIN code from your computer, you leave it practically defenseless. On the other hand, if you are sure that no one else except you will have access to it, then why not? But you can save a little time by not entering your PIN code every time you turn it on.
Step-by-step instructions on how to remove a PIN code inWindows 10:
We figured out the PIN code, but there is one more small nuance. Now Windows 10 will ask you for your account password at startup. And a password, by the way, is even less pleasant and time-consuming to enter than a PIN code. Therefore, next we will show you how to disable the password when logging in in Windows 10.
How to disable password in Windows 10
Before you disable your password in Windows 10, make sure you have it written down somewhere or remember it well. Because if you rarely use a password, you can easily forget it. And then, when you need it to confirm some changes in settings in your account Microsoft records, you will not be able to remember the password. Of course, it can be restored, but this is an extra hassle that no one likes.
Disable passwordWindows 10 when logging in:
- To get started, press Windows + R. In this case, Windows is the key on your keyboard with the Windows logo on it.
- In the window that appears, enter the phrase netplwiz to bring up the account settings item we need.
- Directly in the “User Accounts” settings window, uncheck the “Require username and password” checkbox.

Next, click OK and restart your computer to make sure everything is applied. Oh yes, I almost forgot, to apply these settings, you will need to enter your password two more times to confirm that you are the one currently controlling the computer.
Personally, everything worked out for me. I'm almost sure you do too. Now Windows 10 will not ask you to enter your password or PIN when you turn on your computer. If something went wrong for you, write in the comments below, we’ll try to figure it out. If you managed to mess up very badly, then use to return your operating system to its previous state.
Did you read to the very end?
Was this article helpful?
Not really
What exactly did you not like? Was the article incomplete or false?
Write in comments and we promise to improve!
How to remove password from Windows computer 10? Knowing this You can simplify your login task.
By default, desktop PCs and laptops on which Windows 10 is installed require entering a password for their accounts or local accounts when turned on.
Typically, this combination of password characters is chosen during system installation to enhance security. confidential information, stored on a computer that is accessible to several users at once.
Therefore, if protection interferes and you want to disable the Password prompt, you should use one of the options for setting up automatic Windows boot 10 to go straight to the desktop.
Pros and cons of passwordless login
The main advantage of passwordless login is quick access to the system.
No need to remember passwords and waste time entering them; nEvery time you turn on your computer, this saves valuable time, and most importantly, you will never lose your password and access to your data.

Among the disadvantages, it is worth noting the simplification of access to the computer by other people - at home, for example, these could be children.
Removing the password
The principles of setting up a Windows 10 login are not very different from the actions that are performed in previous versions– Windows 7 and 8.
At the same time, it is recommended to remove protection for the entire system and individual accounts only in cases where only one person uses the computer.
If there are several users, you should leave passwords on other accounts.
There are two main ways to remove a password in Windows 10:
- through the registry;
- through accounts.
In addition, the password can be removed not only for the account, but also for the local account. And also - remove a similar function when exiting sleep mode.
Method using accounts
Using Windows 10 accounts is the most simple option to remove the password. The main actions will be as follows:
- open the “Run” window by pressing the Win+R combination;
- enter one of the commands in the dialog box - netplwiz or control userpasswords2;
- press “Enter”;

- select the required user in the accounts window that opens and uncheck the box that requires entering a name and password;
- click the “Apply” button;

- in the window automatic login enter the previously set password twice to confirm your rights to withdraw it;
- Click "OK".

Advice! After completing all the steps, make sure that the checkbox on the password requirement has disappeared. The final way to check this is to reboot the system.
Removing a password through the registry
In cases where automatic passwordless login cannot be configured for some reason, you should use the second option - the registry editor.
To do this you need:
- open the editor using the “Run” window, called by the Win+R key combination;
- enter the regedit command;
- press enter key;
- When a window appears asking you to make changes to the system, select the “Yes” option.

- in the registry go to the “HKEY_LOCAL_MACHINE” section;
- open the SOFTWARE, Microsoft, Windows NT, CurrentVersion and Winlogon subsections in turn;

- find the DefaultUserName parameter in the right column of the editor, double-click on it and check whether the name of the account for which the password is being changed is in the value field;
- select the option called “DefaultPassword” there or create it if it has not already been created. To do this, click the “Create” button and select the “String parameter” value. Enter the password in the “Value” field;
- enable the ability to automatically log into the operating system by finding another parameter - “AutoAdminLogon”. This value defaults to zero and must be changed to one for passwordless entry.
After you restart your computer, Windows 10 should start without you having to enter passwords.
However, due to the complexity of this method and the possibility of changing the registry, it is better to use the first method first.
Disabling the password for local recording
Using a local account, which limits the user's capabilities, but is often necessary for a work computer, you can also remove the password when logging into Windows.
After this, even a system locked with the Win+L keys does not require entering a password. All that is required for this:
- launch the command line (requires logging in with an administrator account);
- enter the net users command and pay attention to how the user name is displayed;
- repeat the input again using another command - “net user username”;
- press Enter.
After command line will be closed, the Windows 10 user gets the opportunity to log in without using a password.
Removing the wake-up password
In addition to entering a password when logging in, the security requirements of Windows 10 lead to the need to request a fifteen-digit code when exiting “sleep mode”.
However, on home computer such protection is practically meaningless.
And in order to get rid of it, you should use a special setting in the accounts menu.

To change your login options, you need to set the time interval at which Windows asks for a password to never.
Now exiting sleep mode will be passwordless and quick.
There is another way to remove the password prompt when you turn on a temporarily dark screen - using the “Power Options” item located in the control panel.
To do this, when setting up the power supply scheme, you must select the item for changing unavailable parameters, change the value “Yes” to “No” and click “Apply”.

Conclusions
By using password disabling methods, you will have a system at your disposal that does not require entering a code.
However, if it is possible for others to access your computer, passwordless login is not safe.
And it’s best to leave the password, since saving a few seconds of time is not worth the violation of confidentiality.
Continuing to unravel the mysteries of the Windows 10 operating system, I learned about next problem users. Some people cannot remove the password that the operating room asks us for Windows system 10 each time you enter it or exit sleep mode. Having figured it out a little, I decided to write this article and explain to my readers what’s what.
And so, in the Windows 10 operating system there can be two accounts: either a local account or a Microsoft account. If you have a local one, then you can safely start disabling the password now, if you have a Microsoft one, then first you will need to transfer it to local, and only then disable it. If you don’t understand what we’re talking about at all, then finish reading the article, and only then start practicing.
Local account– this is your personally created username and password; they are used when logging into the system.
Microsoft account– this is your registration data on the Microsoft website, where your email address is used as a login.
In the list of accounts
And so we begin. Press the Win+R key combination and in the window that opens, write netplwiz, click “OK”
In the window that opens, in the “Users” tab, remove the checkbox next to the item "Require username and password". Click "OK"


In theory, this should be enough, but just in case, let's move on. Click the “Start” button and select “Settings”

In the window that opens, click on the tab "Accounts"


If this is not the case for you, then disconnect your account from Microsoft by clicking on the “Disconnect” button. In the window for switching to local, you enter your password and username. Next press "Log out", after all this the system will be transferred to a local account.
Via login options
Removing the password in the section "Login Options". They write to us here that if we are absent, the system should prompt us to log in again after some time. Near this item, select the value “Never” from the drop-down list (this means that operating system will no longer prompt us for a password when resuming from sleep mode). And next to the “Password” item, click on the “Change” button.

Enter your current password and click on the “Next” button:

In the next window we leave all the fields empty, which means that now we won’t have any password at all:

That's how it is, for us in the section "Login Options" Now they write that our account does not have a password.

We could end here, although there is another way to disable the password through the registry, but I don’t recommend using it, because you can create the wrong parameters and values and cause trouble.
And also watch a video on the topic:
Rate this article:
There are questions regarding disabling the login password. The Windows 10 operating system requires you to enter your Microsoft account password every time you turn on your computer and log in, which is quite annoying for users. Especially if the password is quite complex and the user cannot enter it from memory.
If you also encounter similar problem, then this article should help you. Now you will learn how to disable the login password in Windows 10.
Step No. 1. Execute the “netplwiz” command.
In order to disable the password when logging into Windows 10, you need to run the “netplwiz” command. This can be done in several ways. For example, you can open the Run window using the Windows key combination + R and enter the command “netplwiz”.
You can also use the search. To do this, open the Start menu and search for “netplwiz”. After this, the system will prompt you to run this command.

Step No. 2. Disable the password when logging into Windows 10.
After executing the “netplwiz” command, a window called “User Accounts” or “User Accounts” should appear on the screen if you have English Windows version 10. In this window, you need to disable the “Require username and password” function and click on the “Ok” button.

Step No. 3. Confirm that the password is disabled.
After clicking the “Ok” button, the operating system will require confirmation by entering a password. Enter the current password twice and click on the “Ok” button again.

At this point, disabling the login password can be considered complete. Now when you turn on the computer, the system will not require you to enter a password. But, the password will be required when exiting sleep mode. To disable the password when resuming from sleep mode, follow step #4.
Step No. 4. Disable the password when exiting sleep mode.
If you have Windows 10 without updates, then in order to disable the password when exiting sleep mode, you need to right-click on the “Start” button and select “Power Management”.

You can also open the Power Options window by searching in the Start menu. To do this, enter search query"Power supply."

In the power management window, you need to go to the “Require password on wakeup” section. The link to this settings section is in the left side menu. If you do not have the “Request password on wakeup” section, then perhaps you have the “Power button action” section, where the same settings are available.


After this, you need to enable the “Do not ask for password” function and save the settings by clicking on the “Save changes” button.

After these simple manipulations, the password when logging into Windows 10 will be completely disabled. Now the operating system will not require you to enter a password after turning on or resuming sleep mode.
If you have installed latest updates for Windows 10, then you will not have the settings described above in the “Power Options” section. In your case, you need to use the "Options" menu. To do this, open “START”, go to “Settings” and find the “Accounts - Sign-in Options” section there. In this section, there will be an option called “Login Required”, you need to set it to “Never”. After this, the system will disable the password when logging into Windows 10.

If you have Windows 10 Professional or Windows 10 Enterprise, then you can also use the Editor group policies. To do this, run the command “gpedit.msc” and in the window that appears, go to the section “Computer Configuration - Administrative Templates - System - Power Management - Sleep Settings”. In this section, you need to disable two functions related to the password request when exiting sleep mode (marked in the screenshot below).

Once again, I repeat that the Group Policy Editor (gpedit.msc) is only available for Windows 10 Professional or Windows 10 Enterprise. If you have Windows 10 Home, you can disable the password prompt when resuming from sleep mode only through the Settings menu.
More and more users are buying laptops with . Along with the increasing popularity of this system, the number of questions related to the use of the new Windows interface. In this article we will answer one of these questions, namely, how to disable the password in Windows 8.
How to disable password prompt in Windows 8
There are different ways to disable your password in Windows 8. The first option we'll look at is disabling the password prompt when the system boots.
Open the starter Windows screen 8 and enter the netplwiz command.
After this, the operating system will finish the search - launch the netplwiz program.

In the window that opens, you need to uncheck the “Require username and password” option. When you close the window, the system will ask you to enter your current account.

After these steps, restart the computer. After rebooting, the operating system will no longer require you to enter a password. You will be logged into your account automatically.
This method does not remove the password, but only disables its request when the computer starts. In other situations, such as when changing users, you will have to enter a password.
How to disable the password in Windows 8 completely
In order to completely disable the password in Windows 8, you need to remove it. To do this, open the Windows 8 start screen and launch the interface Windows settings by clicking on the link “Change computer settings”

In the window that opens, open the “Accounts” section, and then “Login Options”.
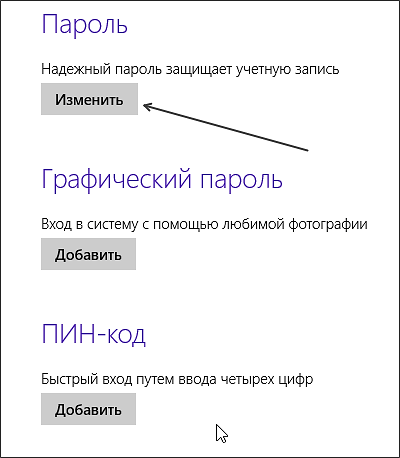
In the window that opens, click on the “Change” button in the “Password” section.
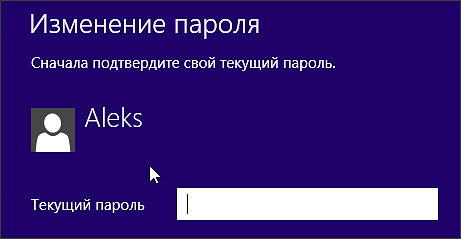
After this, you need to enter your current password and click on the “Next” button. The last step is the “Change Password” window.

Here you need to leave all fields empty; to do this, just click on the “Next” button. That's it, after this the password will be completely removed and you will be able to use account without entering a password.