Sometimes you urgently need to transfer files from your computer to your phone: programs, books, movies, music, photos, presentations, TV shows, etc. Even if it is personal data - office data Word documents and Excel, home photos and videos, contact lists, history of correspondence by mail and instant messengers - the task is still the same: transfer files from your computer to your phone in order to have them at hand. There are several ways to do this, all you have to do is choose the simplest and most accessible one for your situation.
The first method that comes to mind for transferring data to a phone is, of course, connected to the cable that comes with the kit. Actually, that’s why it’s attached to the phone. Data transfer speeds via USB 2.0 can reach 280 Mbit/s. At one end of the cable there is a standard USB plug, at the other there is a corresponding connector (microUSB for Android smartphones and Lightning for iPhone).
How to send files via cable on iPhone
Download, install and launch iTunes. Connect iPhone to PC. Windows system will install drivers that allow you to use all the functionality of transferring data to and from your iPhone.
- Give the command “File – Add file/folder to library”. For example, if you drop music tracks into a gadget, wait until they are all registered in the iTunes library.
- Choose your gadget.
- Go to the music section and select the specific songs you want to copy to iPhone, or check the “Copy entire library” option.
- Click on the “Apply” button and wait until the files are copied to the iPhone memory.
- To transfer photos to iPhone, go to the “Photos” section and turn on the “Sync” function.
- Enable scanning of all folders - or specify the folder in which your files are located using the "Select folder" button in Windows Explorer.
- Click on the "Apply" button. Photos and screenshots taken on this iPhone, will begin to be copied to the PC, and from the PC, in turn, photos taken on other devices and saved in this folder will be transferred.

Videos (movies, TV shows), audiobooks and other content are transferred to iPhone in the same way.
Transfer files from PC to Android device via USB cable
In the case of Android gadgets, sending files to the device is simplified. To transfer files from PC to USB via USB Android phone, do the following:
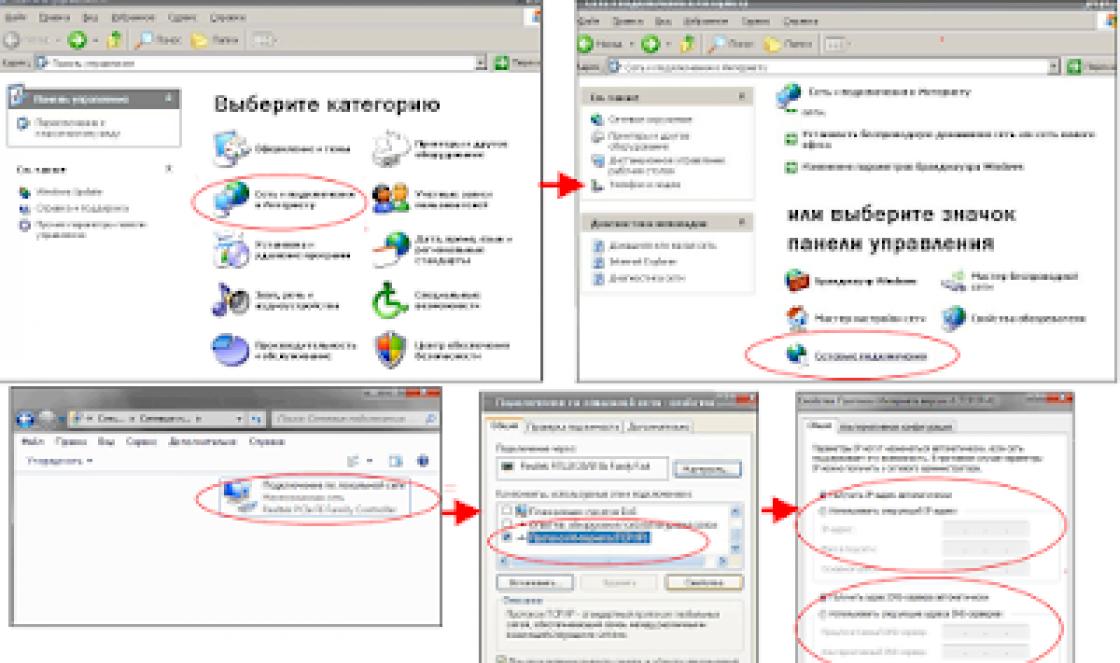
- Connect your Android smartphone or tablet to your PC using USB cable and wait until Windows installs the “USB Mass Storage Controller” and “Disk Storage” devices (if this is the first connection of the smartphone to the PC after reinstalling the OS).
- On your smartphone, select the connection type “MTP - Media device”.
- Give the command “(My/This) Computer – Android Removable Disk”. If an SD card is inserted into the gadget, it will appear as a separate volume (partition) on the Android disk. Proceed to the “DCIM” folder (photos and videos folder) - this is the shared “Android Galleries” folder.
- Open in a separate Windows window another folder where your photos, screenshots, videos and other content are stored. In this folder, give the command: right-click - “Copy”, and in the multimedia folder on Android - a similar command “Paste”.
As you can see, unlike iOS, copying/transferring any files to Android does not require any programs. All you need is Windows Explorer, thanks to the openness of the Android platform.
The copied files will be immediately available, only for required types files, appropriate applications are suitable - for example, ZIP/RAR archives can be opened WinRAR program for Android. Majority necessary programs you can easily find it in PlayMarket.
By the way, gadgets based on any OS are additionally recharged via a cable. When finished copying/transferring files, disconnect mobile device from PC.
How to transfer files from a computer via Bluetooth
Bluetooth is second in speed after the USB cable. The advantage of “wireless” is to connect not only a gadget and a laptop equipped with Bluetooth, but also gadgets and laptops separately at a distance and in an unusual environment, for example, in a crowd of people.
How to send files to iPhone via Bluetooth
Unfortunately, no way. Bluetooth pairing of “foreign” PCs, tablets, smartphones and all types of laptops, except Apple equipment (iPad, iPod, Apple Watch/TV, MacBook laptops) c iPhone is not officially supported by Apple Inc. developers. from the very beginning. Apple Company explains this by copyright protection and serious requirements for anti-virus security of its customers. To bypass this limitation a jailbreak is required, which is increasingly difficult for iDevices users: in every new version iOS “closes” “holes” in the security of the program code on iGadgets.
How to transfer files via Bluetooth on Android
It is precisely because of the difficulties with free file sharing via Bluetooth radio on the iPhone that more and more users are leaning towards Android. “It’s better to buy another one Samsung Galaxy S, than no less new iPhone", is their answer.
To “drop” a file via Bluetooth from a PC to an Android smartphone, do the following:
- Turn on the Bluetooth function on your gadget and PC. Pair both devices (if not already paired) using a random PIN generated by one of the devices. The Bluetooth connection of your mobile device will appear in Windows Explorer.
- Open the contents of the device, as in the instructions for using the cable. The location of folders and files will be the same. Find the media files you need and copy them to your PC/laptop drive.
- At the end of the file sharing session, turn off Bluetooth on your PC and smartphone/tablet unless you currently plan to use other data synchronization options.
But not all users will be able to use this method, since not everyone has Bluetooth installed, and more and more people prefer to transfer data via WiFi.
Transfer data over the Internet
There are dozens of domestic and foreign Internet services called “clouds” (“cloud” storage). Among the Russian ones are Yandex.Disk and cloud.Mail.Ru, the RusFolder service. From foreign ones - Google Drive, DropBox, and dozens of others. For each of them, both for Android and iOS, versions of software clients have been released.
The main requirement is multi-megabit unlimited cellular tariff, preferably without restrictions on high-speed traffic, can also use a Wi-Fi connection to a home or public cable Internet channel.

To connect, for example, to Yandex.Disk you need the following:
- Login to your Mailbox"Yandex.Mail". If you don’t have it, register at mail.yandex.ru. Go to disk.yandex.ru.
- Allow - or block - the use of cellular data in the Yandex.Disk settings. When the speed on the tariff is “cut off”, which is why synchronization with the “cloud” can take hours and drain the gadget’s battery, select the “Wi-Fi Only” function.
- Select files on your mobile device to transfer. By default, the Yandex.Disk client will copy all files to the server. Available online memory is up to 10 GB per user.
- Log in from the same account to Yandex.Disk from a browser on your PC and download these files as from any site.
- To transfer files to your iPhone or Android device, follow steps 4-5 in reverse order. Downloading files from mobile browser, For example, Google Chrome or “Yandex.Browser” for Android/iOS is not much different from downloading on their PC versions.
This instruction is the same for Android and iOS.
Advantages of the cloud:
- your content is not tied to any model of Apple or Android device;
- editing, cropping photos and videos online.
Sending files over Wi-Fi
In terms of bandwidth, Wi-Fi competes with USB. Speed – up to 150 Mbit/s. There are plenty of applications for “transferring” files from a PC to iOS and Android smartphones/tablets.
How to send a file via Wi-Fi on iPhone
Synchronization via Wi-Fi between PC and iPhone media libraries is possible. To enable this feature, do the following:
- Connect your iPhone via cable to your PC and wait until it is detected. Click on its icon in iTunes.
- Give the command “Settings – Overview” and in “Options” enable synchronization via Wi-Fi.
- Click the Apply button, unplug the cable, and restart iTunes.
Important! Your PC and iPhone must be connected to the same router/hotspot. Only in this case will you successfully transfer files from your computer to iPhone.
How to send files to an Android smartphone via Wi-Fi
As an example, ES Explorer for Android. Do the following:
- IN Google Play download, install and run the ES Explorer program.
- Check that the Wi-Fi function is active on the gadget, your router (or PC/laptop as a virtual Wi-Fi hotspot) is turned on, and the gadget is connected to the specified wireless network. In the application, give the command “Network - Enable”. The WLAN address will be “shared” from the address space of your network - with forwarding one of the software ports.
- Enter the local web address (and port as specified in the application) on your PC in any of the browsers. The file storage will open on your gadget. Click the “Download” button (or link) next to the name of the desired file.
- Similarly, you can “upload” a file from a PC to a smartphone: in the ES Explorer web interface there is an “Upload file” button. Click it and use Windows Explorer to select the file you want to send, and then click the Open button in Windows. The file will be downloaded to the gadget and available in a folder on the Android disk.
The “browser” method is the simplest: you do not need to configure network hosting in Windows. Files are downloaded as on any site - and saved to the browser downloads folder configured by the user. The disadvantage is entering a temporary login and/or password when establishing a file exchange session.
Transfer files from computer to phone (iPhone, Android smartphone) in most cases is not difficult. If in the case of the iPhone, due to the closed nature of the iOS platform, some difficulties are encountered, then Android gadgets“transparent” for any of the ways to exchange content between a PC and a mobile device. This will help you both speed up your work by taking your work documents with you to any country, and share your collection of content with family, friends and colleagues.
One of the possible tasks of the owner of an iPhone or iPad is to transfer videos downloaded on a computer or laptop to it for later viewing while on the road, waiting, or somewhere else. Unfortunately, you won’t be able to do this by simply copying video files “like to a flash drive” in the case of iOS. However, there are plenty of ways to copy a film.
In this guide for beginners, there are two ways to transfer video files from Windows computer on iPhone and iPad from a computer: the official (and its limitations) and my preferred method without iTunes (including via Wi-Fi), as well as briefly about others possible options. Note: the same methods can be used on computers with MacOS (but for them it is sometimes more convenient to use Airdrop).
There are third-party apps that allow you to transfer videos to iOS devices and play them on iPad and iPhone. One of the best free applications for these purposes, in my opinion, is VLC (the application is available in the store Apple applications App Store https://itunes.apple.com/ru/app/vlc-for-mobile/id650377962).
The main advantage of this and other similar applications is the smooth playback of almost all popular video formats, including mkv, mp4 with codecs other than H.264 and others.
After installing the application, there are two ways to copy video files to your device: with using iTunes(but without restrictions on formats) or via Wi-Fi in local network(i.e. both the computer and the phone or tablet must be connected to the same router for transmission).
Rip Videos to VLC Using iTunes

Once the copying is complete, you can watch the downloaded movies or other videos in the VLC player on your phone or tablet.
Transfer videos to iPhone or iPad over Wi-Fi in VLC
Note: For this method to work, both the computer and iOS device were connected to the same network.

Once completed, the video can be viewed in VLC on the device.
Note: I noticed that sometimes after downloading, VLC does not display the downloaded video files in the playlist (although they take up space on the device). I empirically determined that this happens with long file names in Russian with punctuation marks - I didn’t find any clear patterns, but renaming the file to something “simpler” helps solve the problem.
There are many other applications that work on the same principles, and if the VLC presented above did not suit you for some reason, I also recommend trying PlayerXtreme Media Player, also available for download in the Apple App Store.
iPhone is a multimedia device with which you can listen to music, watch movies, read books and do a whole lot of different things. But a user who has recently purchased a reasonable question arises - how can I transfer all these files to mine? In this article we will look at the process of downloading various types of multimedia (and not only) files to the iPhone.
While users can delete apps from the device itself, deleting 20 apps one after another can cause irritation or boredom. As a result, they avoid deleting apps until they start playing challenging games. You can see the delete icon in the top left corner of the app icon.
Step # Click on the delete sign. The application will be deleted quickly. This way you can remove apps that are no longer useful. Sometimes users have to follow this method to uninstall apps that are there. And in case you want to recover deleted apps, you can.
Step 2: Connect iPhone to Computer Using USB Cable
- Make sure you have it installed.
- Press the buttons until the maintenance screen appears.
Step 3. The device will be detected in the program and you will be able to transfer absolutely any files to it, using the iPhone as a flash drive
Step 4. Drop the files that need to be “transferred” to the folder Shared storage
A very convenient solution that can help out at the most crucial moment. For example, you don’t have a flash drive at hand, but you need to upload an important file “weighing” several gigabytes, and you can’t send it by mail. The iPhone, coupled with iFunBox, copes with this task perfectly - the files are not damaged and are transferred safe and sound.
Or you can clear your purchase history of unused apps. 
Enjoy premium features with a free trial.

In contrast, the manual method of removing apps from your shopping list is time-consuming and inconsistent, at least when you're looking at multiple apps. With this amazing device, you can capture high-quality images, record videos, save documents or open multiple files.
Users who jailbreaked their devices were several times luckier. Thanks to a huge selection of tweaks from Cydia for working with the file system, they can unpack files using special managers, download files directly from Safari and much more. Read this article about how to jailbreak your device running 7, but be careful, the ability to jailbreak new firmware has been closed and in iOS 7.1 these instructions will no longer be relevant.
More details about the application below. No cable or incompatibility issues. You can still drag and drop songs to send them more easily to your device.
- To download music, click the Music icon.
- Click the "Upload Files" button and select the songs you want to transfer.
- Click the Video icon on the left.
Create Screenshots at will
If you can't find the document you want to move, search using the "Search Bar" in the top right corner of the program.

Captured images are saved on your local disk. The output files maintain the same quality as the original files.
Beginner users of Apple technology sometimes think that transferring photos from PC to PC is as easy as transferring them in the opposite direction. And they are wrong. When connected to a computer, an iPhone is not recognized as a regular flash drive - this is one of the security measures that reliably protects Apple devices from viruses.
The developers recommend using the iTunes media processor to download files to the iPhone - this method is considered official. However, there are other ways to transfer images, including those that allow you to do without a USB cable. They will also be discussed in this article.
Easy to use interface
After that you will see the following program. Click "Photos" - "Manage photos on your device." By right-clicking on any photo and selecting Preview, you can view large photos and rotate photos as you wish. Applications evaluate the content and potential of any smartphone or tablet.
Solution 1
In the latter cases, as well as when deleting an application, you should also find a way to permanently delete any data and personal settings stored on the device. Hold the icon for a few seconds and notice that the screen begins to vibrate.
Before you start transferring photos in the official way - that is, through iTunes - you need to perform a number of preparatory steps:
Copy photos to Apple device from different folders impossible - this is one of the significant disadvantages of this method.
After completing the preparatory steps, you can begin the data transfer procedure:
Solution 2
If there are other apps that you want to remove, you can follow the same procedure. If these steps don't work, try the solution below. In some situations you may need to know. Additionally, you may want to know the difference between uninstalling and logging out. So you just need to get started. No need for backup. However, you need to reconfigure the application. When you uninstall the app, you will see a warning that all data will be deleted. However, the data in question in this case is stored locally.
Step 1. Open iTunes and go to the device management menu - click on the button with the image of a smartphone.
Step 2. In the block " Settings» select the tab « Photo».

Step 3. Check the box next to " Synchronize».
Transfer movies to iPhone
This is information that is only required once, that is, during the first installation. In addition to this data, settings saved locally are reset. There aren't many of them, so there's no need to create them again. At this point, keep your finger on it until all the apps start shaking. Then you must select the Delete option highlighted in red to confirm. The procedure, as you can see, is the same as any third-party application that you want to uninstall.
One of them is reinstalling the application. To know more about logging out, you can read. If you have purchased the infinity app in recent years, there is no doubt in your mind that you will no longer use it. Some of the apps you may have become useless to you and you would like to get rid of them as you cannot use them. You can also uninstall some apps in an attempt to speed up your device. You may need to create a space on your device. . In this article, we'll look at some ways you can easily do this.

Step 4. On the menu " Copy photos from:» click on the item « Select folder».

Step 5. Through " Conductor»Locate the folder on your PC with photos that you want to transfer to your iPhone.
You can hide some of the apps in this list, as we'll see shortly. Step Three: Find Documents and Data and then select the app you want to remove. Step Five: Click the Delete button to the left of the file you want to delete. You will be asked to confirm the deletion.
Step 6: If you want to delete everything, click "Delete All" and then confirm the deletion. The above method will help you get some space on your device. You should see a list of all the apps you have purchased. Click "Purchased" on the right and you'll see your purchase history. Your purchased list will be updated and you will see that the app that was hidden is no longer listed.

If the folder also contains video files that you would also like to copy to your mobile phone, check the box next to “ Include video in synchronization».

Step 6. Click the button Apply».

Wait for the synchronization to complete, then go to the Photos app on your iPhone. There you will see the folder with the pictures that you copied.

Photos downloaded to iPhone via iTunes cannot be deleted using the standard method.. If you open any of these photos, you will see that the icon with the image of a basket is simply not in its usual place.

Deleting such images also needs to be done through a media harvester. Just uncheck the " Synchronize" in the " tab Photo" and start the synchronization process by pressing the button " Apply" The folder with photos will disappear from the memory of the mobile device.
You will need
- - USB cable;
- - a special program installed on the computer;
- - Yandex.Mail application for mobile phones.
Instructions
Connect your iPhone using the USB cable that came with the device in the original box to your PC. The iPhone is recognized by both iTunes (if installed) and the computer as a flash drive - the AutoPlay dialog box will open. If an iTunes window opens, close it. The phone should not be synchronized with the program.
If you need to transfer photos to your computer, then in the AutoPlay dialog box, click “Open folder to view files.” If the “Always perform selected actions” checkbox is checked, you need to uncheck it and only then press “Enter” on the keyboard or click “OK”. In the window that opens, double-click on “Internal Storage”.
Double-click on the “DCIM” folder and the subfolder it contains. A folder will open with images you took on your iPhone or saved from the Internet. Select the ones you need and copy to your computer in any known way.
If you plan to transfer music compositions to your computer, then use the SharePod program. Download it from the Internet by clicking the “Download” link on the page. In the window that opens, select “Launch” or “Run”. A window will open. .
Double click on the SharePod.exe file. The program will automatically find the iPhone and recognize the songs that are on it. Click "Copy to computer". A separate window will open.
Check the correctness of the data specified in the window - the number of tracks (“n track(s) to copy”), the folder in which the songs will be saved (“Copy tracks to this folder”) and the type of folders/tracks (“I want my music to look like this"). Appearance can be changed by simple clicks on the presented ones. To copy, click "Ok". All selected songs can be viewed in the folder where you saved them.
To transfer music, photos, videos, and books from iPhone, use a multifunctional program like iPadMate. It is suitable for iPhone, iPod and iPad. Download the program by clicking the “Download” button. Confirm the installation of the program, wait until it is installed and launch it either from the desktop or from Start.
Wait until the program is completely loaded. When it is installed, it will automatically find the connected device (iPhone) and display it in the section on the left. The status of the iPhone and its fullness will be displayed in front of you. The iPhone section will have subsections, photos, videos.
Select the section you are interested in, click on the file and hover your mouse over the second icon from the left with the image of the HDD and a green arrow pointing down. “Copy to computer” should be displayed. You can click on the file, then right-click on it and select “Copy to computer” from the menu. Click and wait for the file to be transferred to your computer.
If you need to transfer text files from the Notes app, use mobile version"Yandex.Mail". Connect to Wi-Fi hotspot access. Open the text you want to copy in Notes. Hold your finger on the text for a couple of seconds. A tooltip will appear; Click "Select All" and then "Copy".
Go to the Yandex.Mail application on your iPhone. Open "Drafts". Create a new letter by clicking on the top right button. Paste text by holding your finger on the message input field and when the tooltip appears, tap Paste.
Exit the email, remembering to save the draft. Open Yandex.Mail on your computer. Go to drafts, open the letter. Select and copy the text. Create a new document in text editor on a PC or in Notepad. Paste the text and save.

After this, the application status changes. The "To be installed" icon appears. One more synchronization is enough for the applications to be downloaded to the iPhone. To start, click on the “Apply” button in the bottom right corner.
Sometimes it happens that all the instructions have been completed, but the application still does not start. What to do in such a situation? First you need to launch iTunes, select the item called “Store”. Then from it there is a sub-item with computer authorization. A window will appear in which you need to enter your Apple ID information. And then click on the authorization button. This often helps to cope with problematic loading of applications on the iPhone.

iPhone and iPad are multimedia devices with which you can listen to music, watch movies, read books and perform a whole lot of different tasks. But a user who has recently purchased an iPhone or iPad has a reasonable question: how can he transfer all these files to the device? In this article, we will look at the download process on iPhone and iPad various types multimedia (and not only) files.
You can transfer any file to your iPhone and iPad, without exception, but, unfortunately, not every file can be opened. Let's start with the most simple manipulations- learn how to reset movies, music, books and photos using iTunes.
How to Transfer Music from Computer to iPhone and iPad Using iTunes
Step 1: Open iTunes. In case it is not installed, download the latest version from the official website.
Step 2: Connect your iPhone or iPad to your computer using a USB cable.
Step 3. Add the music you want to download to your smartphone to iTunes. To do this, click " File» → « Add a file to your library" to open a specific song or " File» → « Add a folder to your media library"to add a music folder. iTunes supports Drag'n'Drop, which allows you to simply drag individual songs and music folders into the program window for adding.
 Step 4. Wait until the music is detected in iTunes and select the icon with the image of your device in the panel.
Step 5. Go to menu " Music» and select the songs you want to transfer to your iPhone or iPad. You can also check the " Entire media library» to sync all music to your device.

Step 6: Click " Apply" in the lower right corner of iTunes and wait for the synchronization to complete.
To transfer movies to your iPhone or iPad, you must do exactly the same operation as described above, but by choosing in Step 5 not “ Music", A " Movies" By the way, it was after several such operations that users who did not like iTunes for its apparent complexity completely changed their opinion about this unique multimedia processor.
How to Transfer Photos from Computer to iPhone or iPad Using iTunes
Step 1: Open iTunes. If the utility is not installed, download the latest version from the official Apple website.
Step 2: Connect your iPhone or iPad to your computer using a USB cable.
Step 3: Select the device that appears from the top panel.
 Step 4. Select menu " Photo» .
Step 5. Click on the check mark next to the inscription “ Sync photos from».
 Step 6. To the right of this inscription there is a button with the inscription “ Images" Click on it and select " Select folder»
 Step 7. Specify the folder with the photos you want to see on your iPhone or iPad.
 Step 8. Click " Apply"in the lower right corner and wait for the synchronization to complete.
How to Transfer Books from Computer to iPhone or iPad Using iTunes
With books, things are a little different. We have already described in detail three different applications for reading books on the iPhone and iPad, this, and. Follow the appropriate links to learn about this process.
How to use iPhone or iPad as a flash drive
Step 1: Download and install the latest version of iFunBox.
Step 2. Open the program and connect your iPhone or iPad to your computer. In order for iFunBox to see your device, iTunes must be installed on your computer.

Step 3. The device will be detected in the program and you can transfer absolutely any files to it using your iPhone or iPad as a flash drive.
Step 4. Drop the files that need to be “transferred” to the “ Shared storage».
A very convenient solution that can help out at the most crucial moment. For example, you don’t have a flash drive at hand, but you need to upload an important file weighing several gigabytes. You can't send something like this by mail. An iPhone or iPad together with iFunBox copes with this task perfectly - the files are not damaged and are transferred safe and sound.
Users who have jailbroken their devices are luckier. Thanks to a huge selection of tweaks from Cydia for working with the file system, they can unpack files using special managers, download files directly from Safari and much more. A striking example One such tweak is the iFile file manager. With other useful tweaks for iPhone, iPad and installed jailbreak you can find out by going to.
Many iPhone owners, when going on a trip, for example, want to pass the time by watching their favorite TV shows or movies. Unfortunately, you won’t be able to transfer the video to your gadget by simply copying it, like on a flash drive.
You need to download it on your computer and then upload it to your iPhone using special programs. There are plenty of ways to transfer movies from your computer to your iPhone. Let's look at some of them.
iTunes program
The first way to transfer videos from a computer to an iPhone is iTunes. Despite the fact that this program, according to many, is not a convenient tool for working with an iPhone, it is still quite easy to transfer videos with its help:
- Download and install the program.
- We launch it and in the “File” menu go to the “Add file to video library” item.
- In the window that appears, you are asked to select the path to the desired movie on your computer, only in mp4 format. Therefore, it is advisable to download the video in this format or reformat it in advance.
- Select a movie and click "Open".
- Next, connect the iPhone to the computer with a USB cable, click “Trust” on the phone and click on the phone icon in iTunes.
- After that, go to the “Movies” section. Check the box “Synchronize movies” and select the video files that we will download.
- Click “Apply”, and when synchronization is complete, click “Done”.
Checking video on iPhone. IN standard application“Video” we should see the video downloaded from the computer. Let's check it out.
iTools program
The next way to transfer movies from a computer to an iPhone is the iTools program. This program from a Chinese developer is similar in capabilities to iTunes. But at the same time, it helps to use the functions of an IPhone connected to a computer without restrictions. For example, using iTools you can easily set your own music to a call.

Download and install iTools. We launch it and connect the iPhone to the computer. In the program window that appears, the model of the connected gadget will be determined. If this does not happen, restart the program with the connected smartphone.
In the Videos section, open the same tab and select Add. Specify the path to the required video and click Import. We put a tick on the video added to the program. Select the Import to Device and IPhone option.
Once synchronization is complete, check the downloaded video.
nPlayer program
Another option for downloading a movie to an iPhone from a computer is the nPlayer program. This software will help you download videos to your iPhone without a USB cable. To do this, you now need to download the nPlayer program from the App Store application on your iPhone and install it. To use the player, connect to the Wi-Fi network and launch the program:
- At the top of the player window that opens, click the Wi-Fi icon to start the transfer mode.
- Next, enable the HTTP/WebDAV server. We see the address provided to us. This address must be entered into the browser open on the computer.
- We put the phone aside as it is. Enter the address in your computer browser and press Enter. The nPlayer program interface will appear.
- To upload videos to it, click AddFiles and select any films and videos on your computer.
The main advantage of this player over standard ones is its ability to support a large number of different file formats.

At the end, we wait for the selected files to download. Disable HTTP/WebDAV on your smartphone and check the downloaded content.
Service "Yandex.Disk"
The fourth method of how to transfer movies from a computer to an iPhone is to use the Yandex.Disk service. With its help, you can not only download a video, but also save it to your camera roll.
Before you can transfer video from your computer to your iPhone using this service, you need to download the program of the same name for your computer and the same application for your smartphone:
- First, we copy on the computer those films that we will transfer to the IPhone.
- After that, go to the “Yandex.Disk” folder, for convenience, create a new one and paste the copied video into it.
- We are waiting for the synchronization to finish.
- Go to your smartphone and open the Yandex.Disk application.
- The created video folder will appear among the updated disk folders. If you have a good Internet connection, movies will play well.

- In order to do this, click on the arrow icon located at the top above the open video file.
- In the window that appears, select “Save to gallery.”
- We wait a while for the video to download to the iPhone.
- We go into the camera roll and find the downloaded video.
AnyTrans program
This is a program that will help you manage your iPhone. With its help, you will open your gadget in a completely new way. Many users like Any Trans for its ability to download videos from almost a thousand sites, with maximum quality and speed. In addition, this is a really free application with such functionality today.
Now we will tell you how to transfer movies from your computer to your iPhone using it:
- Download and install AnyTrans on your computer.
- After launching the application, connect the smartphone to the computer.
- If the computer does not see the iPhone, open/close the program.
- In the menu that opens, click “Content to Divece” and select the path to the video that we want to transfer.
That's all!

YouTube
Now let's look at how to download YouTube movies from your computer to your iPhone. Among the tools for downloading video files to iPhone from YouTube, you will need the Documents application. If you don't have it, download it from the App Store (the app is free).
We insert the link from YouTube into the search bar of the site that opens and carry out a search. After the video is found, select its quality and click “Download”. The download is located in the Downloads folder of the Documents application. You can select it and transfer it to your smartphone’s camera roll.
As you can see, there are a huge number of ways to download a movie to an iPhone from a computer. We hope you find the advice in this article useful in achieving your plans.
Apple and its products are known all over the world. iPhone is a universal, multifunctional smartphone that has won the hearts of many users. But sometimes problems arise with such a gadget. You need to remember how to work with an Apple smartphone. For example, some people are interested in how to transfer music from a computer to an iPhone. How is it generally suggested to download media files to this device? With some preparation, even a beginner can bring the idea to life.
About working methods
In fact, everything is simpler than it seems. How to install music on iPhone? Several simple techniques are available to all users. The owner of a smartphone is able to choose how to act under certain circumstances.
Today you can do the following:
- work with iTunes;
- use iTools;
- use jailbreak on iPhone;
- work with third-party applications to work with data on the device.
In fact, everything is simpler than it seems. At least 2 methods are suitable when working with a computer and smartphone. What features of each method should you keep in mind?
Using iTunes
How to transfer music from a computer to an iPhone? This can be done by using specialized program called iTunes. This application helps you easily work with information on your iPhone.

Working with iTunes comes down to the following algorithm:
- Download and install the latest version of the application for your OS.
- Run the program. Add music to your library that should be on your mobile device.
- Connect iPhone to computer. For example, using Wi-Fi or a special wire.
- Visit the "Devices" - "Browse" section in iTunes.
- Find "Options" - "Manually process music and videos." The performed algorithm will help sort tracks and select them according to certain criteria.
- Click on "Music" - "Synchronize".
- How to transfer music from a computer to an iPhone? In the menu that appears, check off all the tracks you want to download. After that, click on “Apply”.
No further action is required. After completing all these steps, the user will be able to listen to downloaded music and install it on calls. There is nothing difficult or special about the process. This particular scenario is considered the simplest and most effective.
Working with iTools
The next scenario is to work with a program called iTools. She easier than iTunes. The application is completely free, you can easily download and install it for yourself.
Using iTools, you can download music not only from your computer, but also from your iPhone. The only drawback of the program is the limited track organization. Playlists and various albums cannot be created here. It's not such a big problem.

How to download music to iPhone using iTools? The following instructions will help with this:
- Download to your computer and install iTools. It is advisable to work with the latest version of the application.
- Connect your iPhone using a cable or wireless network.
- Open iTools.
- Click on "Music" - "Import".
- Mark all the tracks you want to transfer to your device. After that, click on the “Import” button.
- Wait until the operation is processed.
That's all! From now on, it’s clear how to transfer music from your computer to your iPhone. iTools is not always used by subscribers, but this application should not be overlooked. It has its advantages and disadvantages. For example, if a track was previously downloaded via iTunes, two copies will appear on the mobile device.
Mac FoneTrans
The methods listed are suitable for all users. In particular, when working with Windows. However, the operating systems on computers are different. Some people prefer to work on MacOS.
For this operating system, there is a separate answer to the question of how to transfer music from your computer to your iPhone. To do this, you can use an application called Mac FoneTrans. This multifunctional program, which allows you to synchronize your iPhone with your PC.
The main disadvantage is that the application is paid. Otherwise, working with Mac FoneTrans comes down to the previously proposed algorithms. Namely:
- Connect your smartphone to your computer.
- Launch Mac FoneTrans.
- Open the "Music" menu.
- Transfer all the desired tracks to the window responsible for working with the iPhone.
Downloading music in this way is not particularly popular among users. This is due to the fact that Mac FoneTrans is very expensive. Therefore, subscribers prefer to work with free content.

From social networks
Music can be downloaded to an iPhone via a computer without much difficulty. You can use a little trick. It allows you to download ringtones from social networks. In particular from VKontakte.
What will be required to bring your idea to life? Currently, the most effective option is to follow the instructions:
- Install a program called Melody Player on your iPhone.
- Open the application and log in using the data from your VKontakte profile.
- Select a melody and click on "Load/Save".
How to download music to iPhone? This is easier to do than it seems. From now on, users know everything about the most effective and safe techniques. There is nothing special about the procedures.
Beginner users of Apple technology sometimes think that transferring photos from PC to PC is as easy as transferring them in the opposite direction. And they are wrong. When connected to a computer, an iPhone is not recognized as a regular flash drive - this is one of the security measures that reliably protects Apple devices from viruses.
The developers recommend using the iTunes media processor to download files to the iPhone - this method is considered official. However, there are other ways to transfer images, including those that allow you to do without a USB cable. They will also be discussed in this article.
Before you start transferring photos in the official way - that is, through iTunes - you need to perform a number of preparatory steps:
After completing the preparatory steps, you can begin the data transfer procedure:
Step 1. Open iTunes and go to the device management menu - click on the button with the image of a smartphone.
Step 2. In the block " Settings» select the tab « Photo».

Step 3. Check the box next to " Synchronize».

Step 4. On the menu " Copy photos from:» click on the item « Select folder».

Step 5. Through " Conductor»Locate the folder on your PC with photos that you want to transfer to your iPhone.

If the folder also contains video files that you would also like to copy to your mobile phone, check the box next to “ Include video in synchronization».

Step 6. Click the button Apply».

Wait for the synchronization to complete, then go to the Photos app on your iPhone. There you will see the folder with the pictures that you copied.

Photos downloaded to iPhone via iTunes cannot be deleted using the standard method.. If you open any of these photos, you will see that the icon with the image of a basket is simply not in its usual place.

Deleting such images also needs to be done through a media harvester. Just uncheck the " Synchronize" in the " tab Photo" and start the synchronization process by pressing the button " Apply" The folder with photos will disappear from the memory of the mobile device.
How to download photos from PC to iPhone using alternative file managers?
To download photos to iPhone, you can use the Chinese alternative to the iTunes media harvester - iTools. After installing this utility, you must proceed as follows:
Step 1. Connect your mobile device to your PC and launch the program.
Step 2. When iTools detects the device, go to the " Photo» main menu.

Step 3. Click the button Import" and select via " Conductor» folder with the pictures you want to upload.

You won't be able to download photos one by one through iTools.
Step 4. Confirm that you want to copy the folder to your device - click " Yes».

Do not try to understand the question - it is written “crookedly”. Russification is a real problem with the iTools application.
Wait until the import is completed and you will see that the photos have appeared in the gadget’s memory.
Photos downloaded via iTools also cannot be deleted from the smartphone directly - only through a computer utility. But what then is the advantage of an alternative manager over iTunes? The advantages are:
- Through iTools, you can drop as many folders with photos as you like onto your gadget. In the case of iTunes, downloading a new folder will delete the one that was downloaded previously.
- iTools does not force the user to sync. This not only saves time, it also makes it possible not to worry about the safety of data on the device that the user has erased from the PC.
If you need to transfer photos to your iPhone one by one, you should use another alternative data manager - iFunBox. You can download the utility. The iFunBox program is good because it allows the computer to identify the Apple device as a flash drive.
You need to copy pictures to iPhone via iFunBox like this:
Step 1. After connecting the smartphone to the PC and launching the utility, go to the “ Quick Toolbox» in the main menu.
![]()
Step 2. Click on the icon " Photo».

Step 3. Click " Import» and drag the pictures you want to copy into the window that appears.

Once the import is complete, the photos will be on your mobile device.
iFunBox can only work correctly on the computer on which iTunes is installed.
Warning to users: do not resort to multiple alternative file managers for iPhone! This can lead to a failure, as a result of which all the gadget’s photo albums will be empty, and the pictures will be available only one at a time in the “ Photo» application of the same name.

Uploading photos to iPhone via the cloud
Dropbox continues to be the most famous cloud storage service, despite the fact that other similar services offer more attractive conditions. We have discussed the procedure for transferring data via Dropbox in manuals more than once - for example, in an article dedicated to. Now we will show how to transfer pictures through the “cloud”, using the example of another service - “Mail.ru Cloud”.
First you need to upload photos from your PC to cloud storage. Go to cloud.mail.ru, log in (or register if you are using the service for the first time) and create a folder for photos - through the button " Create».

Give the folder a concise and understandable name - for example, “ Photo" Then click " Add».

Finally, open a new folder and through the " Download» Fill it with photos you want to admire on your iPhone.

After this, you can close the site on your PC and switch to your mobile phone. Download the Mail.ru Cloud application to your iPhone, launch it and log in with your credentials.

In the main menu of the application, select the section " Cloud" In this section you will find the folder created on the PC.

After this, all that remains is to download the files from the folder to your phone.
How to upload photos via iCloud - Apple's cloud?
Only owners of devices with iOS version higher than 8.1 can copy photos to iPhone via iCloud. Also, for this to be possible, you need to download the program “ iCloud for Windows", available at this link, and install it.
How to use Apple's cloud to transfer photos?
Step 1. First of all, on your iPhone, go to “ Settings", follow the path " iCloud» - « Photo" and activate the slider " iCloud Photo Library».

Image: macrumors.com
Step 2. Launch the program on your PC and enter your Apple ID credentials. Then click " To come in».


Click on the button " Options…" opposite the item " Photos».
Step 4. In the window " Photo options» look for the item « Upload new photos and videos from my Windows PC" and click the " Change", located opposite him.

Step 5. Through " Conductor» select a folder with pictures.

Then close the window Photo options» by clicking on the button « Ready».

Step 6. In the main program window, click on the “ Apply».

Confirm that you want to combine the information stored on your PC with the information hosted in iCloud - click " Merge».

After this, the computer program can be closed. Photos and videos from the folder uploaded to iCloud will be available on the network, as well as on all mobile devices and Macs associated with the same Apple ID.
Transfer Pictures from PC to iPhone: Other Methods
There are other ways to copy photos from a computer to an Apple gadget:
- Through social networks. You can use, for example, VKontakte as an intermediary. Upload photos from your PC to an album on your social network page, then go to VK from your smartphone and save the images to the device’s memory.
- Via email. , then send the photo to this mailbox from another mailbox using a computer. After that, go to your mail from your “mobile phone” - in “ Inbox» you will find photos that you can save in your smartphone’s memory. This method has a disadvantage - video, as well as high-resolution photographs, cannot be transferred due to the heavy weight. Emails have a limit on the size of attachments - the limit is usually set at 5 MB.
- Via a flash drive. On the modern market you can find flash drives designed for iPhones, equipped with a Lightning plug. The most famous of these media is . This video talks about the original flash drive from SanDisk:
Flash drives for iPhone are quite expensive (from 1.5 to 3 thousand rubles, depending on the amount of memory) and require the installation of additional software on the mobile device, but they allow you to quickly transfer large amounts of data from a PC to a gadget without “dancing with a tambourine.”
Conclusion
Despite the fact that Apple does not allow you to “upload” photos directly from a PC to an iPhone without iTunes, users have no reason to put up with this limitation. To transfer pictures, you can use any of the following options: social networks, to email.
The most convenient among the “wireless” methods is downloading via cloud storage. Cloud services are offered by many large Internet companies. The user's choice is not limited - he can use the service that he likes best to transfer photos. We recommend the relatively new product Cloud Mail.ru. The advantages of this service include a large amount of free space (25 GB) and low requirements for the mobile application from Mail to iOS - version 7.0 is enough.