Lenovo laptops are not particularly capricious in terms of connection via wireless network, but sometimes to turn on Wi-Fi on Lenovo laptop, you have to sweat a lot. Especially if it's not very new model laptop, and it has Windows 7, or Windows 8 (or even XP) installed on it. In Windows 10, everything is somehow simpler. Although, I'm on my laptop after Windows installations 10 could not turn on Wi-Fi. I wrote about this in one of the articles on the site. But the problem was solved quite quickly. I will also write about this in the article.
Of course, depending on the laptop model installed operating system and different settings - the reasons may be different. But as it shows personal experience and the information that is often shared with me in the comments is that most often a Lenovo laptop cannot connect to Wi-Fi due to the fact that it is disabled by a switch on the laptop body, or a key combination on the keyboard. Therefore, we will consider these two methods first. And of course, very often the wireless module driver is simply not installed on the laptop.
Let's go in order:
1 If you have a wireless network icon with an asterisk in your tray, this means that everything is fine. Click on it, choose the desired network and connect. 2 If there is no Wi-Fi icon there at all, but instead a “network connection” (Ethernet) icon, then I’m almost sure that your Lenovo laptop does not have a Wi-Fi driver installed. This is what the icon looks like:And in the device manager, on the "tab" Network adapters"you will not see the wireless adapter (Wireless, WLAN).

In this case, you need to download and install the required driver. I already wrote about this in a separate article: .
3 Well, the third option, which this article is devoted to, is when Wi-Fi adapter Yes, everything seems to be working, but the Wi-Fi icon has a red cross and the status is , or “Wireless network – Disabled”.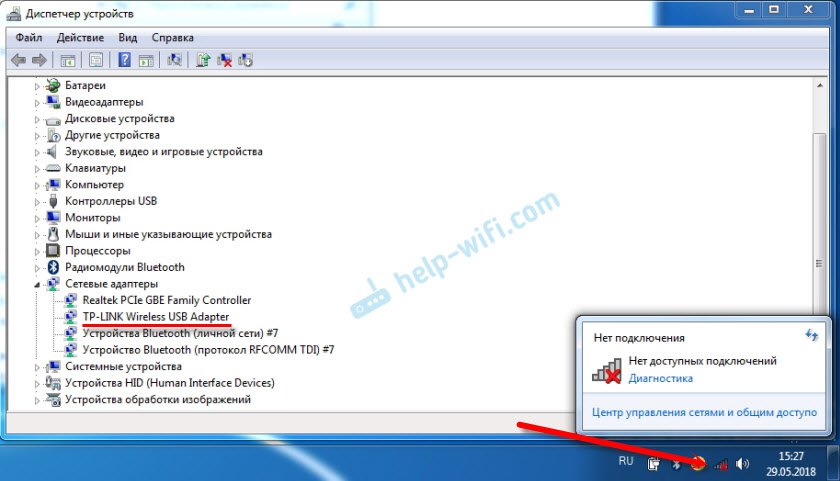
In my case, in Windows 10 the Wi-Fi button was simply grayed out. And the wireless network switch in the settings did not work. I wrote about this in an article. There I just encountered this problem on a Lenovo laptop.
If you have the same case, you cannot turn on the wireless network on your laptop, then see and apply the solutions from this article.
Mechanical Wi-Fi switch
Many Lenovo laptop models have a separate switch that is designed to disable and enable wireless connection. You need to check if there is such a switch on your laptop. Maybe you or someone else accidentally turned it to the "Off" position. Therefore, wireless communication is disabled.
Most often it is located on the front of the laptop. Maybe the assembly, or somewhere near the keyboard. There should be a wireless network icon next to the switch.

If your laptop has such a switch, make sure it is in the "On" position. If everything is turned on there, then turn it off and turn it on again.
You can also reboot your laptop. If the laptop does not see wireless networks immediately after using a special switch.
Fn key combination on Lenovo laptop to turn on Wi-Fi
On new models on which the manufacturer recommends installing Windows 10, the keyboard shortcut Fn+F7 (with airplane icon) serves to turn it on and off. But it is possible that using this key combination in some cases you can also turn on Wi-Fi.

The keyboard shortcut is also common Fn+F5 (with wireless network icon).

Basically, Lenovo laptops use the key combination Fn + F7, or Fn + F5. I haven't met any others.
Press these keys together once and look at the result. If nothing happens, then click on them and restart the laptop.
Why don't the function keys work?
It happens that the wireless connection on a Lenovo laptop is actually disabled using the function keys. Windows (after running diagnostics) tells us to use the keys or switch to turn it on.
But there is no separate switch, and the function keys do not function due to the lack of a driver or utility that is responsible for the operation of these function keys. Including Fn + F7 and Fn + F5.
This means that we need to download and install the utility from the Lenovo website, specifically for our laptop and the system installed on it. Most likely this is the Hotkey Features Integration utility, which can be downloaded from this link: https://support.lenovo.com/ua/ru/downloads/ds014985. This is for Windows 8, Windows 7 and Windows XP.
And if you have Windows 10, then most likely you need the Lenovo Utility for Windows 10 utility. It can be downloaded on the page of your specific laptop model.
After installing the utility, restart your laptop and try using the function keys.
Software method (in Windows settings)
Try using Windows Mobility Center. To call it, press the Win + X key combination.
There may be a "Turn on wireless" button.

If it is there and active, then after pressing Wi-Fi should work.
In Windows 10, you can open this window through search.

But there is no control on my Windows 10 laptop wireless communication in this window. Therefore, go to the settings, to the “Network and Internet” section and on the Wi-Fi tab, try to turn it on.
I think these tips are enough. If you know other ways in which you can enable Wi-Fi on a Lenovo laptop, then write in the comments.
If nothing from the article helped, then check the function keys again. Especially if you have Windows 8 and below. Download and install the Hotkey Features Integration utility, which I wrote about above.
There is a built-in connector that connects to Wi-Fi. But what to do if, after turning on a brand new laptop with an operating system installed on it, connecting to the router to receive communication does not work? You need to “rummage through” the settings by connecting Wi-Fi itself. We will look at classic methods for checking the ability of an adapter built into a laptop to connect and present methods that help you change Wi-Fi settings and configure it in versions of Windows 7-10.
We enable Wi-Fi in the laptop by hardware
Hardware-type tools will help you enable the connection. To do this, you should use buttons designed for connecting to wi-fi - this is the simplest option. If it doesn’t work, it’s worth checking to see if the driver on the laptop has failed.
Turn on wireless connections using laptop buttons
Some versions of equipment equipped with an element that makes it possible to use wi-fi require its separate inclusion: not every device allows automatic start wireless network. Some devices require the use of two keyboard buttons, some are equipped with one key for adapter launch. On older versions of laptops there is an independent button on the body, and not on the keyboard, made in the form of a slider.
If the user examined the laptop's casing but did not find a stand-alone slider, he should. As a rule, to turn on the transmitter, allowing you to join a wireless type of network, use function buttons F (first to twelfth).
You need to look at the symbols drawn on these keys. One of these keyboard elements has a Wi-Fi icon embossed in the form of an antenna.
Important: To connect to the Internet, which is a wireless type, the Fn+F5 combination is often used, so you should first look at these keyboard elements.
Checking and installing drivers for Wi-Fi
If the methods described above failed to turn on an element designed to connect to a network wirelessly, the adapter may be turned off software– was disabled in the operating system options. Launch the adapter using the classic Windows settings, the user can use two methods.
Method 1
This method involves using a center designed to manage network access. To start the device that connects the laptop to Wi-Fi, the user should use the combination Win + R, and then, when the window opens, type “ncpa.cpl”.

This request will bring up a section that allows you to change connector parameters.
Attention! In older XP versions, this item is indicated differently: you will need to find a section for a network type connection.
In the section, the user needs to find a column/option that provides information about the connection to the network, which is a wireless type. If this column is gray, the element connecting to WiFi is turned off. To start its operation, you need to click the button on the right and assign the option to be enabled. After this, you should try to connect to an available network.
Method 2
This method involves using a manager, which is designed to monitor the operation of devices. In the manager, connectors are disabled infrequently: usually the termination of the connector’s functioning is caused by a malfunction of the laptop (especially inexpensive but convenient models like).
Important: If the Wi-Fi connector built into the laptop is turned off, then in the graph displaying connections related to the network type, the icon corresponding to wireless connectors will not be visible.
To enter the dispatcher, the user should press Win + R on the keyboard that is built into his laptop. In the window that opens, to execute it, you need to enter devmgmt.msc and confirm the request.
When the dispatch window opens, in the column displaying adapters, look for the one whose name suggests “Wi-Fi” or “Wireless”.
Then you need to select the option in the menu that enables the connector: it is called up by right-clicking the touchpad on the device name.
Attention! If you get an error at startup, check the drivers: they will have to be reconnected, updated or reinstalled.
Additional method
Setting up WiFi on a laptop with Windows 10
Unlike the eighth option, the tenth (for example, ) does not have a panel that drops down on the right, namely, it cannot be “summoned” by clicking on the “network column” located in the system type tray (it is located next to the clock and date).
Because of this, users who have used a different version of Windows may become confused during Wi-fi settings. This is also due to the fact that in the tenth version of the operating system the user receives only a list of connections that are accessible to the connector built into the laptop and are within its accessible radius.
In order to correctly configure Wi-Fi in the tenth version of the operating system created by Microsoft, and not mess up other settings, the first thing you should do is find a shortcut in the system tray. The icon will display a list of those networks that are open for connection.

Attention!If after clicking on the network list icon is not visible, click on the line that can show available connections. After the user clicks on the inscription, a panel will appear on the right.
When the network is found, click on it: if it is protected, enter the password and confirm. After this, a message indicating a successful connection will appear. In order not to enter the password every time, you should tinker a little with the settings.
Select the option that gives access to additional options. When the window opens, click on the section leading to the center, which is intended to indicate grid parameters. Find the connection in the center, click on it and select the option that leads to its network properties.
Important: After completing the steps, you should note those functions that the user considers necessary in order to work comfortably with Wi-Fi.
So, the user is free to connect to any visible to the device, non-password-protected networks. This column is located in a tab designed to control connections that are of the wireless variety.
Also, the owner of a laptop that runs on “Ten” has the opportunity to open automatically triggered access for . This section is located in the tab that displays network connectors.
To start automatic access, the laptop user will need to click on the section for network connections, go to properties and check the corresponding box.
Interesting:The same column displays other options regarding network settings.
In the center, where it is possible to work with connected network devices, the laptop user has the opportunity to program the router and “create” a new connection, which belongs to the category of those that connect wirelessly. There you can also set up a network VPN designed for accessing work data from a distance.
The user can also create a local group and enable/disable the Firewall.

Setting up Wi-Fi on Windows 8-8.1
To make the setup on a laptop that runs on the eighth Windows versions(for example, ), you need to find the network shortcut in the tray and click on it using the left button of the touchpad (a double short press on the manipulator built into the laptop will also work).
This action will “announce” the list of connections available for the laptop connector, which belong to the wireless variety. Afterwards, you need to click on the Hotspot to which the user wants to connect, and then confirm the action by clicking on the line with the same name. A field will appear in which you need to enter a password that gives access to the network point.
Attention! In order for the laptop user to be able to see the text of the password that he wrote, he will need to click on the icon made in the form of an eye, which is located with right side fields. It should be remembered that the printed text is visible only if you “pinch” your “eye”.

When the password is printed, the user will need to click on “next”. If the password characters are entered correctly, the connection will be established in a maximum of a minute. Connecting to the network takes longer only when the Internet is slow.
A sign that everything is connected is the changed appearance of the network shortcut, which is located in the tray. It’s convenient that Windows 8 (for example,) sets all the configurable parameters that are necessary for a new connection “automatically,” excluding the password.
When the system comes online, it will “ask” you to determine the network type. The request concerns whether the user wants a printer or other peripheral device to be connected immediately, without requesting access. The user will also need to indicate whether he wants the information on his laptop to be available to others.
Attention! If you click “yes,” then information exchange between connected PCs and MFPs (wireless printing) will be available on the network under the name selected by the user. It's convenient for the office. If you click on “no”, the network will only work with the Internet.
Changing indicators
All in the same tray, on the “network” shortcut, you need to use the right key of the touchpad, and in the optional window that pops up, click on the section, which is a center that allows you to interact with network settings.
In the center you will need to find the name of the “hotspot” and click on it to bring up an option displaying its status. In this window, click on properties related to the network connection. There you need to check the necessary boxes regarding the settings.
http://tvoirouter.ru/nastrojjka-routera/kak-vklyuc...astrojjt-wifi-na-noutbuke.htmlOften, users who have purchased a laptop or netbook encounter difficulties when turning on and setting up wifi. The procedure itself is quite simple, but in some cases there are various snags and unforeseen difficulties, and sometimes it is also necessary configure the router Before you start, connect Wi-Fi to your laptop. In this article we will look at both the standard connection and options for solving such problems.
How to turn on wifi on a laptop
Usually, to turn on wifi, it is enough to perform 2-3 simple operations. Which ones exactly depend on the model and manufacturer of the laptop. Here are the inclusion options wifi networks on beech trees from the most popular manufacturers:
- On an ASUS laptop, you need to press the combination of the FN and F2 buttons.
- On Acer and Packard bell, hold down the FN button and press F3 at the same time.
">- On HP laptops wi-fi is turned on touch button with a symbolic image of an antenna, and on some models - the FN and F12 key combination. There are also models that have a regular button with an antenna design for this purpose.
- To turn on wi-fi on Lenovo, hold FN and press F5. There are models where there is special switch connections for wireless networks.
- On Samsung laptops, to turn on wi-fi, you need to hold down the FN button and press either F9 or F12, depending on the model.
For wi-fi connections on laptops various models and different manufacturers may use their own original key combination. Detailed description for a specific model, you need to look in the user manual that came with the laptop. The FN button is found on almost all models of modern laptops. It helps you connect various functions and connecting the beech with other devices. If the laptop does not have an FN button, then a special button or switch is used to turn on the wireless network. As a rule, it is indicated by one of these drawings.
If you don't find it on the keyboard, examine the ends of the laptop; perhaps the switch is on the side. Also, take a close look at the bottom of your laptop. There are models in which the switch is located on the bottom cover. Moreover, manufacturers make this button barely noticeable. It practically merges with the body and may not be visible at first glance. It may be signed Wireles or Wlan. Have you turned on wifi using the required button or combination, but it doesn’t work? You should set up Wi-Fi on your laptop.
Example of a hidden WiFi switch
Attention: It is worth saying that such switches can be located in the most unexpected places, even on the back cover of the laptop. So if your WiFi is not working, carefully inspect your laptop for a switch.
How to set up wifi on a Windows 7 laptop
Before setting up, you need to check the availability and connection of drivers. Checking drivers Checking the driver is to find out whether they are on your device at all and whether it is involved in at the moment. So, in Control panels select an item device Manager, which can be hidden inside the item Equipment and sound.
A window opens in which we find Network adapters. There must be two items: Ethernet and Wi-Fi. One of them should have the word “Wireless” in its name. This is your adapter.
If there is no entry for the wi-fi adapter, or there is an icon with an exclamation mark on a yellow background next to it, this means that you have a problem with the drivers. If there is no entry, it means that the drivers are not installed and you will have to install them from the disk that came with the laptop. Or find it on the manufacturer's website. Without them, wi-fi will not work. If there is an entry, but there is a yellow exclamation mark next to it, right-click on this item. In the window that appears, select “Engage”. The reason for connection difficulties may lie in the fact that the adapter is set to a power saving mode. To disable it, right-click on it, then Properties - Power Management, now you need to uncheck the box “Allow the computer to turn off this device to save energy.”
Now everything is fine with the driver. Enabling the adapterwi- fi . To do this through Control Panel→ Network and Internet go to Network connections. Here we find Wireless network connection . This is the wi-fi adapter. Right-click to open the dialog box and select “Enable”. Connect to an access point. All that remains is to connect the laptop to the access point. Make sure the access point is active. Find the wi-fi icon in the lower right corner of the screen on the taskbar. When clicked, a network management window will open, select the desired network, click “Connection”.
If the network is protected by a password, the system will ask you to enter it (if you have forgotten the password for your network, you can find it in several ways). Only after entering the required password will you be able to use the Internet. If the network is open, the connection will occur automatically. That's it. Enabling and setting up Wifi on a laptop completed. If you have set up Wi-Fi once, you won’t need to do this anymore, since they will automatically be saved in the laptop’s memory. You will only need to turn it on with the appropriate button or key combination. Remember that connecting wirelessly takes a lot of power from your device, so the battery will be used quite intensively. Have a nice and simple connections no adventures!
Original post and comments at
None of the owners of laptops are protected, for example, from a situation where water may spill on the keyboard. In this regard, the keyboard may either stop functioning completely, or some specific keys may not work as they should. At the same time, on laptops, many actions can be performed solely using a combination of hot keys, including connecting to a network using Wi-Fi. To do this, use the Fn button on the keyboard and the button with the image of an antenna. If, for example, the Fn button does not work, then starting a Wi-Fi network becomes much more difficult.
It is worth noting that the Fn button operates under the control of the BIOS, the main software where you can change most of the computer’s parameters. It is worth noting that even modern laptops do not offer any special software for running Wi-Fi, that is, somehow fixing the pressing problem, even through the BIOS it will not work. Fortunately, there are several ways out of this situation, for example, using an additional one. software.
Is it possible to enable Wi-Fi without hotkeys?
You can use the KeyRemapper program and use it to reassign keys. For example, if the Fn button does not work, then it should be reassigned to another and then turn on Wi-Fi. In addition, using the same program, you can reversely replace keys and buttons, that is, swap them in places, etc. If one of the buttons to turn on the Wi-Fi network does not work, then this method is the best and simplest way out of this situation.
There is another option - buying another keyboard that includes a function key. Of course, in this case you will have to spend money on a keyboard, but it’s still better to buy it than new laptop. The same method of solving the problem includes contacting a special service center, where the keyboard will be replaced with a new one, but this is also an additional cost.
In addition, function keys can simply be disabled in the BIOS itself. Accordingly, to solve the pressing problem, you need to go there, change and save the settings.
Unfortunately, today there are no other ways to launch Wi-Fi on laptops without using hot keys, therefore, as mentioned above, the best way out of this situation is to reassign the keys, and if the keyboard does not work at all, you will have to buy a new one or replace the old one.
In this article we will take a detailed look at the process of connecting a laptop or Windows 7 computer to the Internet via Wi-Fi. I think the article will be useful to many, since many questions always arise when connecting to Wi-Fi for the first time. As a rule, they are associated with installing the necessary drivers, enabling the wireless adapter on the laptop, etc. More on this a little later.
The laptop is generally a great thing. I don’t really understand people who are buying desktop computers now. Only for serious games. Well, you must admit, it’s much more convenient with a laptop. If you want a big screen, you can connect it to a monitor or TV. It makes no noise and you can take it with you if necessary. And also, all modern (and not so modern) laptops have a built-in Wi-Fi module. A receiver that allows you to connect your laptop to the Internet wirelessly Wi-Fi networks. In the case of a desktop computer, you will need to buy .
All you need is to buy and install (if you don't already have it), it will distribute Wi-Fi to which you connect your laptop. You can connect your computer to a free Wi-Fi network in cafes, shops, etc. Or, to your neighbor’s unsecured network :) This is much more convenient than laying a network cable. If for normal desktop computer This is still normal, but for a laptop this is no longer the case. And it’s not convenient to move around the house with this wire all the time.
Connecting a laptop to the Internet is not difficult, provided that the Wi-Fi driver is installed. Many people have a lot of problems because of the driver. If you simply did not install the driver for your Wi-Fi receiver, or you installed Windows yourself and did not install it, then you will not be able to connect to Wi-Fi. But you may already have everything installed and configured, so let’s first look at the process of connecting to a wireless network normally. If you fail to learn, there is no wireless connection, etc., then read the article to the end, we will look at possible problems.
Connecting the laptop to Wi-Fi
Let's first look at the connection process without any settings or checks. Why complicate everything, perhaps you already have everything set up. If everything is fine, your laptop sees the wireless network and is ready to connect, then the Internet connection icon in the notification panel will look like this:
Connection status, which looks like network level with an asterisk (like the picture above) indicates that the laptop sees available networks and is ready to connect to them. Click on this icon, then select the Wi-Fi network to which we need to connect and click the button Connection. In Windows 10, the process of connecting to Wi-Fi is slightly different. If necessary, detailed instructions.

If the network is password protected, a window will appear in which you need to enter a password and confirm the connection by pressing the button Ok.

That's all, your laptop should connect to the Wi-Fi network. The connection status will be like this:
![]()
You can use the Internet.
If you see the connection status, it looks like this:
![]() This means that most likely everything is configured on your laptop, but the laptop simply does not see the networks available for connection. Perhaps there is simply no coverage in this place. If you are connecting to your network, check that the router is turned on. If enabled, then .
This means that most likely everything is configured on your laptop, but the laptop simply does not see the networks available for connection. Perhaps there is simply no coverage in this place. If you are connecting to your network, check that the router is turned on. If enabled, then .
This is how the connection will proceed when you have the driver installed for the Wi-Fi adapter and the adapter itself is turned on. But very often the adapter on the laptop is turned off, or no one installed the driver for it at all. In such cases, many questions arise. Now we will examine in detail both cases, due to which you may have problems connecting your laptop to a wireless network.
Enable "Wireless network connection" on the laptop
If your wireless connection is disabled, or the Wi-Fi driver is not installed, the connection status will look like this:
![]()
This means that there is no way to connect to the Internet via Wi-Fi, and there is no connection via network cable. As I wrote above, this happens due to the adapter being turned off, or due to the lack of a driver. Let's first check if you have "Wireless" turned off. network connection". This is of course unlikely, unless you turned it off yourself, but you need to check.
Click on the internet connection icon and select Network and Sharing Center.

Then select Changing adapter settings.

Looking at the adapter "Wireless network connection", if it is disabled, then right-click on it and select Turn on.

After this, the connection status "There are available connections" should appear. (if there is a Wi-Fi network within the radius).
We enable wireless connections using the buttons on the laptop
It seems to me that now manufacturers no longer install separate buttons to turn on the Wi-Fi adapter. But, if you are having problems connecting to Wi-Fi, then please check if there is special button to disable/enable wireless connections on your laptop. I know for sure that Toshiba loved making such switches.
Nowadays, on laptops, a keyboard shortcut is used to disable/enable the wireless network. As a rule, different manufacturers have different keys. But usually it's Fn+F2. So on Asus laptops. You can look at yourself, there should be a network icon on the key that is pressed in conjunction with Fn. Something like this:

True, for me the combination of these buttons is responsible for turning off Bluetooth. It doesn't seem to respond to Wi-Fi at all. But yours may be different. It's definitely worth checking out.
If in the adapter management window there is no “Wireless network connection” adapter at all, but there is definitely Wi-Fi on your computer/laptop, then this means that The driver for the Wi-Fi adapter is not installed.
Now we will check everything and try to solve this problem.
Check and install the driver for Wi-Fi
I have not yet seen a case where after installing Windows 7, the system itself installed the driver for the Wi-Fi adapter. This is much better in Windows 8. Windows 10 often installs the necessary drivers itself. So, after installing Windows, in order to use Wi-Fi, you need to install a driver specifically for your laptop or adapter (very often, adapters from different manufacturers are installed in one laptop model. It is because of this that you can see several drivers for Wi-Fi on the manufacturer’s website).
We go to the device manager.

In Device Manager, open the tab Network adapters, and looking for a driver for Wi-Fi. I have it called Atheros AR9485WB-EG Wireless Network Adapter, it is installed. You should also have something like a Wireless Network Adapter.

If you don’t have a wireless connection, then most likely you won’t find an adapter either. You need to install the driver, then Wi-Fi will work. And yet, if the driver for the Wireless Network Adapter is not installed, then in the device manager there will be at least one unknown device with a yellow exclamation point. It looks something like this:

This is most likely the same Wireless adapter that the laptop does not know how to work with.
Driver installation
All you need to do is download the required driver and install it. It is best to download the driver from the official website of the manufacturer of your laptop/adapter, and for your laptop (or adapter) model. It’s best to find the official website of your laptop, for example Asus, through Google, then use the site search on the site, indicating the model of your laptop. Most likely your computer's page will be found, open it and look for downloads of utilities and drivers there. Find the Wireless driver and download it for the operating system you need.
Most likely, the driver will be in the archive. To install, run the .exe file from the archive. For example, an archive with a driver for my laptop:

After installing the driver, restart your laptop and try connecting to the wireless network according to the instructions. I wrote in more detail about installing the driver in the article about .
If some points from the article remain unclear to you, or you were unable to connect your computer to Wi-Fi, then write about it in the comments, we will try to solve your problem.