Before installing the system, you need to understand how to burn a Windows 7 image to a USB flash drive, then configure your computer to install Windows 7, and begin the installation process. If you visited this page, it means you are having difficulty creating a bootable flash drive or disk. Here you will find answers to all questions.
To burn a Windows 7 image to a flash drive, you will need specialized tools. There are quite a lot of them, but we will describe them all. As an example, we'll talk about UltraISO, USB/DVD Download Tool and many others.
Step 1: What you need to burn a Windows 7 image
Any image operating system or programs is a common format that is recognized by most utilities. The most popular image format is ISO. It can be written to flash drives, hard drives, CD-DVD media. The format is somewhat similar to archive ZIP or RAR. In general, this is an optical disk image and is a single file or archive containing any other type of file. Modern operating systems already have built-in tools for working with the format. You can also use third party software: UltraISO, DAEMON Tools, Alcohol 120%, PowerISO, ImgBurn, ISO Master and many others.
Before choosing an OS image, you need to understand in advance the bit depth and the volume that it will occupy on the media. There are 32-bit systems (86x) and 64-bit systems (64x). Here you can learn about the differences between these bit depths. The volume of the systems also differs. Below is a table of all editions of Windows 7 with system requirements:
| Editorial | RAM | Processors | CoresCPU | ||
| 32x | 64x | 32x | 64x | ||
| Windows 7 Ultimate |
4 GB |
192 GB |
|||
| Windows 7 Professional | |||||
| Windows 7 Enterprise | |||||
| Windows 7 Home Premium |
16 GB |
1 | |||
| Windows 7 Home Basic |
8 GB |
||||
| Windows 7 Starter |
2 GB |
||||
Using these characteristics, you can choose the system for yourself. In this material we will look at two programs, using which it is possible to burn a Windows 7 image to a flash drive: UltraISO, USB/DVD Download Tool.
You can download tools from virus-free resources from here:
- USB/DVD Download Tool.
- UltraISO.
- Command line.
Step 2: How to burn a Windows 7 image to a USB flash drive using UltraISO
Download the program from the link above or from your source and install. Using trial version UltraISO can perform the intended task, so there is no need to look for a version with a key. After downloading and installing, perform the following steps (I also recommend reading the article if you work with optical media:)
- Let's launch the program. If it is not complete, then we use a trial period.
- Insert a flash drive with a capacity of 4 or 8 GB into the USB port, preferably larger.
- In the program, click on the tab with the mouse "File" — "Open" and select the Windows 7 Ultimate (Maximum) image file or any other version.
- The files will be automatically loaded into the program window, which are displayed in the right section. Now you need to click on the “Boot” tab and select the option “Burn Hard Disk Image”.
- At the next step, select a flash drive (Disk Drive), an image file that has already been registered, a recording method USB-HDD+. It is worth noting that files that are already on the flash drive will be destroyed.
- Click on the button "Record".

- A message will appear indicating that the information on the disk will be erased. We agree using the “Yes” button.

- Preparation for recording begins, and then the process itself, which does not take much time.

- The completion of the operation is accompanied by a message “Recording complete!”.
The finished flash drive can now be used for its intended purpose.
Step 3: How to Burn Windows 7 Image Using USB/DVD Download Tool
- We launch the program from the desktop. A window will open asking you to complete four steps. The first step is to select an ISO image of the operating system. Click the Next button.

- Next, select the media type, in our case USB Device.

- Select the media and click “Begin Copy”.

- Next, formatting the flash drive and copying files will begin.

After copying, the flash drive is ready to install Windows 7. It is worth noting that using the USB/DVD Download Tool you can burn the image to a DVD or Blu-Ray disc.
Step 4: How to burn a Windows 7 image to a USB flash drive using the command line
If you have a Windows operating system at hand, you can use its capabilities to create a bootable USB flash drive. We will use the command line. Run this tool as administrator and follow these steps:
- In the command line (CMD) enter the command to work with disks: diskpart. Using it, we will format the media and write ISO image files to it.
- After entering the command indicated above, the user will find himself in the disk utility, which is characterized by the line “DISKPART>”.
- The next step involves displaying all drives connected to the computer. There is a command for this list disk.
- You need to select the media that will be used as boot. Here we focus on volume. For example, now a 30 Gb flash drive is connected here, in the “Size” column this volume is indicated. To select this disk, you need to register select disk N(your carrier number). When choosing, be very careful, because it is very easy to make a mistake here.
- Let's move on to copying files to a flash drive. We mount the system image (so that it appears in the “My Computer” directory) and in the command line go to the created image disk.
- Using the commands, go to the boot directory and execute the command bootsect /nt60 N. Where N is the letter of the flash drive intended for installing Windows
- Copy the image files to the USB flash drive.
- Installing Windows 7.
Some users may find it somewhat difficult to use command line, since you have to enter a lot of commands. The likelihood of making a mistake here increases many times over. Therefore, it is recommended to use UltraISO or USB/DVD Download Tool. The following articles will discuss other utilities:
Using all these tools, the user will quickly figure out how to burn a Windows 7 image to a flash drive. In this material, third-party and standard tools for creating such a medium were analyzed. The next material will be about how to create bootable dvd disk with Windows 7. This use case is losing popularity every year, as DVD drives are built into computer systems increasingly rare, and optical disks are being replaced by flash media.
All the best!
Quite often you need to record some image ISO disk to a flash drive, for example, when installing Windows, when creating an emergency flash drive, for, hard drive etc.
Moreover, the same Windows installation from CD/ DVD disc A takes longer(and they fail more often than flash drives). Not to mention the fact that not every new PC/laptop has a disk drive installed. That is why using a flash drive is preferable (and more universal - it can be connected to any PC with a USB port).
In this article I will look at a couple of programs that can easily and quickly burn any disk image to ISO format to a flash drive.
Note: ISO is the most popular disk image format. More than half of all possible images are distributed in it.
Burning an ISO image to a USB flash drive
Method No. 1 - PowerISO
![]()
PowerISO is a very powerful program for working with ISO images. Allows you to open them, edit them, extract files from them, add files to ISO images, compress them, burn them to CD/DVD disks and flash drives, etc. Also in PowerISO you can make an image of any of your disks, test it, get a checksum (to assess whether the file is broken...).
In general, how to write an image to a flash drive using PowerISO.
1) The first thing you do is open the image. To do this, click the button "Open", or open the file menu, and then specify the image file. You can also use keystrokes Ctrl+O.

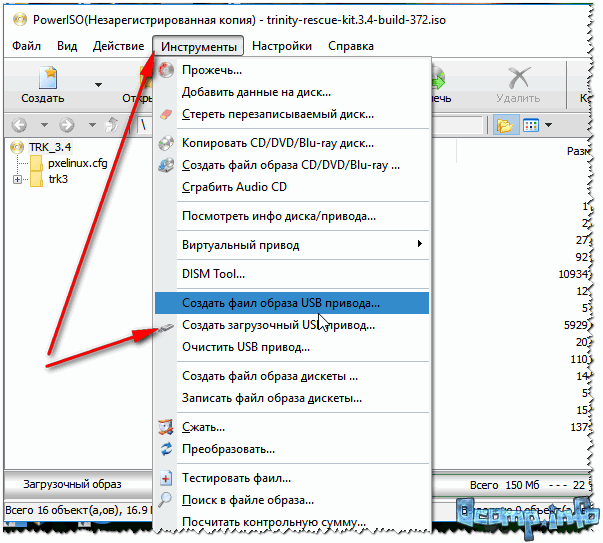
2) If the image was opened and the program did not issue any warnings, go to the menu "Tools". Select a feature such as "Create bootable usb drive" (see arrows in the screenshot below).
3) In some cases, the program will ask you to give it administrator rights. We just agree: the program will restart and you will continue the recording process.

4) In the recording settings window, you need to:
- in the column "USB drive" indicate your flash drive (Caution! Do not mix up the letters, because during the recording process, all data on the flash drive will be deleted;
- recording method: if you are recording boot image ISO - choose recording method "USB - HDD"(for example, for recording images from Windows);
- the file system column can be left as default;
- next click "Start";
- By the way, please note that at the bottom of the window there are links to instructions (several links, depending on the image being recorded).

Burn Settings // PowerISO
5) The program will warn you again that all data on the selected flash drive will be deleted!

- loading your PC with extraneous tasks (I recommend turning off everything unnecessary: at least torrents, games, video editors, and other programs that put a lot of stress on your PC);
- size of the recorded image;
- speed of the USB drive and the flash drive itself.
7) If the recording went well and without errors: you will see a message "USB drive writing completed successfully" , as in the screenshot below.

Method number 2 - UltraISO
![]()
UltraISO is the most famous program for working with ISO images. It can do almost everything the same with them as the first one: open, mount, edit and change, write bootable flash drives, external hard drives, CD/DVD discs, etc.
It is as easy to use as the first one. Both, by the way, fully support the Russian language.
And so, let's start working in UltraISO
1) First, download (link above), install and run the program. There is nothing special to comment on here, except for one thing - run the program as an administrator (otherwise the option to write a USB flash drive may not be available!).
Note! To run as administrator: just click on the UltraISO program icon and select “Run as administrator” in the context menu, as shown in the screenshot below.

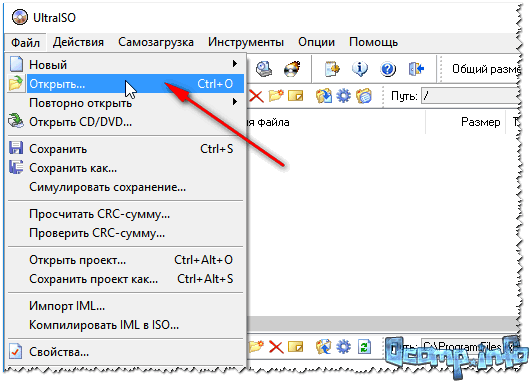
3) If the image has opened, open the menu (see screenshot below).

4) Then you need to set the recording settings:
- disk drive: select the letter of your flash drive (the data on it will be deleted, so be careful and attentive!)
- recording method: either USB-HDD+ or USB-HDD (this is for the record bootable media, which is what is required in most cases) . It’s quite difficult to say specifically what to choose; in most cases, USB-HDD+ works - but if suddenly your BIOS version will not see it, rewrite the flash drive in USB-HDD mode;
- then click the button "Record" .

Note! In normal mode, UltraISO automatically formats the media into the FAT32 file system (even if the flash drive was previously NTFS). In order for NTFS to remain, you need to select ExpressBoot, then click on ExpressWrite. Result: when unpacking the image onto a flash drive, file system will remain unchanged.

6) If everything went well, you will see the following message in the program message: "Cache synchronization. Writing complete!" . Please note that there are no errors in the list of program messages, otherwise your boot image will simply give an error when installing Windows (for example).
An example of a successful recording is shown in the screenshot below.

After burning the flash drive, they usually proceed to install Windows...
All the best to everyone.
In some cases, users need to write a file in ISO format to a flash drive. In general, this is a disk image format that is recorded on regular DVD discs. But in some cases you have to write data in this format to a USB drive. And then you have to use some unusual methods, which we will talk about later.
Typically operating system images are stored in ISO format. And the flash drive on which this very image is stored is called bootable. The OS is then installed from there. There are special programs, which allow you to create a boot drive. You can read more about this in our lesson.
But in this case, we are dealing with a different situation, when it is not the operating system, but some other information that is stored in the ISO format. Then you have to use the same programs as in the lesson above, but with some adjustments, or even other utilities. Let's look at three ways to complete the task.
Method 1: UltraISO
This program is most often used to work with ISO. And to burn the image to removable storage media, follow these simple instructions:

As you can see, the whole difference between the process of transferring an ISO image to a disk and to a flash drive using UltraISO is that different storage media are specified.
Method 2: ISO to USB
ISO to USB is a unique, specialized utility that performs one single task. It consists of recording images onto removable storage media. At the same time, her capabilities within the framework of performing this task are quite wide. This allows the user to specify a new drive name and format it to a different file system.
If the computer does not have a disk drive, then you have to use bootable flash drives to install the operating system. In this article we will talk about how to burn an ISO image to a flash drive using programs and Rufus.
How to burn an ISO image to a USB flash drive using UltraISO
UltraISO is equipped with many functions for working with ISO images. For example, using UltraISO you can create and edit disk images, burn and copy disks. Also among the functions of this program is writing ISO images to a flash drive. The only drawback of UltraISO is that it is paid. But, you can.
So, in order to burn an ISO image to a flash drive, you must first open the ISO image using the UltraISO program. To do this, click on the “Open” icon, which is located on the program toolbar.
Or use the “File – Open” menu.

After this, a small window will appear on the screen with which you can select an ISO image to burn to disk. Choose the one you need ISO file and click on the “Open” button.

As a result, the contents of your ISO image should appear in the UltraISO program.

Now this content can be written to a USB flash drive. To do this, simply open the “Boot” menu and select “Burn Hard Disk Image” there.

This will open a window called “Write Disk Image”. Using this window you can write to a flash drive. To do this, just select the desired flash drive from the list and click on the “Burn” button.


After this, the UltraISO program will begin writing the ISO image to the USB flash drive. All you have to do is wait until the recording process is completed.
How to burn an ISO image to a USB flash drive using Rufus
The second way to write ISO images to a flash drive, which we will consider in this article, is to write through the Rufus program. Unlike UltraISO, this program is completely free and you can. Rufus is a program designed exclusively for creating bootable USB flash drives. Therefore, it has a minimum of functions and is very easy to understand.
So, in order to burn an ISO image to a flash drive using Rufus, insert the flash drive into your computer and launch Rufus. The first thing you need to do after starting the program is to select the flash drive on which you want to burn the ISO image.


If the ISO image you specified is an operating system image Windows systems, then a switch between “Standard Windows Installation” and “Windows To Go” will appear on the screen. Here we select the “Standard Windows installation” option.

This completes the setup of the Rufus program; click “Start” to start the process of writing an ISO image to a flash drive.
You can also use regular means Windows, for example, by recovery, but this is not always possible, so it is much easier to remove old system and install a new one.
To restore you will need a disk or .
Let's look at the process of creating an image using an example Windows entries 8, although “seven” and other operating systems are written the same way.
Step 1. Getting started
To perform further actions, you will need to run the program as Administrator, otherwise the system will simply not allow you to do anything.
After you have opened the program, you need to click the “Open” menu as shown in the first screenshot and start creating a bootable ultraiso flash drive.

The example shows a prepared . The files themselves are easy to find on the Internet, in particular on torrent trackers. The extension must be ISO, not EXE.

Once you have confirmed the choice of image by clicking the “open” button, a list of used files will be displayed in the right window of the program.
Do not delete or rename anything to avoid any installation errors in the future.
Step 2. Preparing the image for recording
A pop-up window will appear again, once again warning that the data will be deleted. We agree with this and move on.

Now the fun begins - direct recording of the OS. Multiboot ultraiso flash drive began to be created , which will take some time.

The program itself works quite quickly and efficiently, but the system often slows down the entire creation process. Be patient.
Upon completion of the process, a notification will be displayed in the logs "Recording complete"! This means that our flash drive is ready Windows 8 ready to use.

Since we no longer need UltraISO services, the program can be closed.
When you connect the flash drive to the PC a second time, something similar to the one shown in the screenshot should appear.