
In this article I will tell you how to use a fairly common library to manage LCD controller based display HD44780 and output information to it. The library consists of two files lcd_lib.h and lcd_lib.c for use with a display connected via a four-bit data bus. The header file contains the settings for connecting the display to the controller, which can be changed at your discretion, as well as variables and functions.
Below are the basic functions of controlling and displaying information on the LCD.
lcd_com– sending a command to the LCD
Example:
lcd_com(0x01); // clear display
lcd_com(0x38); // interface 8 bit 2 lines
lcd_dat- output one character to the current position
Example:
lcd_data("U"); // print "U" character
lcd_dat(0xB0); // output character "U" (According to the display character table)
lcd_init– LCD initialization
Here is an example of a common LCD initialization sequence: 0x38, 0xOC, 0x06 .
0x38 sets the display mode of 2 lines with a matrix of 5 x 8 points and work with an 8-bit data bus;
0xOC enables display on the LCD module screen, without displaying cursors;
0x06 sets the cursor to move automatically from left to right after each character is printed.
lcd_clr– LCD cleaning
lcd_home- moves the cursor to the beginning
lcd_string- output a string of the specified length to the current position
Example: lcd_string("TEST",4); // output string TEST 4 characters long
lcd_gotoxy- moves the cursor to the specified position
Example: lcd_gotoxy(12, 1); // cursor at the position of the thirteenth digit of the second line
copy_string_to_lcd– output a line from flash memory to the specified display position
Example: copy_string_to_lcd("TEST",4,0); // output string TEST to position fifth digit of the first string
lcd_definechar– writes a custom character image to the display memory
To display your own symbol on the display screen, you need to know the symbol code, write this code in the microcontroller program memory (PROGMEM), then place it in a free LCD memory cell (CGRAM) and display it on the screen using the function lcd_dat().
For programming, 8 redefinable characters are available in the mode with a 5x7 matrix of points and 4 with a 5x10 matrix (in the 5x10 mode, redefinable characters are addressed by DDRAM codes through one: 0x00, 0x02, 0x04, 0x06). To encode the matrix, horizontally "stacked" bytes are used, the five least significant bits of which carry information about the pattern (and 1 (one) means that the segment will be included), the 4th bit of each of the 8 (or 11 in the 5 x 10) bytes of the matrix defines the left column of the character, and the 0th - right. The upper three bits are not used, as are the upper five bytes that make up the full area of the character matrix (16 bytes) in 5x10 mode (note that the programmable character matrix allows the use of the full line height (8 lines for 5x7 mode and 11 lines for 5x10 mode). ), that is, you can place points in the area of the underline cursor).
It is more convenient to create a symbol in binary format, for example, let's create a rectangle symbol, the code will be like this:
Const uint8_t pryamougolnik PROGMEM= ( 0b11111, 0b10001, 0b10001, 0b10001, 0b10001, 0b10001, 0b11111, 0b0 );
lcd_shift_right- moves the image to the right by the specified number of characters
lcd_shift_left- moves the image to the specified number of characters to the left
lcd_cursor_on- turns on the underline cursor
lcd_cursor_blink– turns on blinking cursor
lcd_cursor_off- turns off the cursor
lcd_blank- turns off the image, but does not clear
lcd_visible- includes an image
lcd_cursor_left- moves the cursor a specified number of characters to the left
lcd_cursor_right- moves the cursor to the right by the specified number of characters
lcd_progress_bar- allows you to display a dynamic scale, we will talk about this function in more detail using a practical example.
lcd_num_to_str- allows you to display a variable up to 4 digits
Example: void lcd_num_to_str(ADC, 4); // Output ADC variable 4 bits
Let's make a project "Analog voltmeter" in which information about the measured voltage will be displayed on the screen in the form of a horizontal dynamic scale. The measured voltage is applied to the ADC0 input, maximum 5V. without using a divider. We use an atmega8 microcontroller for this project, which is clocked from an internal 8MHz oscillator. We connect the display via a four-bit bus in accordance with the settings from the lcd_lib.h file. When creating a project in AVRSTUDIO, we copy 2 library files to our project folder, and add these files (lcd_lib.c and lcd_lib.h) in the project tree.
The function is responsible for displaying the dynamic scale. lcd_progress_bar(uint8_t progress, uint8_t maxprogress, uint8_t length), depending on the state of the variables of this function, the scale changes its level, progress - the level from 0 to 255, maxprogress - the maximum level is limited to a number from 0 to 255, length - the length of the scale from 0 to 16 cells (depending on the display type). Since the ADC value is 1024 at the maximum input voltage, we divide this value by 4 and assign it to the variable "u", and use the variable "u" in the dynamic scale output function progress().
The full text of the program is posted below:
//******Using libraries to work with LCD HD44780***** #include
0b00000.0b10001.0b01010.0b00100.0b01010.0b10001.0b00000.0b00000
};
const uint8_t simbol_2 PROGMEM= (
0b00100,0b00100,0b00100,0b11111,0b00100,0b00100,0b00100,0b00000
); unsigned char u; //************************************************** ******** void progress(void) // scale output function ( lcd_gotoxy(0, 0); lcd_string("0....05......1",16); lcd_gotoxy (0, 1); lcd_progress_bar(u, 255, 16); ) //*********************************** ************************** int main(void) ( /***ADC Setup***/ ADCSRA |= (1<< ADEN) //Включение АЦП
|(1 << ADPS1)|(1 << ADPS0); // предделитель преобразователя на 8
ADMUX |= (0 << REFS1)|(0 << REFS0) // внешний ИОН
|(0 << MUX0)|(0 << MUX1)|(0 << MUX2)|(0 << MUX3); // вход PC0
_delay_ms(100);
lcd_init();// инициализация LCD
lcd_clr();// очистить LCD
_delay_ms(10);
lcd_definechar(simbol_1, 6); // определяем собств. символ 1
lcd_definechar(simbol_2, 7); // определяем собств. символ 2
for(char a=0; a<10; a++) // цикл приветствия
{
lcd_gotoxy(0, 0);
lcd_dat(6);
_delay_ms(100);
lcd_gotoxy(0, 0);
lcd_dat(7);
_delay_ms(100);
lcd_gotoxy(3, 0);
lcd_string("AЅa»oґoіГ№",10); // Аналоговый
lcd_gotoxy(3, 1);
lcd_string("іo»Дїјeїp",9); // вольтметр
}
_delay_ms(1000);
lcd_clr();// очистить LCD
while(1)
{
progress();
ADCSRA |= (1 << ADSC); //Начинаем преобразование
while ((ADCSRA&(1 << ADIF))== 0); //Ждем флага окончания преобразования
u = ADC/4;
}
}
 |
Our blog reader Michael ( mishadesh) created an excellent library to work with LCD and offered to write an article to demonstrate its capabilities. Actually, today this is what we will talk about 😉 Let's analyze what functions are implemented, and at the end of the article an example for working with the display will be posted.
As usual, let's start with a discussion of hardware ... And here, in fact, there is nothing to talk about. As in the first article on working with displays (), we will use a debug board Mini STM32. Actually, the connection of the display, the basic commands for writing data, the sequence of instructions for initialization - all this is there =) Therefore, now we proceed directly to the discussion of the library for working with graphic displays.
Here is the full list of features with explanations:
The following function, as its name implies, changes the screen orientation. Two screen positions are possible, respectively, two possible parameter values orientation:
- Orientation_Portrait
- Orientation_Album
The function draws a symbol on the graphical display, arranging it according to the coordinates passed to the function, and also setting its color. The character's face matches the font defined in the file font.c(the file is included in the library).
From function LCD_DrawChar() smoothly follows the following function:
| void LCD_DrawString(char * s, uint16_t x, uint16_t y, uint16_t color, uint16_t backColor, uint8_t isTransparent) ; |
It’s clear and without further ado 😉 The function prints on LCD line of text. The base for this function is the previous − LCD_DrawChar().
In addition to symbols and text, of course, it is necessary to be able to draw basic graphical primitives, such as a line or a circle. For this, the following has been implemented:
| void LCD_drawLine ( int x1, int y1, int x2, int y2, uint16_t color) ; void LCD_DrawRect ( int x1, int y1, int x2, int y2, uint16_t color, uint8_t filled ) ; void LCD_DrawEllipse(uint16_t X1, uint16_t Y1, uint16_t R, uint16_t color) ; |
To draw a line, you need to pass the coordinates of the start point, the coordinates of the end point, as well as the desired color to the function. For a rectangle - the coordinates of the upper left corner and the coordinates of the lower right corner (!). Last parameter filled Determines whether the shape should be filled. One means yes, the shape will be filled with the selected color, zero means only the outline of the shape will be drawn. This is understandable) Only the circle remains - the function DrawEllipse(). Here, instead of the coordinates of the beginning and end (upper / lower corners), we pass the center of the circle and the radius as arguments.
And finally, one more function:
| void LCD_FillScr(uint16_t color) ; |
The function allows you to fill the screen with a solid color.
All of the above functions are implemented in the file GUI_DRV.c.
In addition to them, the library includes functions for writing data to the display ( LCD_DRIVER.c) as well as the already mentioned fonts ( font.c). As you can see, everything is clearly sorted into different files, so in principle everything is very clear, so let's move on to a practical example!
Let's figure it out! Let's go to the file main.c… I will not give the full code of the peripheral and display initialization functions, all this can be viewed directly in the file, or in the previous article, the link to which was at the beginning of this article 😉 Function main():
| int main(void ) ( initPeriph() ; initFSMC() ; initLCD() ; delay(10000 ) ; LCD_FillScr(0xFFFF ) ; delay(100 ) ; LCD_SetOrient(Orientation_Album) ; delay(100 ) ; LCD_DrawString( "Library for LGDP4532", 30 , 30 , 0x888F , 0x0000 , 0 ) ; LCD_DrawRect(100 , 100 , 200 , 200 , 0x0000 , 0 ) ; LCD_DrawRect(120 , 120 , 180 , 180 , 0xFF00 , 1 ) ; LCD_DrawEllipse(150 , 150 , 50 , 0xF000 ) ; while (1 ) ( ) ) |
We start with initialization, paint over the screen with white color and set the screen orientation to landscape. And now let's move on to drawing graphics)
We display a string, as well as two rectangles and a circle. The result is there:

Obviously everything works great 😉
So, this is the end for today, many thanks to Mikhail for the work done and the materials provided. Here are the contacts of the author of the library:
skype- mishadesh
Mail- [email protected]
That's all, thank you for your attention, see you soon!
Consider the interaction between a user and a device based on a microcontroller. Very often, the user needs to enter information with something, and read it from something. The keyboard and display () are very well suited for these purposes. Consider the interaction of the user and the device based on the microcontroller. Very often, the user needs to enter information with something, and read it from something. The keyboard and display () are very well suited for these purposes. In this note, we will consider in more detail the display of information on a symbolic LCD with sign-synthesizing.
Such indicators are often used in the design of digital devices, so you need to be able to work with it.
Consider the typical internal structure of the sign-synthesizing LCD:
Internal structure of HD44780
The LCD is based on a matrix of liquid crystals, by applying voltage to the element of which we can “light up” a dot on the screen. In our case, the matrix consists of familiar spaces (most often 8x5 pixels), grouped in several rows. It's all managed by the built-in HD44780 controller. The controller has one-byte memory cells ( DDRAM), the contents of which are actually displayed on the screen according to the table recorded in CGRAM. There are usually more memory cells than familiarity in LCD, so the familiarity addressing should be looked at in the datasheet. That is, we only need to write the code of the desired character in the desired position, and everything else HD44780 will do it himself.
To select a position, there is a virtual cursor (number of the current memory cell, AC), which can be controlled by commands, the cursor can be made visible. By default, when a character is written to a cell, the cursor moves forward one position. Character codes for LCD supporting Cyrillic can be seen in the table: 
The senior tetrad of the code will be equal to the row of the selected character, and the youngest - to the line. You can create your own symbol table by writing it in CGRAM. Each character requires 5 bytes, where units are responsible for "lit" pixels. For example, the number "8" is encoded by the sequence 0x6c, 0x92.0x92.0x92.0x6c.
Command codes are given in the table.
HD44780 character table

Flag values: 
The question remains: “how to write the code of the required character in the desired position”? To do this, consider what the conclusions are responsible for. LCD. conclusions DB0-DB7 responsible for incoming/outgoing data. A high level on the RS pin lets the indicator know that the signal on the pins DB0-DB7 is data and low is command. Output W/R is responsible for the direction of data, whether data is written to or read from memory (usually reading from LCD is not used, we can safely apply a low level to it). output pulse E(duration of at least 500 ns) is used as a signal for writing/reading data from the pins DB0-DB7, RS And W/R.
Output V0 used to set the contrast of the image, output A, K - to power the backlight (if it is in your model LCD). The remaining 2 outputs are the actual power supply LCD. That is, to control LCD you will need 8+1+1=10 pins. But you can work in 4-bit interface mode. In this case, the high order/data tetrad will be transmitted first on the DB4-DB7 pins, and then the low one. Conclusions DB0-DB3 are not used. In total, 6 pins of the microcontroller are required for control.
Now let's look at a live example. Let's write a program to output text "website" to what I have in stock WH1602A(2 lines of 16 characters). 
For other LCDs, check the correspondence of the cells DDRAM familiarity. Wiring diagram LCD to the controller looks like this.
Connection diagram to the AVR microcontroller
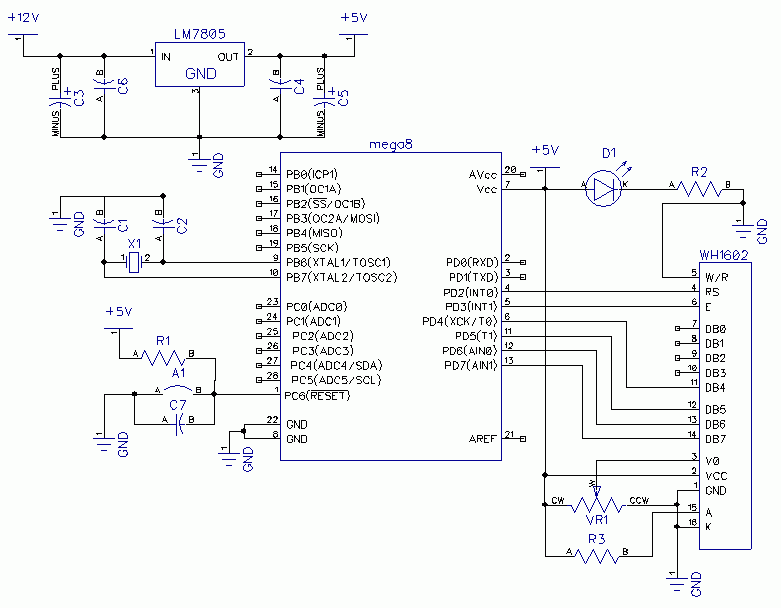
Resistor R3- 17 ohm limits the current through the backlight, and AC VR1 sets the contrast (if everything is connected and programmed correctly, but the indicator is silent, turn VR1 to make the images visible). Also, in no case should the polarity be confused LCD, feed it above 5.5V, from my experience I can say that they burn instantly. The purpose of all other parts is the same as in
Now let's move on to writing the program. To control the indicator, we will write a program with several key functions for working with LCD: lcd_dat(unsigned char x) – to write x data, lcd_com(unsigned char x) – to write x command, lcd_init(void) – to initialize the indicator:
#define RS 2 //RS=PD2 - LCD control signal
#define E 3 //E=PD3 - LCD control signal
#define TIME 10 //Time delay constant for LCD
//clocking frequency MK - 4MHz
//Delay generation program
void pause(unsigned int a)
( unsigned int i;
for (i= a; i> 0 ; i-- ) ;
//Program for sending commands to the LCD
void lcd_com (unsigned char lcd)
( unsigned char temp;
temp= (lcd& ~(1<< RS) ) | (1 << E) ; //RS=0 is a command
PORTD= temp; //Output on portD the highest command tetrad, signals RS, E
asm("nop") ;
PORTD= temp& ~(1<< E) ; //Command write signal
temp= ((lcd* 16 ) & ~(1<< RS) ) | (1 << E) ; //RS=0 is a command
PORTD= temp; //Output on portD the lower tetrad of the command, signals RS, E
asm("nop") ; // A small delay of 1 cycle MK, for stabilization
PORTD= temp& ~(1<< E) ; //Command write signal
pause (10 * TIME) ; //Pause for command execution
// Program for writing data to the LCD
void lcd_dat (unsigned char lcd)
( unsigned char temp;
temp=(lcd|(1<< RS) ) | (1 << E) ; //RS=1 is data
PORTD= temp; //Output on portD the highest data tetrad, signals RS, E
asm("nop") ; // A small delay of 1 cycle MK, for stabilization
PORTD= temp& ~(1<< E) ; //Write data signal
temp= ((lcd* 16 ) | (1<< RS) ) | (1 << E) ; //RS=1 is data
PORTD= temp; //Output on portD the least data tetrad, signals RS, E
asm("nop") ; // A small delay of 1 cycle MK, for stabilization
PORTD= temp& ~(1<< E) ; //Write data signal
pause(TIME) ; //Pause for data output
//LCD initialization program
void lcd_init(void)
lcd_com(0x2c) ; //4-wire interface, 5x8 character size
pause(100 * TIME) ;
pause(100 * TIME) ;
pause (100 * TIME) ;
//Main program
int main(void )
DDRD=0xfc ; //Initialize portD
PORTD=0x00 ;
pause(1000) ;
lcd_init() ; // LCD initialization
lcd_dat("w") ; //Output "www.site"
lcd_dat("w") ;
lcd_dat("w") ;
lcd_dat(".") ;
lcd_dat("a") ;
lcd_dat("v") ;
lcd_dat("r") ;
lcd_dat("l") ;
lcd_dat("a") ;
lcd_dat("b") ;
lcd_dat(".") ;
lcd_dat("c") ;
lcd_dat("o") ;
lcd_dat("m") ;
lcd_dat("I") ; //Write "It's so easy"
lcd_dat("t") ;
lcd_dat(""" );
lcd_dat("s") ;
lcd_dat(" " ) ;
lcd_dat("s") ;
lcd_dat("o") ;
lcd_dat(" " ) ;
lcd_dat("e") ;
lcd_dat("a") ;
lcd_dat("s") ;
lcd_dat("y") ;
while (1) //endless cycle
return 1 ;
#include
The program is very simple, it will not be difficult for anyone who knows at least a little to understand it. C for AVR. For latin and numbers ASCII codes match those wired into the character generator LCD, so it is permissible to use lcd_dat('A'). You can create your own library for working with LCDs by separating the functions lcd_dat(unsigned char x), lcd_com(unsigned char x), lcd_init(void) into a separate module LCD.h and connect it as needed.
This idea saves a lot of time, it is only necessary to write the necessary functions once, and then only use them all the time. You can also notice that it is inconvenient to display a long phrase one letter at a time, for this you can push our output string into an array of unsigned char and display it using a loop:
pause(1000) ; //Delay for the LCD to turn on
lcd_init() ; // LCD initialization
for (i= 0 ; i< 14 ; i++ ) //Display the entry letter by letter
lcd_dat(data[ i] ) ;
int main(void )
( unsigned char data [ 14 ] = ( "w" , "w" , "w" , "." , "a" , "v" , "r" , "l" , "a" , "b" , " ." , "c" , "o" , "m" ) ;
unsigned char i;
DDRD=0xfc ; //Initialize portD
PORTD=0x00 ;
Just do not forget that the numbering of arrays in C starts from zero. An existing program can be used in conjunction with the controller without significant changes ATtiny2313 by connecting LCD to PORTB, like PORTD at ATtiny2313 has only 7 pins, not 8, like ATmega8.

I also recommend connecting LCD using connectors. It is very convenient when debugging a program when you need to display some intermediate data. Connected one connector and the whole thing. In continuation of this note, in the near future I will also consider displaying the read information on LCD.
Have a nice day, everyone;)
there is a small flaw in this example
there is a small flaw in this example, perhaps for this reason the example does not work for many!
in general, the example is concise and simple, so a small flaw is not striking (for those who are versed in the "C" language), and even more so for those who are just getting acquainted with the AVR and the "C" language, perhaps they are even perplexed how so ... .write do it and it will be like in the picture .... but it wasn’t there ...
in general, the whole problem with delay cycles, in order for the display to keep up with the controller, namely in the function-
//Delay generation program
void pause(unsigned int a)
( unsigned int i;
for(i=a;i>0;i--);
everything seems to be correct at first glance, but compilers for microcontrollers tend to optimize the code for the maximum compactness of the resulting program flash memory image ... and not seeing any sense in an empty loop and, accordingly, further down the chain behind it: all calls, declarations of constants and everything related to this function, which he thinks is meaningless ... simply removes it from the code at build time ...
at least this is true for atmel studio 6.1, and you can verify this by looking at the project folder, there is a * .lss file containing the assembler code of this program, generated when the project is built. no hint of an implementation of the void pause function...
as a result, when the controller is flashed, random garbage or emptiness is obtained on the display ... when you press the reset button several times, the garbage can disappear and reappear ... obviously the out of sync between the processor and the screen
but if you make a small correction
void pause(unsigned int a)
( unsigned int i;
for (i=a;i>0;i--)
asm("nop");
Then it makes sense for the compiler, it is also confirmed by the explicit appearance of the function implementation in the assembler code
0000006c
:
6c: 9c 01 movw r18, r24
6e: 03 c0 rjmp .+6 ; 0x76
70:00 00 nop
72: 21 50 subi r18, 0x01 ; one
74:31 09 sbc r19, r1
76:21 15 cp r18, r1
78:31 05 cpc r19, r1
7a: d1 f7 brne .-12 ; 0x70
and most likely everything will work .... at least for me on atmega16 (internal RC synchronization 1Mhz) and using atmel studio 6.1 it was just like that ... maybe at other frequencies you will have to play around with the #define TIME 10 constant and / or values \u200b\u200bpassed to the function void pause
here-> pause(value) ...or pause(value*TIME) ....
good luck learning how to operate the AVR!
Look, imagine that LCD -
Look, imagine that the LCD is a typewriter, the paper in the typewriter is the memory of the LCD, the carriage is the cursor pointer. In addition, the LCD does not display the entire contents of the memory, but only a part of it. It seems like some kind of window that we put on our paper with text.
Here I / D specifies how we will print, right-to-left or left-to-right.
S determines whether we will move the screen window as we type or not.
S / C - simply shifts the visible window of the screen or the carriage of the typewriter.
R/L - specifies where (left or right) we will shift the screen or courses using the S/C flag.
something is missing!
Ripped off your prog and proteuse and won't start on mega8. The screen is silent, I began to dig through the datasheets and this is what I found:
missing in the initialization of the first three!
0011 - wait 5 ms
0011 - wait 100 µs
0011 - wait 2 ms
0010 - waiting 41 µs
0000 - -and-
0010 - -and-
1000
0000
1000
0000
0001
0000
0100
correct me if I'm wrong!
Does not work!
I tried to change the clock rates, delays during initialization and output of symbols (commands), so far without success. Regarding the fuses, if you mean to configure the port D pins using the DDRB, PORTD registers as low log outputs. level, then I did it.
From there is nothing to do, I compiled a simple symbol output program using CodeVisionAVR tools, drove it into PROTEUS - it works! ... but refuses with a real LCD ..
No, I'm talking about
No, I'm talking about trying to display a flasher on port D, for example, or just light the entire port at once. When I bought only a microcontroller, I did not manage to do this. I dug through the forums, it turned out that there were somehow programmed fuses that port D and all of its 8 bits were not included. Check this point, but better try to move the LCD to another port, for example, to B. The fact that the program works in the proteus but not with the real one is the difference in the parameters of the LCD clogged in the proteus and the real one.
Does not work!
I assembled and connected everything as per the diagram, only the MK used ATmega16 and LCD WH1602M, respectively compiled the firmware for it in WinAVR. However, the LCD refused to output anything, it also collected it in the proteus (on ATmega 8 and LM016L), data from the MK is displayed, but nothing is visible on the LCD. What could be the problem? (If it matters, used the internal RC oscillator to clock at 1MHz)
1. For Atmega16 you need
1. For Atmega16, you need to turn on the fuses first so that port D works.
2. Try changing the clock frequency to 4MHz and 8MHz. The whole problem of the LCD is that all the pauses during initialization or when a command is given are not maintained. And the LCD controller is very sensitive to this.
There is a question:
I assembled a chronometer circuit on a mega 8 with a ready-made hex, - the readings are displayed on WH0802,
indication - a number of three digits that are displayed on the entire screen, one digit consists of 4 familiarity. Screen type pseudographic. How could the firmware be written?
The author categorically refuses to give source codes and does not comment on the work, probably for reasons of "intellectual property".
In freedom, I want to try to write my own firmware for educational purposes.
Faced with such
Faced such a situation.
There are two LCD 16x2:
1 - MTC-S16204XFGHSAY
2 - WH1602A-YGH-CTK
The first one I use in a project with GPS.
The 2nd decided to use it in a project with a keyboard. But for some reason the lcd doesn't work.
The contrast is adjusted and squares appear. And that's it.
Perhaps there is a different order of initialization.
Help me to understand
Here are the datasheets
filebox.od.ua/?file=24a31fc50d62bfcd658bdadac84088ab
The displays are no different.
The displays are no different. The pinout is the same. The timings are slightly different. Try to increase the delay when sending commands to the LCD or lower the frequency of the MK.
All LCDs on the HD44780 have an identical command system. What interface are you using, 4-bit or 8-bit? Also try to increase the delay between turning on the LCD and its initialization, up to about 0.1s. The polarity of the power supply for the LCD was not confused, so they need a little to burn out? Then I foolishly somehow burned, and then tried to connect. Black squares were also displayed, data was output every other time, i.e. worked extremely unstable.
I use programs from articles
I use programs from articles about GPS.
interface 4-bit
tried a program from here
chipenable.ru/index.php/programming-c/75-chasy-na-mikrokontrollere.html
earned
And what to change in your program?
Pay attention to delays
Pay attention to the delays after issuing the initialization and configuration commands, maybe that's the point. I also had a case like this, but the controllers were both the same, and the program worked only on one.
HD44780 analogs
I ran into a problem - I can not find a WH1602A LCD at a reasonable price. For example
in chipdip these are chipdip.ru/product/wh1602a-ygh-ct-k.aspx
700 wooden. What is YGH in the name "WH1602A-YGH-CT(K), LCD 16x2, English-Russian"
What are LCD analogs based on HD44780? Here I found the page micronika.ru/order.phtml?vid=64 - there the name FDCC1602A-FSBFBW-51SR contains 1602A,
just paid attention. Maybe FDCC1602A-FSBFBW-51S will do without much code change?
What problems can arise when using
not actually HD44780 from Hitachi, but its analogues?
PS It would not be bad to read about the use of various LCDs, analogs of xd44780, than MELT "ovskie
LCDs are bad
Working with 16x2 display on HD44780 controller in Bascom-AVR
LCD displays on HD44780 controller (and also compatible with it KS0066) are very common due to the simple method of working with them, as well as their low price. Depending on the display version, they allow you to display from 8 to 40 characters per line, there can be one, two or four lines. The most common are 8*2 (eight characters*two lines), 16*2 and 20*4.
For example, consider the pinout of the indicator 16 * 2 (for all displays on the HD44780 controller, it is similar)
Each display on the HD44780 controller has 14 pins for connection + 2 pins for backlight (if any):
- Ground, GND
- Supply voltage, Vcc (+5V)
- Contrast adjustment, Vo
- Register selection, R/S
- Read/Write, R/W
- Read/write enable signal, E
- Bit0,D0
- Bit 1, D1
- Bit2, D2
- Bit3, D3
- Bit4, D4
- Bit 5, D5
- Bit6, D6
- Bit 7, D7
- Backlight supply for backlit displays, LED+
- Backlight supply for backlit displays, LED -
Data is loaded into the display via the data bus (D0-D7), while the controller supports both 8-bit and 4-bit connections. A 4-bit connection saves microcontroller legs and is often enough for many tasks (with an 8-bit connection, you can load data into the display controller faster, but we don’t need it yet, so we won’t consider it). For a 4-bit connection, the last 4 bits of the bus (D4-D7) are used.
As an example, we will use a 20x4 display connected to an ATmega8 microcontroller via a 4-bit interface according to the diagram below.

The display requires 5 volts for power supply, the divider on the resistor R1 adjusts the contrast of the displayed characters, the R / W output is connected to the ground (i.e. permanent recording to the display is selected). You can connect the remaining pins to any free pins of the microcontroller. The configuration of the legs for connecting the display on the ATmega8 microcontroller will look like this:
$regfile
= "m8def.dat"
$crystal
=
1000000
"operating frequency 1 MHz
config
lcd=
20
*
4
config
Lcdpin = Pin , Db4 = PortB . 3 , Db5 = PortB . 2 , Db6 = PortB . 1 , Db7 = PortB . 0 , E = PortB . 4 , Rs = PortB .5
CLS - display cleaning
LCD - display data example: LCD "Hello world" will display the inscription hello world )
And now we will write such a small program that will display the inscription on the display:
$regfile
= "m8def.dat" "selected type of microcontroller
$crystal
=
1000000
"operating frequency 1 MHz
config
lcd=
20
*
4
"specify which display we have
"and configure the legs for connecting
config
Cursor
Off
Cls
"clear the display
lcd
"LCD 20*4 HD44780"
Locate
2
,
8
"move the cursor to the second line, the eighth character
lcd
"site" "display text
End
as a result, the display will look like this:

Bascom-AVR also has a few additional commands for working with displays:
HOME- also returns the cursor to the top line, but unlike the UPPERLINE command, this command can take additional values: if you put a letter after it L, T or F then the cursor will move to the beginning of the line whose name begins with the corresponding letter (example: in order to move the cursor to the beginning of the third line, you need to write the command HOME
T
)
sample code for outputting information to the display using these commands:
$regfile
= "m8def.dat" "selected type of microcontroller
$crystal
=
1000000
"operating frequency 1 MHz
config
lcd=
20
*
4
"specify which display we have
"and configure the legs for connecting
config
Lcdpin = Pin , Db4 = Portb . 3 , Db5 = Portb . 2 , Db6 = Portb . 1 , Db7 = Portb . 0 , E = Portb . 4 , Rs = Portb . five
Cursor
Off"Turn off cursor display
Cls
"clear the display
lcd
"*** HD44780 LCD ***" "print the text on the first line
lowerline
"go to the second line
lcd
"Line number 2" "display text
third line
"go to the third line
lcd
"AaBbCcDdEeFfGgHfIiJj" "output on the third line
Fourth line
"go to the fourth line
lcd
"1234567890"
"print on the fourth line
End
"end of program

and an example of how to use text shift:
$regfile
= "m8def.dat" "selected type of microcontroller
$crystal
=
1000000
"operating frequency 1 MHz
Dim
A Asbytes"variable for loop organization
config
lcd=
20
*
4
"specify which display we have
"and configure the legs for connecting
config
Lcdpin = Pin , Db4 = Portb . 3 , Db5 = Portb . 2 , Db6 = Portb . 1 , Db7 = Portb . 0 , E = Portb . 4 , Rs = Portb . five
Cursor
Off"Turn off cursor display
Cls
"clear the display
Locate
1
,
11
"set the cursor on the first line, the tenth familiarity
lcd
"Bascom-AVR" "display text
"left shift cycle
For
A=1 To 10
"repeat this loop until variable A reaches the value 10
shiftlcdLeft"move text to the left
Waitms 300
"delay 300 milliseconds
Next
A
right shift cycle
For
A=1 To 10
"repeat the loop until variable A reaches the value 10
shiftlcdRight"now move the text to the right
Waitms 300
"delay 300 milliseconds
Next
A "increment the value of variable A by 1
"Continue program execution
Wait
1
"delay 1 second
Home
F "set the cursor to the bottom line
lcd
"END PROGRAM" "and display the inscription
End
"end of program
At the request of the workers, and on my promises, I decided to describe the work with the iconic 16x2 LCD in the CodeVisionAVR environment. Let's start with a description of the LCD itself. Hitachi's HD44780 alphanumeric LCD display can display characters in one, two, or four lines of 8, 16, 20, or 40 characters each. In this article I will consider LCD 16x2 (16 characters, 2 lines). This display for physical connection to the MK has 16 pins (pin assignment varies by manufacturer). Let's look at these findings. Without further ado, I stole a sign in MELT. In principle, it is suitable for any LCD.  Well, I think that it is not necessary to explain why this or that pin is needed. Everything is written in Russian. But there are a few small buts. 1) LCD displays can be produced in two versions for 5 volts, or for 3.3. 2) A current-limiting resistor is not always installed in the power circuit. Look carefully, it may just be a jumper. (I burned the backlight on two displays this way.) 3) Scheme for switching on a resistor to adjust the contrast.
  So, well, now how to connect this miracle to the MK. We will work with ATmega8 and quartz at 4 MHz. Here is the diagram itself.
  As you can see, there is nothing complicated. The first three bits of the port D are for control and the last four are for data. You can also work with these displays on an 8-bit bus, but I think giving extra 4 legs is a waste. Therefore, we will work on a 4-bit bus. We figured out the scheme, now let's get to the software part. To initialize the display and transfer it to 4-bit mode, you need to execute several commands. But before that, I want to explain how the control bits work. The RS bit is responsible for what the LCD will receive. If RS = 0, then we send the command, and if 1
then the data. If a bit RW=0, then we write in LCD, and if 1
, then we read. Bit E just a strobe. That is, as soon as we want to enter a command or data, then after we have set all the bits on the legs, we simply set them to 1
bit E, and then again drop into 0
. 1 - Turn on the power 2 - Hold a pause of at least 20 ms 3 - Command for 4 bits. tires 4 - Maintain a pause of at least 40 µs 5 - Command for 4 bits. tires (RS=0), (RW=0), (D7=0), (D6=0), (D5=1),(D4=1) 6 - Pause for at least 40 µs 7 - Command for 4 bits. tires (RS=0), (RW=0), (D7=0), (D6=0), (D5=1),(D4=1) 8 - Hold a pause for at least 40 µs 9 - Command for 4 bits. tires (RS=0), (RW=0), (D7=0), (D6=0), (D5=1),(D4=0) 10 - Pause for at least 40 µs 11 - Set parameters (RS=0), (RW=0), (D7=0), (D6=0), (D5=1),(D4=0) (RS=0), (RW=0), (D7= 1), (D6=0), (D5=0),(D4=0) 12 - Turn off the display (RS=0), (RW=0), (D7=0), (D6=0), (D5=0),(D4=0) (RS=0), (RW=0), (D7= 0), (D6=0), (D5=1),(D4=0) 13 - Clear the screen (RS=0), (RW=0), (D7=0), (D6=0), (D5=0),(D4=0) (RS=0), (RW=0), (D7= 0), (D6=0), (D5=0),(D4=1) 14 - Data entry mode (RS=0), (RW=0), (D7=0), (D6=0), (D5=0),(D4=0) (RS=0), (RW=0), (D7= 0), (D6=1), (D5=1),(D4=0) Oh how. Now after this abracadabra, our display is ready to receive data. What's next. And then let's look at the LCD commands. To transfer commands / data to the LCD over a 4-bit bus, two passes are required. First we send the high 4 bytes, and the second we send the low 4 bytes. Further, I will write all the commands in pairs. The command to clear the indicator and put the cursor in the upper left corner. RS=0, RW=0, D4=0, D5=0, D6=0, D7=0 (E=1 then 0) RS=0, RW=0, D4=0, D5=0, D6=0, D7=1 (E=1 then 0) Command to move the cursor to the left position. (X means don't care what value)
RS=0, RW=0, D4=0, D5=0, D6=0, D7=0 (E=1 then 0) RS=0, RW=0, D4=0, D5=0, D6=1, D7=X (E=1 then 0) The command sets the cursor shift direction (ID=0/1 left/right). Also display shift resolution (SH=1) when writing to DDRAM. RS=0, RW=0, D4=0, D5=0, D6=0, D7=0 (E=1 then 0) RS=0, RW=0, D4=0, D5=1, D6=ID, D7=SH (E=1 then 0) Command to turn on the display (D=1) and select the cursor (A, B). A=0, B=0 No cursor, no blinking A=0, B=1 No cursor, whole character flashes A=1, B=0 Underline cursor, not blinking A=1, B=1 Cursor underline and blinking RS=0, RW=0, D4=0, D5=0, D6=0, D7=0 (E=1 then 0) RS=0, RW=0, D4=1, D5=D, D6=A, D7=B (E=1 then 0) Display/cursor shift command (SC=0/1 cursor/display RL=0/1 left/right). RS=0, RW=0, D4=0, D5=0, D6=0, D7=1 (E=1 then 0) RS=0, RW=0, D4=SC, D5=RL, D6=X, D7=X (E=1 then 0) The command to set the bus width (DL=0/1 4/8 bits) As well as the pages of the P character generator. RS=0, RW=0, D4=0, D5=0, D6=1, D7=DL (E=1 then 0) RS=0, RW=0, D4=1, D5=0, D6=P, D7=0 (E=1 then 0) The command to set the address of the next operation by placing the cursor there and selecting the CGRAM area (Own invented symbols). RS=0, RW=0, D4=0, D5=1, D6=ACG, D7=ACG (E=1 then 0) RS=0, RW=0, D4=ACG, D5=ACG, D6=ACG, D7=ACG (E=1 then 0) The command to set the address of the subsequent operation and select the memory area DDRAM (Character Generator). RS=0, RW=0, D4=0, D5=1, D6=ADD, D7=ADD (E=1 then 0) RS=0, RW=0, D4=ADD, D5=ADD, D6=ADD, D7=ADD (E=1 then 0) Command Write data to the current area. RS=1, RW=0, D4=DATA, D5=DATA, D6=DATA, D7=DATA (E=1 then 0) RS=1, RW=0, D4=DATA, D5=DATA, D6=DATA, D7=DATA (E=1 then 0) The command to read data into the current area. RS=1, RW=1, D4=DATA, D5=DATA, D6=DATA, D7=DATA (E=1 then 0) RS=1, RW=1, D4=DATA, D5=DATA, D6=DATA, D7=DATA (E=1 then 0) Here are all the commands. There is also a command to read the busy flag, but I don’t use it, but just keep at least 40 µs between each command. That's all. And now, after reading this treatise, have a cup of tea or coffee and forget about all this. Since all this mura is taken over by functions from the CodeVisionAVR library. We create a new project as it was already told. For those who are not in the know, go here, the rest go to the tab in the code generator LCD and choose PORTD.
As you can see, there is nothing complicated. The first three bits of the port D are for control and the last four are for data. You can also work with these displays on an 8-bit bus, but I think giving extra 4 legs is a waste. Therefore, we will work on a 4-bit bus. We figured out the scheme, now let's get to the software part. To initialize the display and transfer it to 4-bit mode, you need to execute several commands. But before that, I want to explain how the control bits work. The RS bit is responsible for what the LCD will receive. If RS = 0, then we send the command, and if 1
then the data. If a bit RW=0, then we write in LCD, and if 1
, then we read. Bit E just a strobe. That is, as soon as we want to enter a command or data, then after we have set all the bits on the legs, we simply set them to 1
bit E, and then again drop into 0
. 1 - Turn on the power 2 - Hold a pause of at least 20 ms 3 - Command for 4 bits. tires 4 - Maintain a pause of at least 40 µs 5 - Command for 4 bits. tires (RS=0), (RW=0), (D7=0), (D6=0), (D5=1),(D4=1) 6 - Pause for at least 40 µs 7 - Command for 4 bits. tires (RS=0), (RW=0), (D7=0), (D6=0), (D5=1),(D4=1) 8 - Hold a pause for at least 40 µs 9 - Command for 4 bits. tires (RS=0), (RW=0), (D7=0), (D6=0), (D5=1),(D4=0) 10 - Pause for at least 40 µs 11 - Set parameters (RS=0), (RW=0), (D7=0), (D6=0), (D5=1),(D4=0) (RS=0), (RW=0), (D7= 1), (D6=0), (D5=0),(D4=0) 12 - Turn off the display (RS=0), (RW=0), (D7=0), (D6=0), (D5=0),(D4=0) (RS=0), (RW=0), (D7= 0), (D6=0), (D5=1),(D4=0) 13 - Clear the screen (RS=0), (RW=0), (D7=0), (D6=0), (D5=0),(D4=0) (RS=0), (RW=0), (D7= 0), (D6=0), (D5=0),(D4=1) 14 - Data entry mode (RS=0), (RW=0), (D7=0), (D6=0), (D5=0),(D4=0) (RS=0), (RW=0), (D7= 0), (D6=1), (D5=1),(D4=0) Oh how. Now after this abracadabra, our display is ready to receive data. What's next. And then let's look at the LCD commands. To transfer commands / data to the LCD over a 4-bit bus, two passes are required. First we send the high 4 bytes, and the second we send the low 4 bytes. Further, I will write all the commands in pairs. The command to clear the indicator and put the cursor in the upper left corner. RS=0, RW=0, D4=0, D5=0, D6=0, D7=0 (E=1 then 0) RS=0, RW=0, D4=0, D5=0, D6=0, D7=1 (E=1 then 0) Command to move the cursor to the left position. (X means don't care what value)
RS=0, RW=0, D4=0, D5=0, D6=0, D7=0 (E=1 then 0) RS=0, RW=0, D4=0, D5=0, D6=1, D7=X (E=1 then 0) The command sets the cursor shift direction (ID=0/1 left/right). Also display shift resolution (SH=1) when writing to DDRAM. RS=0, RW=0, D4=0, D5=0, D6=0, D7=0 (E=1 then 0) RS=0, RW=0, D4=0, D5=1, D6=ID, D7=SH (E=1 then 0) Command to turn on the display (D=1) and select the cursor (A, B). A=0, B=0 No cursor, no blinking A=0, B=1 No cursor, whole character flashes A=1, B=0 Underline cursor, not blinking A=1, B=1 Cursor underline and blinking RS=0, RW=0, D4=0, D5=0, D6=0, D7=0 (E=1 then 0) RS=0, RW=0, D4=1, D5=D, D6=A, D7=B (E=1 then 0) Display/cursor shift command (SC=0/1 cursor/display RL=0/1 left/right). RS=0, RW=0, D4=0, D5=0, D6=0, D7=1 (E=1 then 0) RS=0, RW=0, D4=SC, D5=RL, D6=X, D7=X (E=1 then 0) The command to set the bus width (DL=0/1 4/8 bits) As well as the pages of the P character generator. RS=0, RW=0, D4=0, D5=0, D6=1, D7=DL (E=1 then 0) RS=0, RW=0, D4=1, D5=0, D6=P, D7=0 (E=1 then 0) The command to set the address of the next operation by placing the cursor there and selecting the CGRAM area (Own invented symbols). RS=0, RW=0, D4=0, D5=1, D6=ACG, D7=ACG (E=1 then 0) RS=0, RW=0, D4=ACG, D5=ACG, D6=ACG, D7=ACG (E=1 then 0) The command to set the address of the subsequent operation and select the memory area DDRAM (Character Generator). RS=0, RW=0, D4=0, D5=1, D6=ADD, D7=ADD (E=1 then 0) RS=0, RW=0, D4=ADD, D5=ADD, D6=ADD, D7=ADD (E=1 then 0) Command Write data to the current area. RS=1, RW=0, D4=DATA, D5=DATA, D6=DATA, D7=DATA (E=1 then 0) RS=1, RW=0, D4=DATA, D5=DATA, D6=DATA, D7=DATA (E=1 then 0) The command to read data into the current area. RS=1, RW=1, D4=DATA, D5=DATA, D6=DATA, D7=DATA (E=1 then 0) RS=1, RW=1, D4=DATA, D5=DATA, D6=DATA, D7=DATA (E=1 then 0) Here are all the commands. There is also a command to read the busy flag, but I don’t use it, but just keep at least 40 µs between each command. That's all. And now, after reading this treatise, have a cup of tea or coffee and forget about all this. Since all this mura is taken over by functions from the CodeVisionAVR library. We create a new project as it was already told. For those who are not in the know, go here, the rest go to the tab in the code generator LCD and choose PORTD.
 What have we done with it. First, we told the program that we want to work with the LCD display (by selecting the tab LCD). Then we said that we will connect it to the port D. The drop down list below allows you to select the number of characters per line. Since the default is 16
, and we want to work with LCD 16x2, then nothing needs to be changed. Below, for a hint, the port legs are painted for the correct connection of the LCD to the MK. That's it, save the project and look at the freshly generated code. The first thing to pay attention to is the piece of code after the preprocessor directive #include
What have we done with it. First, we told the program that we want to work with the LCD display (by selecting the tab LCD). Then we said that we will connect it to the port D. The drop down list below allows you to select the number of characters per line. Since the default is 16
, and we want to work with LCD 16x2, then nothing needs to be changed. Below, for a hint, the port legs are painted for the correct connection of the LCD to the MK. That's it, save the project and look at the freshly generated code. The first thing to pay attention to is the piece of code after the preprocessor directive #include  Next function. void lcd_puts(char *str) This function prints the string located in SRAM starting from the current position. Example: lcd_gotoxy(0,0); lcd_puts("STRING"); We see:
  Next function. void lcd_putsf(char *str) This function prints the string located in FLASH starting at the current position. Example: lcd_gotoxy(0,0); lcd_putsf("STRING"); We see: Well, the "Eraser" function closes all this disgrace void lcd_clesr(void) By calling this function, you will erase everything on the display, and the cursor will move to the leftmost position of the top line. This is how you can start by displaying words and numbers on the LCD using ready-made functions. Now let's talk about how to display the value of variables. For these purposes, we need another library. Well, those who programmed in C under a PC should know about it. It's called stdio.h We rise to the very top of the program and after the preprocessor directive #include
  So we learned how to display formatted text on the LCD. Next, I will briefly go over the types of transformation. i d- To output signed decimal integer u- To output unsigned decimal integer e -d.d e-d
E- To display real floating point type -d.d E-d
f- To display real floating point type -d.d
x- For hexadecimal output in small letters X- For hexadecimal output in capital letters c- To output to character If write %-05d then sign "-"
will force it to be left-aligned, and nulls will not be filled with zeros. If you try to print a floating point number, you will be surprised. The number will not be printed. In an ambush)) The problem lies in the compiler settings. For the compiler to understand the format float you need to tweak it a bit. For this we go Project->Configure and go to tab C Compiler. In property (s)printf Features: choose float, width, precision. That's all. Try, experiment. If you have any questions, write on the forum. Good luck!
So we learned how to display formatted text on the LCD. Next, I will briefly go over the types of transformation. i d- To output signed decimal integer u- To output unsigned decimal integer e -d.d e-d
E- To display real floating point type -d.d E-d
f- To display real floating point type -d.d
x- For hexadecimal output in small letters X- For hexadecimal output in capital letters c- To output to character If write %-05d then sign "-"
will force it to be left-aligned, and nulls will not be filled with zeros. If you try to print a floating point number, you will be surprised. The number will not be printed. In an ambush)) The problem lies in the compiler settings. For the compiler to understand the format float you need to tweak it a bit. For this we go Project->Configure and go to tab C Compiler. In property (s)printf Features: choose float, width, precision. That's all. Try, experiment. If you have any questions, write on the forum. Good luck!


