I want to devote today’s article entirely to working in the editor Microsoft Word. It will be especially useful for novice users to familiarize themselves with it. At first glance, the working methods described here may turn out to be simple and do not require study, but they form the basis without which further study of the editor is impossible. We'll figure it out on Microsoft example Word 2010.
How to change the font in Word?
The font changes on the tab Home in the group Font.

Here you can change, in fact, the font itself, its size, color, make it bold, italic, underlined or strikethrough.
Aligning text in Word
To align text left, center, right, or justified, click the corresponding buttons on the tab Home in the group Paragraph, having previously selected the text that needs to be formatted.

How to insert a table into a Word document?
You can insert a table from the menu Insert/Table by clicking on the drop-down list and selecting the number of rows and columns.

You can also use ready-made formatted table templates by calling the menu item Express tables.
How to change line spacing and indentation in Word?
You can change the spacing between lines on the tab Page layout, group Paragraph.

To do this, you need to place the cursor on the line To or After which you want to change the interval and set the desired value. Indentations are made from the right or left edge in the same way.
Inserting a picture into a Word document
To insert a picture into a document, select the tab Insert, group Illustrations and press Drawing.

A window will appear where you need to find the file on your hard drive that we are going to insert into the document. Click on it, press the button Open and rejoice at the drawing in the document.
If you want to learn how to put footnotes in a document, then read here.
A user who wants to learn something new, in particular Word, first of all wants to learn how to work in Word. It’s good if there is a teacher who can and has the desire to give advice and give lessons computer literacy. What if he is not there? You can also rely on tutorials, of which there are many today, and learn lessons from them. However best choice is to study Word on your own.
How they work in Word
So, when working with the Word program, an ordinary user without special skills performs the following operations:
- creates a document;
- prints letters and numbers;
- deals with its editing or formatting depending on the need;
- saves the document;
- prints it out.
Development office application begins with the creation of a document. Every inexperienced user wants to know how to create a document in a program. There is nothing complicated. To do this, click on the corresponding icon in the desktop panel. Typically, it looks like the letter W on a white background. We can assume that the document has been created. Now you need to start filling it.
Typing takes the most time. An inexperienced user, or user, immediately wonders how to print. There are a lot of techniques, as well as lessons that are ready to help you master the basics of typing letters. Again, the tutorial is ready to help. But the best method is still recognized as practical. That is, you need to open a new Word document using the corresponding icon on the toolbar and start typing. It's not easy at first if you've never done typing before. However, over time it will become easier, typing speed will increase, and your fingers will remember the location of the keys on the keyboard. And you won’t have to wonder how to do this or that operation faster. Just don’t stop training, since a systematic approach is important in mastering any application.
Have you learned to type? It's time to start formatting the document. True, this can be done during the printing process, but it’s better after. All kinds of program tools help the user: increasing or decreasing the size of letters, color scheme, centering the typed text. If desired, you can add a table, a picture and any figure to the text of the user’s choice, who strives day by day to become a confident user of a personal computer.
The received data can be saved to any location on your computer or external storage device. To do this, open “File”, then “Save As”, and then select a location for your first Word document. For example, this could be “Desktop”. If there is a need for a printer, then the finished document can be printed using the “File” command, then “Print”. This is what the tutorial recommends.
Here are the basics of working with text Word document. Thus, in order to learn something, including mastering a text application, you need to practice, you can read a tutorial.
With this article I plan to open a series of lessons on text editor Microsoft Word. Previously, I often had to do tutoring, that is, learning how to use a computer and application programs. People have different levels of training, so there were often cases when it was necessary to train a person from scratch, including various programs from the package Microsoft Office, which includes Word as well.
And I think that I did it quite successfully, judging by the reviews. At least, my clients continued to quite successfully keep in touch with me and consulted me on various issues. When teaching any program, I tried, first of all, to imagine myself in the user’s place and explain it taking into account all those nuances that may be incomprehensible. In the case of the Word program, you must also take into account and know what keys are on the keyboard for and what they are for. Therefore, I will also take this point into account, and this lesson will even cover such an aspect as training in working with the keyboard. There is no way without this, since these are the very basics that you need to know.
And I think it’s normal when a person doesn’t understand something. The reasons may be different. Some didn’t have computer science at school, others did, but they didn’t explain exactly what was needed. So, for example, I studied computer science at school, but we mostly did what we drew in the Paint program. That is, not even in Photoshop, which could really be useful in life. However, this topic can be discussed for a very long time.
All examples will be considered using the Microsoft Office 2010 package as an example. But everything said is also true for Office 2007 and newer packages. Since version 2007, which was different compared to previous versions redesigned interface; later, from the release of software products of this family, the interface remained essentially the same.
Getting started.
Actually after launch Microsoft programs Word, you can already start typing text. What might be incomprehensible to a novice and inexperienced user who is new to computers? Here are some nuances:
To make a letter capitalize, you need to hold down the Shift key and press the letter you want to make capital.
To switch the language from Russian to English and vice versa, the combination is usually used Alt keys+ Shift. What does this designation mean? While holding down one of these 2 keys, press the other.
If you want to end a paragraph, use the Enter key to do this. When typing text, you don’t need to press anything specifically to move a line. Because the transition is carried out independently.
If you need to make a red line in the text (paragraph indent), then use the Tab key for this.
At the very top of the main program window is the main menu. There are tabs File, Home, Insert, Page Layout, Links, Mailings, Review, View, Settings. Depending on the version of the package you are using, your tabs may be arranged differently. But the essence does not change in any case.
We are now on the Home tab.

If we want to change the font typeface and font size, then we indicate the corresponding values (in the figure they are highlighted with a red frame). After this, if you suddenly want to cancel the selected style, you just need to press the Ctrl + Space key combination.
If, when choosing a font, you get a crappy text when typing, keep in mind that this only means that the font you have chosen does not contain Russian letters.

To make the typed text bold, you need to select the Zh, K button on the toolbar - the text will be printed in italics, H - underlined.
You started typing text, but then decided to return to the usual style, press Ctrl key+ Space. I recommend that you remember this combination in the future. Saves time, reduces unnecessary movements and generally makes life easier.
What else might be useful in the future? Well, these are first ways to select text. And it is selected either by moving the mouse over the selection area with the left mouse button pressed. Or using the Shift key and arrow keys. Well, or another very universal way. Hold down the Shift key and click the area where the selection begins, and then do the same by left-clicking where the selection area should end.
Word video lessons for those who want to understand the Word interface on a professional level and make the most of all the capabilities of this office program. I wandered around YouTube and found a selection of good lessons.
It's not that Word is so difficult that you have to learn it. But sometimes, for example, I have problems with Word; changing the case of letters (from small to large) causes difficulties. Other little things. So I think training in Word can be useful for everyone. Of course, the main thing is to be able to type quickly, and also to be literate. Word helps in this matter, for example, spell checking is very helpful. useful feature.
There are 39 MS Word lessons in this playlist. The lessons go from simple to complex, there is a whole video course, I have never seen anything like this before. In any case, it’s definitely not available for free.
Watch Word video lessons
It might also be interesting to see This program is quite a complex thing and it’s not always easy to figure it out at random; for example, Excel has always bothered me.
Friends, subscribe to and receive useful, educational, educational and unique, sometimes exclusive content in your mail... I wrote so much, I wanted to subscribe myself.
We are studying the most popular text editor, Microsoft Word. In this material, you will learn how to create a new document, enter, edit and format text, create lists, apply styles and much more.
With this article we are opening a whole series of training materials with which you will learn how to create high-quality text documents in the most popular application in this area - Microsoft Word (Word). The presentation here will be in a rather primitive language, which may at first scare away readers who are already partially familiar with this editor. But, believe me, you will most likely find useful information in this series.
Microsoft Word is a text editor (processor) used to create professionally designed documents. The name Word was not chosen by chance, because translated from English it means “Word”.
Due to the fact that Word combines the most modern text formatting tools, it can be used to easily create documents of any complexity and organize them. In addition, with powerful editing and modification tools, this application provides a convenient environment for collaboration several users on one document.
In the first part of the Word tutorial series, you will learn how to create a new document, enter and edit text, and get acquainted with some basic types of formatting. Here we will begin our acquaintance with the newfangled ribbon interface of the editor. We'll also look at creating bulleted and untagged lists, changing document fields, and much more.
PROGRAM WINDOW
When you open Word, the program window displays its two main parts: the ribbon located at the top (highlighted in red in the figure below) and a blank document that occupies almost the entire program window.
The ribbon includes a set of buttons and commands that can be used to perform various actions over the document and its contents (for example, changing the text size or printing it). The document window itself looks like an ordinary white sheet of paper and is intended for entering all kinds of test information.
Also above the ribbon on the left is the quick launch menu, in the middle is the name of the document, and in the upper right corner there are buttons for minimizing, resizing and closing the program window.
In the document that opens, in the upper left corner of the page you will see a cursor, that is, a small blinking vertical line. This line indicates that, starting from this place, the characters you enter will appear.
ENTERING AND EDITING TEXT
After opening the program, simply start typing and the letters, words and sentences you entered will begin to appear on the document page. To start typing on the same page, but one line down, you must press the Enter key. The number of times you press Enter will correspond to the number of lines skipped. As you enter text, the cursor gradually moves to the right. Once you reach the end of the line, simply continue typing letters. The characters and insertion point will automatically move to the next line.
If you need to start a new paragraph, press Enter to do so. As a result, the cursor will automatically appear at the beginning new line. If you need to make the spacing between paragraphs a little larger, press the Enter key again before starting to enter a new paragraph.
If you need to correct an error in typed text, just place the cursor to the right of the unnecessary letter and press the Backspace key. In this case, the cursor will delete the character to the left of it. If you need to erase an entire word, press the indicated key as many times as possible until the word disappears. There is another option for deleting an error: place the cursor at the beginning of the word, that is, to the left of it and press the Del key the required number of times.
Practice your text input and editing skills by typing a few random paragraphs, or type the version we suggested.
.jpg)
BUG CORRECTION
As you enter text, Word warns you if there are grammatical or spelling errors by highlighting them with a wavy green or red line. A green underline indicates that you need to check your grammar, and a red underline indicates possible spelling errors or that a word (for example, a proper name or place name) is not recognized, that is, it is not in the Word editor dictionary.
What to do with such underscores? To do this, you need to move the mouse cursor over the underlined word and press the right button. As a result, a small window will appear with suggested correction options. Select the required word and click on it with the left mouse button. The word will be replaced and the underline will be removed. If the word is not recognized, Word will not offer any options. Please note that if these underlines are not corrected, they will not appear on the printed pages of the document.
Similar actions can be done with green underlines. But keep in mind that Word is good at recognizing spelling errors, most of which are fairly easy to correct, but finding grammatical and usage errors on your own is much more difficult. If you think you're right and Word gives you the wrong options, simply skip the correction by selecting the appropriate option from the right-click menu and the underline will be removed.
If you don't feel comfortable paying attention to each underline, you can ignore them while typing, and once you're done typing, check the spelling and grammar of the entire document at once. To do this, open the tab Review at the top of the ribbon and select Spelling in the group Spelling.
If working with the tape still raises questions for you, return to this point later, as a description of working with it will be given below.
HIGHLIGHTING FRAGMENTS OF TEXT
In order to perform any actions with text in a document, you need to select it, and then apply the desired command to the selected area. To select an entire word or a preposition, just double-click on it, after which the selected area will be highlighted in blue.
To select an arbitrary piece of text, you can use two methods. In the first case, place the blinking cursor at the beginning of the fragment that you want to select. Then press the Shift key and, without releasing it, click at the end of the desired fragment. After this, the desired text will be highlighted with a blue background to indicate that it is selected. Click anywhere in the document to deselect.
In the second case, also place the blinking cursor at the beginning of the fragment, but this time hold down the left mouse button and move its pointer to the end of the desired fragment. After achieving the desired result, the button must be released.
If you need to select several fragments in different parts of the text, use the Ctrl key. Select the first section of text in any way, then press Ctrl and, without releasing it, select the next section, after which you can release the key. If you need to select another fragment, press the Ctrl key again and continue.
FORMATTING TEXT
To draw attention to important information For example, you can make text bold, italic, or underlined. But these are minor things. You can change its size, style, color, background and apply animation elements to it. And even this is not the entire list of capabilities that Word provides to users when working with text.
Now is the time to remember the ribbon (ribbon interface), which was discussed at the very beginning of the article, and find out how you can use it.
There are several tabs at the top of the working window. Each of them contains a specific set of actions. We need to select the second tab - Home(if it is not selected, you need to left-click on it).
Each tab contains several groups with commands that combine several elements. On the tab Home find the group Font(the names of the groups are on the bottom line of the feed). This group contains several commands and buttons that allow you to make various changes to the text.
In our case, select an arbitrary section of text or an entire word, then click on the corresponding buttons in the above-mentioned group to change its style.
.png)
As can be seen from the figure, after pressing the button Bold, the selected text has changed its style. Now let's make it more slanted and underlined by clicking on the buttons Italics And Stressed.
In this case, the underline can be either regular solid or wavy, dotted, double, etc. Use the triangle button on the right to see the full list of possible options.
.png)
From our example you can see that you can apply several types of formatting to one selection.
As you have probably already noticed, the group Font contains quite a lot of different useful buttons, giving the opportunity to change the font type and color, its size, strike out the font or convert it to superscripts and subscripts, add animation or background. Select a piece of text and try to apply all these formatting options to it yourself by clicking on the appropriate buttons.
STYLES
The method of making changes discussed in the previous section is convenient only if you need to change the format of just a few characters, words or sentences. To apply several types of formatting to the entire document at once styles.
Different kinds of styles are available on the tab Home in the group Styles. It is enough to select a style to automatically change the font, text size, attributes and paragraph formatting. For example, you can change the font style, make the text larger, and add bold formatting at the same time.
.png)
As you can see from the picture, after selecting a style called Heading 1, our first paragraph was transformed into a heading (the font size increased, its color and thickness changed).
To experiment, on the tab Home in the group Styles Hover your mouse over the different styles one by one. This way, you can see the changes that will happen to the document after you want to apply any option. To finally apply the selected style, simply click on it with the left mouse button. To view other styles, you can open the collection by clicking the button in the lower right corner of the arrow block Other.
CREATING LISTS
If you need to create a list in a document, you can also do this on the tab Home in the group Paragraph(which is to the right of the group Font).
Let's practice. First of all, separate the text that will be converted into a list into different paragraphs using the Enter key. At the same time, these can be either individual words or entire sentences.
In our example, we decided to format the last paragraph as a list.
.png)
Now select the text you want to convert into a list. In the Paragraph group, click the button Markers. The text will be converted to bulleted list. Without deselecting the list, press the button Numbering to create a numbered list.
.png)
.png)
PAGE FIELDS
Page margins are the empty space around the edges of the page. By default, the margin widths at the top, bottom, left and right of the page are 2 cm, 2 cm, 3 cm and 1.5 cm respectively. This is the most common margin width and is often used for most documents. But if you need fields of a different size, you need to know how to change them. Other margin sizes may be useful, for example, when creating short letters, recipes, invitations, or poems.
The ribbon is also used to change the size of the fields. Only this time use the tab Page layout. You must first click on it to select it, and then in the group Page Options select item Fields. Images (icons) of fields and their sizes will appear in front of you.
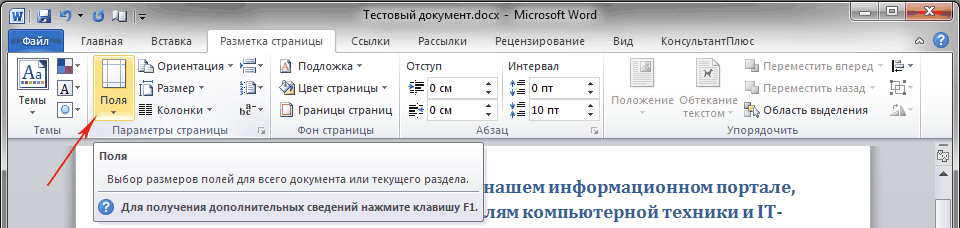
The first value of the list is a field Normal, which is active in at the moment. To create narrower margins, you must click the button Narrow. If you want to make the left and right margins much wider, click Wide. When you select a margin type, it will automatically be applied to the entire document.

When you select fields, the background color of their icons will change. When you press the button again fields, Thanks to this change in background color, you can determine what size margins are set.
WINDOWBACKSTAGE
In order not to lose the changes made in your work, you need to save them, and the sooner you do this, the better. To do this, open the very first tab on the ribbon File. A large window called Backstage will appear, in which you can perform various operations, for example, save, open, print documents, and so on.
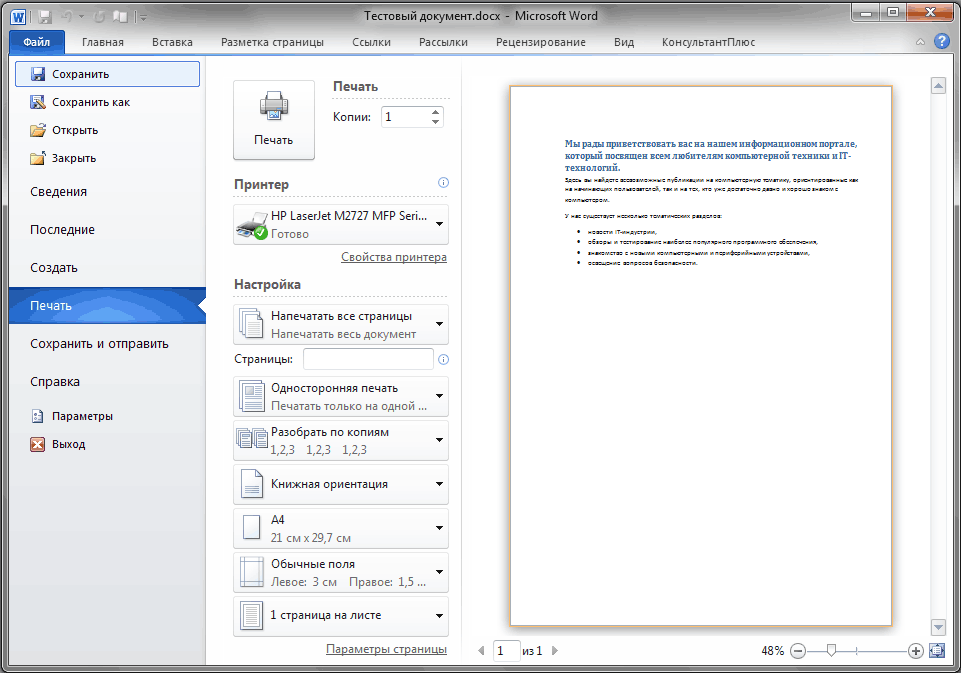
In the left area of the window that appears, select Save. A new, smaller window will appear. In this window you need to indicate where on the computer you want to save the document, as well as what name it will have. After saving the document, continue working by saving it periodically. It is also very convenient to save a document at any time by pressing the Ctrl+S key combination.
If the document is ready to be printed, open the tab again File. In the left area of the menu that opens, select the command Seal. A large window will appear in which you need to click on the line Seal. Of course, a printing device - a printer or MFP - must first be connected to the computer. As in many other cases, you can print a document using hot keys - in this case, the key combination is Ctrl + P.
After work on text document completed and the document is saved, close the file. To do this, open the tab File and in the left area click Close.
To find a document after you've closed it, view the list Latest documents . Click a document in the list and it will open.
To finish working in Word in the tab File select a team Exit at the very bottom of the menu or just click on the cross in the upper right corner of the program window.
CONCLUSION
With this, let me finish the first part of the training materials dedicated to the most popular text editor, Microsoft Word.
To consolidate the acquired skills, be sure to practice your acquired knowledge by typing several short texts yourself and applying various formatting elements in them.
In the next part, we'll learn how to cut and paste chunks of text, change line spacing, do alignment, use formatting marks, and much more.