The review looks at how to configure a router equipped with a built-in ADSL modem. For example, we use a multifunctional TP-Link router model TD W8901G, which allows you to quickly set up a connection with your provider and wireless network.
Operating principle WiFi router equipped with an ADSL module - allows you to create a connection “via telephone wire” without occupying the line. Included with an ADSL modem or multifunctional router is another device called a “splitter.” The connection diagram is shown in the figure.
First, a connection with the provider is configured, then you can turn on the wireless network. The Internet will become available to all its subscribers automatically.
To set up a Wi-Fi router, you need to connect one computer to it via a network cable (the patch cord that comes with the kit). Let's take a closer look at the setting.
Setting up the router
Connection, login to GUI
Before setting up, you need to connect a telephone cable to the device, as well as a patch cord that is connected to the computer’s network card. Network card on the computer - you need to configure it like this (“properties” of the wired connection):

That is, the computer will receive an IP address and DNS addresses from the router in automatic mode. Lastly, you need to turn on the router's power supply.
After waiting 2-3 minutes for the device to boot, on the computer you need to launch the browser and go to the address 192.168.1.1:

The “admin” pair is suitable for TP-Link as a login and password. In the next step, a tab will appear in the browser window:

Device setup wizard
Here, you need to click “Exit”.
Connection setup
The instructions for setting up the router provide all connection options, even when the device operates in “bridge” mode, typical of inexpensive ADSL modems. Still, let’s consider the operation of the device in “router” mode. We need to connect to a provider that uses the “PPPoE” protocol. If you use a static IP, you need to select “PPPoE encapsulation” in the settings; if you use a dynamic IP, do the same. Now let's look at an example setup.
The router menu at the top contains a list of tabs, and the line below it is a list of bookmarks. Go to the “Interface Setup” tab to the “Internet” tab:

One example of configuration is shown when the IP address is not fixed (that is, dynamically obtained). In any case, you need to select the type of encapsulation “PPPoE”, then you need to come up with a name for the service, and fill in the fields with the subscriber’s name/password. Most providers use "LLC PPPoE", as shown in the example (but another variant of "PPPoE" - "VC-Mux" - is also possible).
If you want the router to automatically connect (even in the event of a short-term connection break), then you need to select “Connection” – “Always”. We said that we are setting up a connection with a dynamic IP address, and leave the “Get IP Address” switch in “Dynamic”. A router without access to the Internet is not endowed with any IP address at all, which it can obtain after creating a connection.
Finally, if you plan to watch IP-TV, select “Enabled” in the “Multicast” line. You can also replace MAC address, for which “MAC Spooling” is transferred to “Enabled” and the value field is filled in (but it may be easier to inform the provider about the MAC address change).
Finally, let's look at the hard part. If the provider does not use “ATM”, the TD W8901G router configuration allows you to disable this option by setting “Status” to “Deactivated”. Otherwise, you will have to set the VPI and VCI values, which you also need to find out from the provider.
- VCI=33 VPI=0, with IPTV VCI=34 VPI=1.
- VCI=33 VPI=0, with IPTV VCI=32 VPI=0.
- VCI=32 VPI=0, with IPTV VCI=34 VPI=1.
Three different providers use "a little bit" different meanings, but guessing is useless, you need to know for sure. After completing all the settings, just click “Save” and the connection will be automatically created. You can verify this by opening the “Status” -> “Device Info” tab.
You can often come across the question: “Help me configure the router, all parameters are set correctly, the connection is not created.” It is possible, and most likely, that the provider binds to the MAC address, but this fact was not reflected in any way in the router settings.
Enabling the wireless network
To configure a wireless network, go to the “Interface setup” -> “Wireless” tab:

Setting up a WiFi router called “Access Point” - allows you to enable or disable the wireless network transmitter. It's on now. Next, the wireless network is configured as follows:
- Channel: list of channels - depends on the region. Number (1-13) – set in the list (leave “Auto”).
- Mode: leave “mixed” b+g.
- The “Broadcast SSID” switch allows you to “hide” the network name (“Yes” means do not hide).
- The SSID field must contain the name of the wireless network.
Once you have completed these settings, click “Save”. In less than a minute, the wireless network will appear. Her name is the one that was set by the user. Encryption is not used.
The TP Link TD W8901G router, of course, allows you to enable encryption. To do this, in the “Authentication type” list you need to select the encryption type:

Additionally
IP-TV

An example of setting up a LAN that allows viewing IP-TV is given. Broadcast digital television will go, among other things, to a wireless network. For the settings to take effect, you must click “Save”.
All this is true if, when setting up the connection (“Interface Setup” -> “Internet”), the “Multicast” line is set to “Enabled”. Happy setup!
A multifunctional network device, including a router and an ADSL modem, must have a certain set of capabilities. In the absence of some of them, the acquisition is useless. The “top routers” usually look at which device is faster than others (easier to set up, more reliable, etc.). But an ADSL modem that does not have the necessary options in its settings (for example, the choice between “VC-Mux” and “LLC” modes) may be 100% useless. When choosing, you should carefully read the specifications, comparing them with what is required for a given provider.
Objectively, it may be like this: the router organizes a “high-speed” wireless network, data exchange between internal subscribers is very fast, but the Internet through the router slows down, and for a completely different reason. The total transmission speed between the router network subscriber and the provider depends on some features in the implementation of the router. For example, in the speed of exchange (routing) between home network and a built-in modem.
Although, with speeds of a few megabits, the latter is still a rarity. The “slowest” routers we know of can slow down connections when there are about 100 of them, reducing the total speed to 10 Mbps. Most providers do not provide even 8 megabits. So, it all depends on the quality of the ADSL modem itself and the wires used by the provider.
Question and answer
Question: A router with ADSL can operate in bridge mode. What does it mean?
In “bridge” mode, a device with an ADSL module does not receive an IP, does not tell the provider a password, and does not initiate a connection. That is, it is an “adapter” between the LAN network interface and the telephone cord. With this setup, the “bridge” must “know” only 2 parameters: VPI and VCI.

Connection diagram for the TD W8091G router “bridge”
You can connect another, more modern router via a TP-Link Wi-Fi router configured in “bridge” mode. In this case, only one LAN port (any of the four) is used in the TP-Link device.
Question: setting up the W8091G router for multinex – what will it look like?
Firstly, you need a router without an ADSL module. Secondly, its options must support "802.1x MD5" (connections of this type). There are only a few routers that allow this feature without reinstalling the firmware, but they do exist.
Question: how to reset the TD W8091G router without pressing reset?
You can return the settings to factory defaults from the graphical interface. Go to the “Maintenance” -> “SysRestart” tab:

Reset tab
If you select “Factory...” here and click “Restart”, the settings will return to their default values.
Question: is it possible remote control a router that is connected to the ISP via ADSL?
In general, the answer is this: the router must support telnet control. And also, the administrator needs to know the IP address of the router on the Internet (for static IP - this is simple, for dynamic addresses - there must be support for a special service in the router). The TP-Link model discussed in the review fits both requirements, but supports only one service (dyndns.com).
Question: can a Wi-Fi router work and distribute the network without an Internet connection?
Yes, it can (to do this, just set up a wireless network).
Requirements for use
Updated 04-06-2016 15:04:11 PM
This article is suitable for:
TL-WR54KIT , TL-WR841N , TL-WDR3500 more
TL-WR54KIT , TL-WR841N , TL-WDR3500 , TL-WR743ND , TL-WR543G , TL-WR2543ND , Archer C50(V1) , TL-WDR4900 , TL-MR3420 , TL-WR941ND , TL-WR843N , TL-WR710N , TL-WDR4300, TL-R402M, TL-WR541G, TL-R860, TL-WR702N, TL-WR802N, TL-WR700N, TL-WR841HP, TL-WR340G, TL-WR1043ND, TL-WR1042ND, TL-WR300KIT, TL- WDR3600 , TL-WR542G , TL-WR842N , TL-WR150KIT , Archer C20(V1) , TL-WR940N , Archer C7(V1 V2 V3) , Archer C20i , TL-WR741ND , TL-WR740N , TL-WR840N , TL-WR841ND , TL-WR810N , TL-WR340GD , TL-WR720N , TL-WR843ND , TL-WR842ND , TL-MR3020 , Archer C5(V1.20) , Archer C2(V1) , TL-R460 , TL-MR3220 , TL-MR3040
Note: This article will not be suitable for you if your connection is made in the following ways:
- You have a cable/fiber modem. Internet access is provided automatically without any settings. However, only one user can access the Internet.
- Before acquisition TP-Link router your ISP has provided you with a static IP address. You need to manually enter an IP address on your computer to access the Internet. In this case, please refer to these instructions.
- Your ADSL modem can provide Internet access to multiple devices. In this case, please refer to these instructions.
Additional preparation:
- Turn off power to your router, modem, and computer.
- Connect the modem to the WAN port of the TP-Link router using an Ethernet cable, main computer connect to the LAN port of the router using an Ethernet cable.
- Turn on the power on the router, then on the modem and computer in sequence.
Note: Make sure you can access the Internet via modem, without using a TP-Link router. If the direct connection does not work, contact your Internet access provider.
Step 1: Login to the router's web-based configuration utility.
If you have problems accessing the web-based utility, please refer to these instructions.
Step 2. Configure the WAN connection type.
After logging into the router's web-based configuration utility, go to the " Net", subsection " WAN" In the line " Connection typeWAN» select « PPPoE" as shown below. Then click the " Save».
Step 3: Enter the details provided by your Internet Service Provider
Enter the username and password provided to you by your ISP.

Step 4. Save settings.
Step 5: Check the connection.
Wait a few minutes and check the information on the page " State" in the section " WAN" If the router receives any IP address (similar to the one shown in the image below), then this will mean that the connection between the router and the modem has been established.
Modems from TP Link are popular all over the world due to their simplicity, reliability in operation and high quality manufacturing.
Despite the reasonable prices, the routers of this company have the entire list of necessary functions for use at home.
Setting up the device will not be difficult even for novice users, but for the first time it is recommended to perform all the steps yourself using the instructions.
The information below will introduce you to TP Link equipment and help you quickly understand the procedure for entering network parameters in the device’s web configurator.
Modem connection procedure
Connections are made using the connectors on the rear panel of the device. Depending on the router model, their location and characteristics may vary, however, slightly.
 TP LINK equipment often includes a “1” switch. This distinguishes the device from some devices from competing companies, since to turn off the device there is no need to constantly unplug the power cord from the socket or remove the adapter from the electrical outlet.
If the socket is located in a hard-to-reach place, this creates additional difficulties for the user to operate the device.
You need to install a plug from the power supply into the round socket, marked “2” in the figure above.
The cable from your service provider should be inserted into socket “3”. Often in TP Link devices it is highlighted in a separate color, for example, dark blue, and is also signed below with the letters “WAN” or “Internet”.
Establishing a connection with computers is possible via LAN ports (numbered “4” in the picture). Thus, it is possible to create a local wired network of four PCs.
By connecting a patch cord to one of these connectors, the modem firmware is configured and updated.
Some modifications of the device are equipped with a “QSS” key (indicated by the number “5” in the figure). Thanks to it, it is easy to connect to Wi-Fi over a closed network;
The last key, numbered “6”, recessed into the body of the device, also has an important function.
Using it, the device parameters are rolled back to the factory state. The manufacturer often denotes it with the word “Reset”, which translated into Russian means “Reset”.
Step-by-step connection instructions for setup:
- Insert the power supply plug into “2”;
- Set the provider cable to “3”;
- Connect one of the connectors “4” with a patch cord to network adapter laptop or desktop PC;
- Connect the adapter to a 220 V outlet;
- Press key “1”;
- Wait for the firmware download to complete;
- Sit down at your PC and begin the process of specifying network parameters.
Setup procedure
The answer to the question of how to enter the tp link modem settings is not original, as it is completely standard.
If the user has previously had to work in the router interface, then he will not even need the instructions described below.
Login to the device configurator is carried out through an Internet browser.
Sequence of actions when setting up:

Now all that remains is to configure the wireless network.
Wi-Fi setup
To be able to safely work with any gadgets that have a built-in wireless module, you only need to take the following few steps.
Setting up the TP-LINK TD-W8961ND modem is very simple. The instructions are also suitable for other tp link models. We will set up IP TV ZALA, Internet, WiFi. I will divide the procedure into three points: 1. Set up the Internet. 2. Connect WiFi. 3. Let's set up IPTv (Zala). I will give an example for the ByFly provider. .
Setting up the TP-LINK TD-W8961ND modem, connecting to the Internet
Open any browser and enter:
- In the address bar of your browser write 192.168.1.1 and press Enter.
- In the window that appears, enter your username and password. Name- admin password- admin.
Let's move on to setting up the internet:
- Tab " Interface setup".
- Select " Internet".
- Click brief information and remove all PVC channels. (select the channel after viewing, delete the button at the very bottom. After deleting the involved channel, select the pvc0 channel and we will configure it).
- Find out from your VPI, VCI provider. I write 0-33 for ByFly.
- We set the PPPoE mode.
- We enter the name and password given by the provider or specified in the contract upon conclusion.
- We do it as in the picture Rip2-b, img v2. Don't forget to click save. Here we have set up the Internet for the Belarusian provider ByFly "Beltelecom".

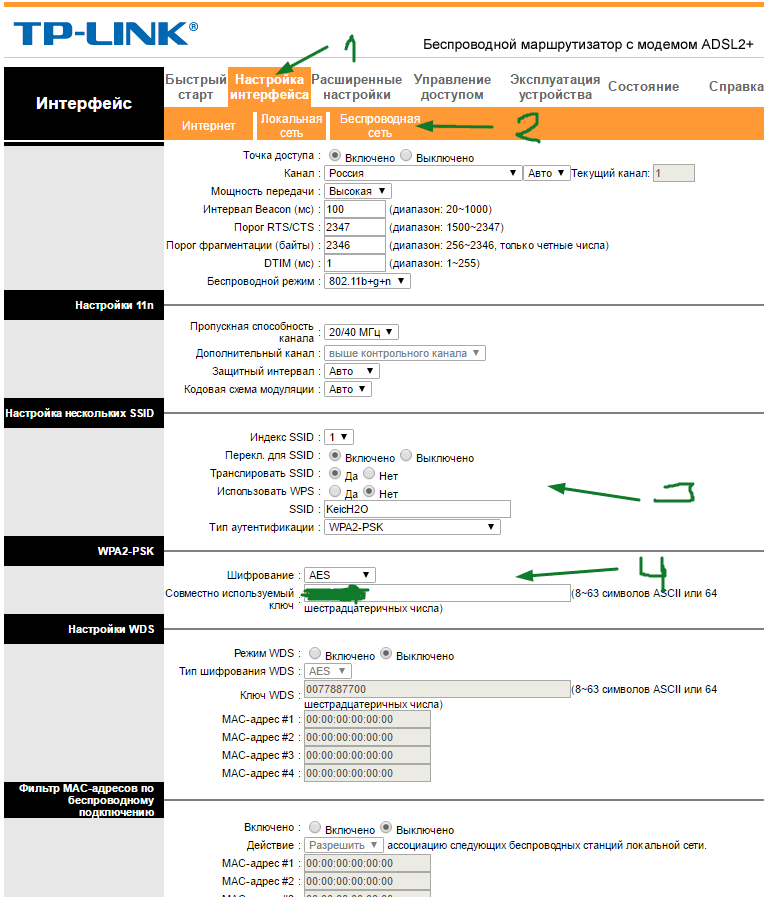
I’ll start right away with the third point, setting it up according to the picture:
- 3. Enter the WiFi network name.
- 4. Create a password. Don't forget to save.
Here we have configured WiFi for distribution from the router.
Setting up the TP-LINK TD-W8961ND modem (IP TV, ZALA-ByFly)
Let's move on to the settings, as we configured the Internet before. Interface, Internet:
- Select a free channel PVC1. I would like to remind you that pvc0 we had the Internet configured, choose another one. Don't forget state must be enabled.
- Find out from your provider or Google the value of your vpi. Depends on the region. Below I will add values for Belarus.
- Select bridge mode.
VPI/VCI values


Let's go to local network. You need to connect Zala to the modem and turn on the set-top box.
- We connected IP Tv Zala, the Node name "00100199..." appeared. You need to select "mac-adres" rooms in the DHCP table.
- Set to statistical mode.
- Disable the fourth port.
- Set it up as in the screenshot.

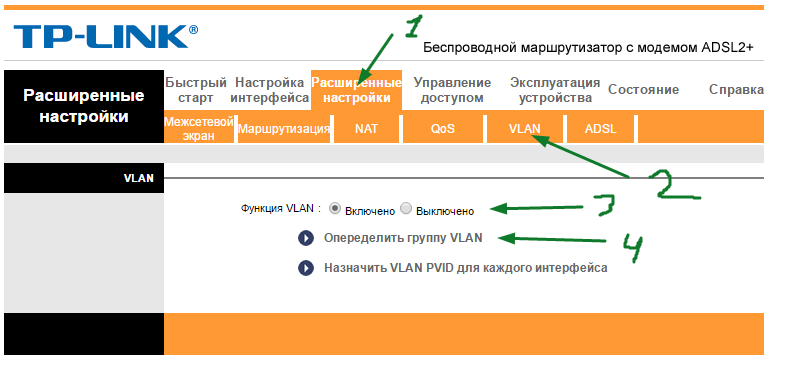
- Let's go to advanced settings.
- Click on VLAN.
- Enable the VLAN function.
- Click on "Define group".
Configuring VLAN ports for the Internet:

Configuring VLAN ports for IP TV:

Let's go back and poke" Assign VLAN PVID for each interface".

Now we need to assign a PVID. Look, we configured ports for Zala under the identifier “2”. The virtual channel is our PVC1. We put our index two for television. Don’t forget that we also set two in the fourth port. Well, of course, for Bssid#4 we set “2” in case of wifi on the TV.