The main advantages of Windows 7 include the ability to simply customize the monitor screen to suit the user's requirements. Of course, it won’t be possible to significantly modify it, but it’s possible for everyone to customize it to their own taste.
The bulk of all the necessary tools for adjusting the screen and font size are located in the “Control Panel” - “Design and Personalization”. It’s even easier to configure by right-clicking on the screen, a menu will appear where you need to click on “Personalization”.
Settings Windows screen 7 includes different options: color of the desktop and windows, cursor size, type of sound notifications, etc. It is possible to manually configure each interface parameter. However, it is easier to perform simultaneous customization by using the standard themes provided in Windows 7.
Themes
There are the following 3 types of topics:

Standard ones do not have decorative elements operating system(soft lines, transparency, shadows) and create a businesslike look.
The advantage is that it reduces the load on computer hardware. This allows older Windows 7 PCs to be used.
Aero has various background images for the screen, changing periodically in automatic mode, as well as individual window color.
High contrast – designed for visually impaired users.
If desired, it is possible to download more themes from the official Microsoft website. To do this, click on “More Internet Topics”. There is an abundance of topics available to the user here.
But sometimes you only need to change the desktop image or just the window color, etc., without changing the design as a whole. All the required functions for this are located at the bottom of the “Personalization” menu. 
Screen background
To change the desktop picture, you need to click on “Desktop Background”. In the window that appears, select the picture you like or a number of them.
 You can choose from standard set pictures in Windows, but by pressing the “Browse” key you can select an image from the “My Photos” or “My Pictures” folders.
Below the picture selection menu there are keys for placing them on the monitor, as well as a slide show function.
Windows background
You need to click on “Window Color” in “Personalization”. There is the possibility of correction - changing the color and tone of all windows in Windows, and it is also possible to adjust transparency, color shades and brightness.
 If the user does not have enough of these settings, he should enter “Advanced design options”.
Sounds
In order to configure sounds for events in Windows, you need to click on the “Sounds” button in the “Personalization” menu. You need to decide on the choice of a standard scheme, or manually select the sounds that accompany operating system events.
 Perhaps you can simply turn off the sounds by activating the "Mute" function.
Screensaver
To configure the monitor screensaver, you need to click on the “Screenaver” button in the “Personalization” menu.
By default, Windows 7 has 6 screensavers, but if necessary, global network There are a large number of screensavers.
 To save energy, it is recommended to simply turn off the screen saver.
In the “Personalization” window, commands are available for adjusting icons on the monitor screen, adjusting the cursor and changing the image of the account icon.
How to change font sizes and screen resolution?
To ensure the convenience of working on a PC, you need to adjust the size of icons, fonts, and the clarity of display of inscriptions and images.
These parameters significantly depend on the screen resolution - this is the main parameter of the monitor, determining the number of pixels that fit on the screen.
To adjust the resolution, you need to right-click on the desktop and click “Screen Resolution”. It should show "recommended" in the resolution bar.
With a high value of this parameter, the display is of better quality, but the font on the monitor is significantly reduced, i.e. it becomes inconvenient to work.
 To change the font size in the Screen Resolution window, click “Make text and other elements larger or smaller.” A menu will appear asking you to select the required scale.
image source http://4k-monitor.ru
Good and correct display settings are not the last task in order to work comfortably and efficiently not only with images, but also simply at the computer. The factory settings of monitors are always too high for brightness and contrast; manufacturers do not make adjustments at all, and users themselves often simply do not know about it.
I note that we will talk about the simplest screen settings; professional calibration is much more complicated.
You can configure it both software (if your display is connected to a PC with an operating system that has tools for such settings) and hardware. Adjusting using the menu buttons is not much different from adjusting the picture on a modern TV.
Hardware setup
Start by learning the buttons on your monitor. If nothing is clear, then you will have to read the instructions, or use the “unscientific poking method” (not recommended). After you have figured out the control buttons of the device, you can go directly to the settings.
Important note: ensure proper lighting! If the sun or a 200 W light bulb hits the monitor directly, no adjustments will help. Well, this is a separate big topic, but now there are a few basic recommendations:
- The bright light source should not directly illuminate the monitor;
- The light should not hit the eyes;
- It is better to use uniform diffused lighting, for example, in the form of an LED strip.
Setting and assessing image quality
When working with a monitor with a low-quality matrix, errors often occur when choosing colors when processing images, photographs and on print layouts, when creating websites and resources.
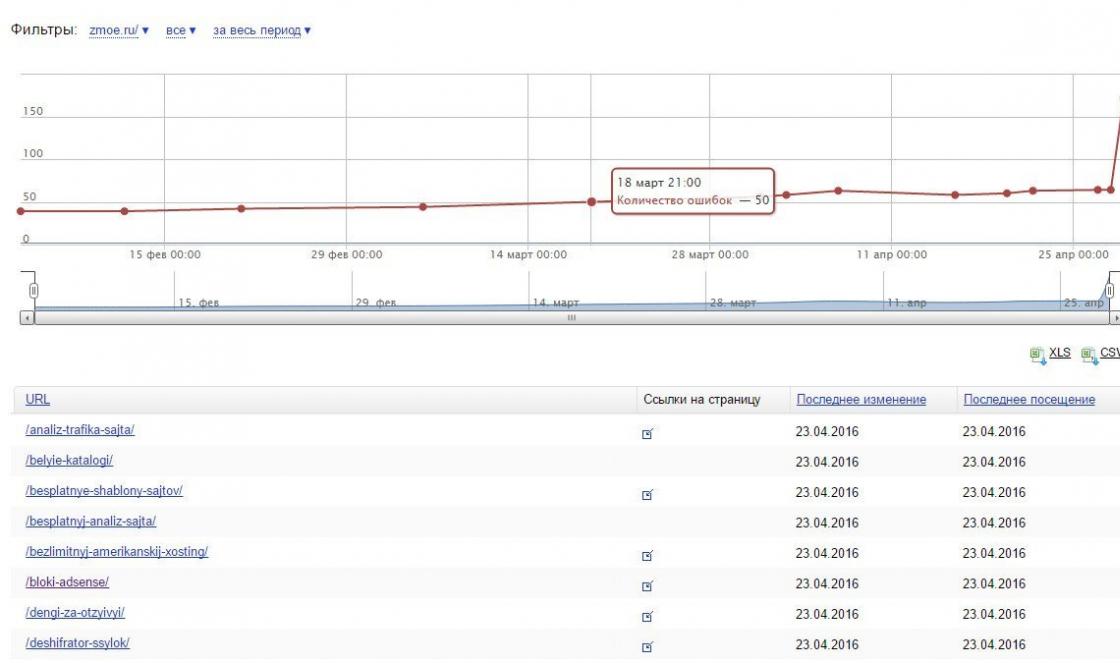
The picture below will allow you to evaluate how well the monitor is configured. On each half of the picture there are numbers 1 2 3 4 5
If you see all the numbers on both bars, then the monitor is set up well. The average level will show you the numbers 3. With a very bad setting, only 1 and 2 are visible.

Remember how many numbers you can see. With this, after configuration, you can evaluate the quality of the improvements made.
But, first, a small off-topic “with a beard”:
“...I downloaded the program “Cleaning the monitor from dust”, laughed, installed it, launched it. The monitor was filled with an even dirty gray color, the keyboard turned off, clicking the mouse did not help.
I took a napkin, wiped the dust off the monitor, and saw a barely visible “Thank you, you can exit the program” button. I went out and thought, looking at the blank monitor...”
Therefore, first we put the surface itself in order, after which we move directly to the settings.
Brightness
The brightness should be adjusted so that in the picture the black colors of the suit and shirt do not merge into a single whole and the cross in the background becomes visible. The brightness parameter is responsible for the difference between details and dark colors.

Contrast
Responsible for light colors and their details.
In the image, to adjust the contrast, you should select a quality such that the folds and buttons on a white shirt are clearly visible. Set the contrast to zero and gradually increase it. As soon as these details begin to disappear, it is worth going back a little.

Gamma
The next important parameter is gamma. The exact ideal setting cannot be performed on all monitors, but it is still worth getting closer to the ideal. A good gamma setting will be indicated by missing spots of light and dark shades in the center of the test image.

Gray setting
Eliminates unnecessary shades that distort the colors on the display. This is done either software or hardware by adjusting the 3 primary colors (red, green, blue). Ideally, a picture with gray stripes should not be interrupted by extraneous shades. Only shades of gray.

Ideal gray setting.
Software setup
We launch the calibration tools programmatically (described for Windows).
In Windows 7, click the “Start” button and write the word “calibration” in the search bar. Launch. You will be given a series of image adjustment tests. There are very few of them. Go through them.
In Windows 10, enter the command cttune in the search bar, ClearType will launch, turn it on and select the display that is most convenient for your eyes. Then enter the dccw command. The calibration of screen colors, gamma, brightness and contrast will begin. Everything is described in the tests, read and follow the advice.
Checking the result
Now go back to the beginning of the article and look at the first image with numbers. At the very beginning, I asked them to remember. If you have improved the settings, you will see at least one more number.
Set it up correctly and in the end you will be pleasantly surprised at what your monitor can do!
Have you set up your monitor? Get to work: profession "".
The poor quality of the matrices in mainstream monitors makes it difficult for users to accurately identify details and colors in photographs, printed designs or other images. But everything is not so hopeless. There is no need to run to the store for a new one. How to adjust your monitor to improve image quality?
First of all, we need to take into account that we are talking about a consumer approach. Professionals are guided by completely different tasks and opportunities. And their requirements differ from everyday ones. Professional decisions require serious costs, which are unlikely to be justified if your earnings do not depend on the quality of the image.
Why adjust your monitor?
A monitor can be good or bad, but more often it turns out to be incorrectly configured. Many of us have noticed the difference in colors on our TV and those of our parents or friends.
You should also understand that a person has individual vision characteristics, so everyone perceives the image differently. In addition to the visual characteristics of the person himself, monitor settings should also be taken into account.
Default computer settings, standard drivers, the use of inappropriate color profiles, standard cords, or incorrect screen placement - all this has specific value. Therefore, you should not rely solely on images on the Internet.
Photographers often show portfolios to potential clients on their laptops, which are set to the appropriate settings. But photos may look different on a different monitor. Therefore, you should not rely on the monitor to assess the quality of pictures. The only way to universally check quality is to print photographs.
How to properly set up a monitor - where to start?
Before setting up your monitor, you should remove possible obstacles to normal color reproduction (with maximum shades for this monitor) and full color perception. First of all, you should place the Monique in a place where there will be no interference from outside lighting. Look around the room - it is optimal that there are no windows in the chosen place, and that the lamp light does not fall directly or at an angle.
Designers also use special curtains that help limit glare and side light. For ordinary users, such curtains may be overkill, but you can at least place them on the table so that no light enters the screen.
Let's consider an image specially created to evaluate the quality of the picture on the monitor. This image contains 2 halves - white and black. Each half is marked with numbers 1-5. If the matrix is of sufficient quality and well configured, you can see all the numbers from this list. Owners of a mid-level monitor can see numbers 1-3. If only numbers 1-2 are visible, or it was not possible to notice them at all, the problem must be solved - this is what our article is intended for.
The issue of changing the display resolution and selecting its optimal value is quite acute for novice Windows users. Today we will touch on its solution, considering several different options for getting out of the situation.
What is permission
Typically, screen resolution refers to the size of the image formed on the display in pixels. It implies a value relative to the physical dimensions of the matrix: the number of pixels is divided by the physical size of the display in inches. That is, the number of pixels does not increase in proportion to the physical size of the display, which immediately dispels the myth: the larger the screen, the higher its resolution.
Changing the resolution may be necessary after reinstalling Windows or drivers on the video card if its value was not set automatically. It is also necessary to expand the screen when launching games - routines do not always correctly determine the resolution settings in Windows in order to apply them to the game.
Solving the problem in Windows 7
You can change the resolution value (the number of pixels vertically and horizontally) on your computer using several methods.
Feature integrated into Windows
To expand the screen in Windows 7, we perform a list of simple actions that any beginner who wants to choose the optimal value for the number of pixels used to display the image on the display can handle.
- Call the context menu of the desktop area free of icons and select “Screen resolution”.
The second method to open the same window is through the Control Panel item called Display. Click on its icon and select “Adjust screen resolution”.

- In the line of the same name, select the desired value from the list of suggested ones.
- Click “Apply” to evaluate the selected settings.

Follow the advice of the monitor developers and select the optimal setting value they recommend. There is always a “Recommended” sign next to it. If there are two or three items in the list, check whether the drivers are installed on your video card. Without them, you won't be able to change the resolution to a higher resolution than 1024x768.
Video card driver
If you have a driver installed for the video adapter, you can change the extension using the one that comes with the driver software. Moreover, these programs will differ for different video chip manufacturers, but the principle will remain the same, and the algorithm for changing the extension value will be almost identical.
nVidia
When using more popular and, as a result, more expensive with the same performance, video cards from nVidia, the control panel for device operating modes will help you change the resolution.
- Call the context menu of free desktop space.
- Select the item highlighted in the screenshot to launch the window for setting up various video card parameters.

- Expand the “Display” menu item, where we click on the link shown below.

- When using multiple monitors, select the target for which we want to change the settings and determine the resolution value.
As already mentioned, you should choose your own resolution, assigned to the first position.
- Apply the new settings and close the window.
If you have a video card developed on an ATI graphics chip from Radeon, we perform the following steps in Windows 7.
- Call up the desktop context menu and click on the first item in the drop-down menu, or open the application via its tray icon.

- Click on the “Display” button, then click on “Advanced settings”.

- Select the desired parameter or enter it manually (which is also allowed) and save the changes made.
Third Party Applications
In addition to the proposed options, which are considered classic, it is possible to change the resolution using special programs. These are utilities for setting up the monitor, overclocking and configuring the video card.
Let's look at how to do this in a video adapter overclocking application called PowerStrip and a program designed to set display performance characteristics.
- Launch the PowerStrip program in Windows.
- Drag the slider located in the “Resolution” frame.
- Click “Save” to apply the parameters.

Very often users are faced with a situation where the monitor displays the message “save mode”, “out of range” or “ unsupported resolution" or «
»
.
This means that the video card settings have set a resolution that the monitor does not support.
On many forums and websites you can find the following advice:
“To change the screen resolution you need to booting Windows press F8 and set some minimum resolution, then reboot in normal mode and enjoy life.”
But, as practice shows, this does not always work.
I want to share 100% way to reset screen resolution on computer.
In order to reset the screen resolution, you really need to boot the computer in Safe Mode, but let's go point by point.
- When loading Windows, press F8;
- Select the item “boot the computer in Safe Mode”;
- Press the Windows + Pause key combination (we get into the properties of my computer), go to the Hardware tab, click the Device Manager button;
- Expand the list of Video adapters;
- Select your video adapter, call up the context menu and select Disable (Windows may ask “Do I need to remove drivers?” You can answer “no”, but sometimes it is necessary);
- Reboot the computer in normal mode;
- And now you don’t need to do anything, we see a miracle, Windows will re-detect the video adapter and reset the monitor screen resolution.
This method has helped out many times.
There is another way to reset the screen resolution - go back old monitor or reinstall Windows :) Why are you laughing, on many forums I have come across advice about reinstalling Windows! Just imagine, a 5-minute problem can be solved in a few hours.
How to boot Windows 10 into Safe Mode to reset your graphics card
In the comments they asked the question (stated): " Windows 10 can't boot into safe mode without first enabling this option in the OS itself , and since it is impossible to enable this option without a working monitor, your advice for Win 10 users is not relevant. Any other thoughts that would be suitable for Win 10?
PS: I don’t have another monitor at hand, nor do I have a built-in video adapter. "
This is not entirely true... Yes, you can actually enable the boot menu only from the “working” Windows 10. But the boot menu, where there will be “Boot in Safe Mode”, can be called up several times by restarting the computer with the Reset button on system unit. Windows 10 will understand that for some reason it cannot boot and will offer various recovery options. Once you boot into safe mode, you can perform all the necessary steps to reset the screen resolution in Windows 10, which are described above.
FAQ
Q: how to reset screen resolution via bios
A: information about screen resolution settings is stored in the operating system configs; you cannot reset the screen resolution through the BIOS