Is it difficult to configure ASUS routers? Perhaps, it is this Taiwanese company that has the graphical interface of its “native” firmware that looks as user-friendly as possible. Basic setup such a router (RT-N of any series, WL-500 and 520, RT-G32) can be completed in 2 minutes. But first, you need to find out the address of the ASUS router in order to enter the web interface. The standard address value for ASUS devices is the following: 192.168.1.1. This is true even for routers with a built-in ADSL block. Indeed, why change anything if the standard values are given in any setup manual? The standard login and password for entering the interface is the “admin” pair.
The only case when problems may arise is if someone has already “configured” the router, and did it in such a way that the value of the IP address and password became different.
Therefore, the first piece of advice. If the router is not new, turn on the power, wait a minute, press reset on its case. The reset button must be held for 10-15 seconds, then released and turned off the device. True, ASUS has a button called restore.
Asus router (red button – restore)
Now we will look at how to connect the router to a computer, and then go to the web interface.
Preliminary steps before setting up
Connecting the router's wired connections
To configure the router, you need to connect it to the computer with a network cable. The sequence of actions before setting up is as follows:
- To the WAN port (blue) - you need to connect the connector of the provider cable
- Any LAN port – connect to an Ethernet port network card computer (using the patch cord included)

ASUS router hardware connections
- Before turning on the router, it is recommended to check that the wired connection is configured correctly on your computer

An example of correctly setting up a PC network card
- If all of the above is done, you can turn on the power to the router. And send the computer to reboot.
We will configure the router from the GUI. Now let’s look at how to find out the interface’s IP address yourself.
When the connection between the computer and the router is established, you can right-click on the icon for this connection. Next, select the word “Status” and go to the “Support” tab:

Connection Status - Support
In the first line of this tab, the user sees the IP address of the computer (the address looks like 192.168.1.XX). Well, the “IP” of the router ends with “one”.
For example, if the computer is assigned the address 192.168.1.13, then the web interface of the router can be opened by going to the following address: 192.168.1.1.
Although in most cases the IP address of an ASUS router is 192.168.1.1, we have looked at a universal method here (allowing you to find out its value). Let's move on to the settings.
Login to the web interface
When the router boots up (which will happen 40 seconds after turning on), the computer will establish a connection with it. Next, you can open any browser and go to the address whose meaning we found out: 192.168.1.1.

Entering the device setup interface
The router will ask the user for a login and password. The pair “admin” is suitable here. After 2-3 seconds the user will see the following tab:

Interface start tab
On the start tab you can only configure wireless network(change the SSID name, set a password). Internet connection settings are hidden in another tab, “Advanced Settings” -> “WAN”.
Change the settings to suit your needs
Changing the password for the web interface
For some reason, it is this option that usually raises questions. Username and password can be changed in routers, but with some restrictions. For ASUS, for example, the user name, that is, the login, cannot be changed (it always remains “admin”).
To set a new password value, in the router’s web interface go to the “ Additional settings" -> "Administration" (then go to the "System" tab):

Setting a password
Set the top field to the password value. Confirm it in the next field. Click Apply. Next time, you will only be able to access the web interface with a new password.
Happy setup!
Changing the router's IP address on the local network
If the user is on at the moment– the default address value is not suitable, this can be corrected. Go to the “Advanced settings” -> “LAN” tab:
ASUS router IP address (from our example) will change to 192.168.10.1. What happens after you click the Apply button.
Important to know! Unnecessarily, there is no need to change the value of the network mask (let the mask with the last zero remain, as done “by default”).
An IP value ending in two units may be “not suitable” for the following reasons. Let's say the WAN port of the router is connected to a modem (configured in router mode). With this connection, the router is configured “for DHCP”. Then, it is imperative to fulfill the condition that the IP addresses of the local networks of the router and modem are not from the same range.
Or, let’s say, “behind the router” there is the next device, which also organizes a local network with a similar range of addresses. Changing the IP address in the router - solves it similar problems in one second.
The video shows an example of setting up a connection “under PPPoE” with enabling the IPTV option for the set-top box:
To set up an ASUS router, you need to connect. Then, in your browser, follow the link - 192.168.1.1 . If you have not configured the device before, you will see Master quick setup . If you need a login and password, then in both fields by default we type admin(should be checked with providers). The ASUS control panel will be displayed.
Basic settings
The panel consists of general and additional settings. Available opportunity viewing the network map, enabling guest Internet, monitoring traffic, and parental controls. In the additional section Wi-Fi is regulated and configured firewall.
To check if you are connected, you can go to the “ Quick network setup" Then select " Check your connection" And " Go" In the window that appears, enter your username and password. Click " Next" Then in the section " Setting up the router» fill in the specified name (SSID) and network key (to connect to the network). 
Click " Apply" It will begin. Then a network with the name you specified will appear in the Wi-Fi list. We connect to the device using the specified access key and return to this section. In the window with connection information, click “ Next».
In most cases, the Internet should already be working, but if your provider does not support the technology AutoIP, That tune Wi-Fi follows on its own. In this case, after checking the connection, the section “ Internet Settings». 
Next in the proposed list choose the connection technology used by your provider. Then in the window that appears you will need to enter login And password, which were provided by the provider in the contract. All information should be clarified with him if any problems arise. It may be necessary further enter any other parameters that must also be taken into account (service name, IP address, etc.). Afterwards you need to do all the same steps as described above.
Wi-Fi Settings
On the main tab there is always an additional option tune Your Wi-Fi. For example, in the section " Internet" Can change type of WAN connection, that is, if the provider has changed the connection technology, you can switch it. In the section " Network map» there is a possibility change key For Wi-Fi connections, as well as the username (be sure to click " Apply"). Can be customized guest network(not recommended if you need to control Internet traffic) and impose parental controls, if necessary save child from an unwanted resource.
You can also change access key to the control panel of your router. To do this, go to " Administration", hereinafter - " System" Enter your new password and click " Apply" for it to take effect. The remaining sections mainly contain additional settings for wireless and local Wi-Fi, which can be configured at your discretion. 
How to reset a router
If you have forgotten your password wireless Wi-Fi, and other devices were not connected, try to log into control Panel on cable and view it there. But if this is not possible, it is recommended reset router to default settings.
For this purpose, there is a special button. Press and hold it about 15 seconds until the WPS indicator starts blinking. The access key will be reset, you must follow all the steps described in the article above. To avoid such situations, when connecting on your computer, you should always check the “ Connect automatically" Then the Wi-Fi login will be done using autofill.
For all routers from a given manufacturer, there is generally the same scheme for entering the settings panel. To do this, you need to connect to it using a wire or Wi-Fi network, then select any convenient browser and use it to log in. For this purpose you can use like standard computer, and a laptop, tablet or even a mobile phone.
In the first two cases, you have two options for logging in - via cable or wireless network. In the last two - only with the help wireless connection. You can choose any of these options, however, experts still advise logging in through a laptop or computer over a wire - this is in case you need to get the router working.
In this article we will look at how to log into Asus settings, this circuit is suitable for any model, including RT N12, RT N11P, RT G32, AC 51U, RT N10. You will learn how to log in using a network cable or via Wi-Fi.

Before going into the settings of the Asus router, you need to connect it and establish a wired connection. You won't have any problems with this, just find the cable that comes in the same box with your Asus router. Connect one end to the LAN connector, and the other to a special connector on your device.
How to log in using Wi-Fi
If you have already configured your router, then connect to your wireless network by clicking on its name. If you have a new one, then immediately after turning on the power it will show the network under the standard name “Asus” and it will not be password protected. You just need to connect to it using the device from which it is most convenient for you to access the administrative panel.
What to do if you forgot your Wi-Fi password
If this happens and you do not have devices on which it is saved, then use a wire. If you only have a phone or tablet, and there is no way to log in via cable, you will have to reset the router settings. To do this, find the “Reset” button on the device panel and press it for 10 seconds. After this, a reset will occur and you will have to configure the router again.
Go to the router settings

Since you are connected to the device, open any of the browsers available on your device. It can be as standard Internet Explorer, as well as Chrome, Firefox and others. In the address bar of the browser, you must enter the IP address of the router; according to the standard, this is 192.168.1.1. To find out for sure, take the router, turn it over, on the back panel there is the information you need. Usually they are located immediately under the Factory Default Settings inscription, there you will find “IP Address” - the numbers opposite should be entered, below there is a “User Name” (login) and “Password” (password).
Note. The address bar is where you typically enter the address of any page https:// or http://.
After you have entered the IP address, a dialog box will pop up where in the “Username” and “Password” fields enter your username and password, usually admin - if this is your first login and you have not changed access. If you have changed accesses, enter yours. It is advisable to always write them down in a personal notebook or notebook so that you do not have to reset them later.
Solving problems with logging into the admin panel

If you can't log in the first time, you can try several ways to solve this problem. Often, all problems begin to arise at the very stage of connecting wires to the router. Also, a problem often arises at the stage of entering the device’s IP address into the address bar - the browser shows “Page unavailable.”
Try these steps:
- Check whether you entered the IP address correctly - look again on the back of the device.
- You need to check in the settings what connection mechanism your Internet provider uses - is it set to automatic receipt IP and DNS.
- If automatic receipt is enabled, but you still cannot reproduce the login to the administrative panel, then make sure that you have correctly connected the wire to your devices. You may have used the wrong connector.
- If you are using wireless connection, then look on the router panel to see if the Wi-Fi icon is lit - it should be lit.
- If all your gadgets are connected in the correct way, but you still can’t log in, try logging in from a different device.
- If you can’t log in via cable, then try to log in via Wi-Fi - or vice versa.
- Reset the router by pressing and holding the “Reset” button for ten seconds, and try to log in through the browser again by entering the IP address in the address bar.
If none of the methods helps, you should go to the official Asus website and contact technical support online or find a hotline number.
Conclusions
Often, users do not have problems when entering the settings, and if this does happen, they can quickly find the source and fix everything. For customer convenience, the login methods are the same for each router model.
From your home network, etc. In order to go into the router settings, you first need to find out the IP address of the router, which will also be discussed. Also, this instruction will help you log into the web interface of a modem, access point and other similar network equipment from such popular manufacturers as D-Link, TP-Link, Asus, ZyXEL.
Are drivers needed?
No. You do not need to install any drivers anywhere to configure or use the router. If the kit includes a disc, it will only contain documentation. Drivers may be required for modems that connect to USB ports, but we are not talking about them now.
Default IP address, username and password
Now directly about how to “log into the router” (as modern users like to say). If the router is new, then its settings are factory settings. These settings are called "default" or default settings.Most manufacturers indicate the details directly on the router itself and designate them as Default settings: IP, username and password. Look for a sticker with this information on the bottom or back of the device:

If for some reason the sticker is missing or damaged, open the instructions and it will indicate what the default IP address, login and password are for your router. Instructions are always included. It can be either on a disk, or in the form of a paper brochure, or both.
Typically, by default, modern routers have the following settings:
IP address: 192.168.1.1 or 192.168.0.1
Username: in most cases admin
Password: admin or empty
To enter the router settings, you need to type http:// in the address bar of your browser.<ай-пи адрес>. For example:
http://192.168.1.1
Enter the IP address in the address bar to enter the router settings
If the address is entered correctly, you will see a page asking you to enter your username and password.

Web interface login page D-Link router DIR-300
And this is what the authorization page for routers from TP-Link, the most popular in our latitudes, looks like: 
Instead of an IP address, the sticker may indicate the host (site name) for logging into the web interface. For example, http://tplinkwifi.net or my.keenetic.net. Enter it into any of your browsers and you will be automatically redirected to the configuration page.
How to find out the router's IP address if the standard one does not fit
1. View the IP address in the network connection properties
Open Network and Sharing Center

Find your connection and click on the appropriate link

Click the Details button

In the window that opens you will see the line:
Default Gateway IPv4: 192.168.1.1
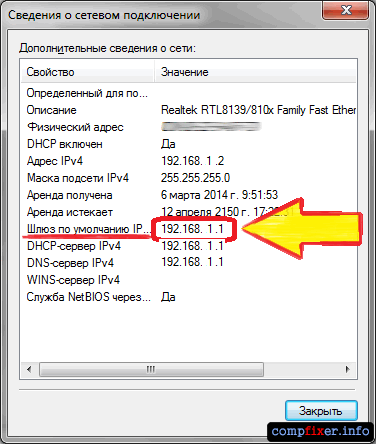
Router IP address
The address specified in this line is the IP address of the router through which your computer accesses the Internet. Now you can write http://192.168.1.1 in the address bar of your browser, then enter your username and password and get into the router settings.
If you cannot connect to the router (it does not give you an IP address over the cable or you do not know the wireless network security key), then all you have to do is reset the router and configure it again: i.e. set your passwords and settings.
Read about how to reset your router.
2. View the IP address of the router in the network environment
Go to the section Net.
In the section Network infrastructure find your router. Select Properties:
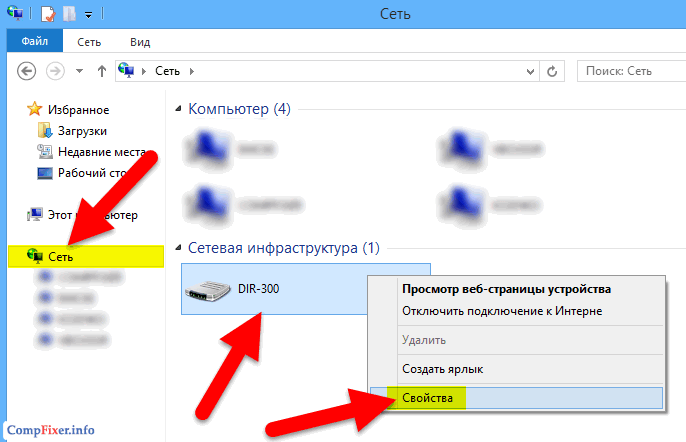
On the tab Network device The IP address of the device will be displayed, through which you can access its settings:

3. How to find out the IP address of a router using the command line
Enter the command ipconfig and press Enter:

In the column Main gateway The IP address of the router will be indicated, which is what you need. Now copy it, paste it into your browser's address bar and press Enter. You should then see your router's settings web interface.
The most common default router IP addresses and passwords
So, in this article we have described in detail all the setup steps and now you can correctly connect the equipment, find the address of its web interface and go to the router settings. If you have any questions, ask them in the comments.
ASUS company specializes in creating high-tech equipment for various types of activities. The company is famous for smartphones, TVs, laptops, motherboards, peripheral equipment, etc. Let's consider the most important and in demand product in modern society - the ASUS router.
ASUS is a popular “player” on the market, producing high-quality devices in the wireless equipment segment.
Each router has many features, some of them the latest.
Almost all ASUS brand routers have identical characteristics, so information about them will be generalized.
The product comes in a cardboard box with beautiful cover. Usually the device is decorated in dark colors. The company, model name and, of course, a photograph of the product itself are indicated.
Inside there is the router itself, the antennas are located separately (you need to screw them on yourself), instructions, a power supply and an Ethernet cable. Manual in several languages, including Russian. The packaging contains a description of the device, warranty card, etc. The power supply is small in size at 19V 1.75A, but different models different.
In case the user needs additional information, for example, on firmware, all this is available on the official website in the support section.
Many ASUS routers have an impressive appearance. The characteristics are dual-band and tri-band routers with USB 3.0 and gigabit ports. Two dual-core processors, allowing operation in two ranges, provide high speed operation with wireless devices. Almost any Asus router works according to the 802.11n, 802.11ac and other standards.
Appearance
 The company mainly creates models in dark shades from matte plastic. The router itself seems large, measuring 22x9x16 cm, but there are larger and smaller ones. For example, the Asus RT-AC88U model has dimensions of 30x18x6 cm. Such a case must be placed only on a horizontal surface.
On the front panel there are several indicators responsible for any action. They usually light up white, but if there is a problem, they light up red. Old routers of other models did not have this function. For example, if the Internet connection is lost, the indicators responsible for the LAN, WAN or even Wi-Fi connection will light up. When packets are exchanged, these indicators will flash white or other colors.
Also on the front panel you can see the merging inscription ASUS.
 On the side of the router there are buttons responsible for connecting wireless clients (WPS) and disabling the device’s wireless modules. On other devices - a button to control the backlight. Located at any of the ends USB port 3.0. There must be a grille for ventilation. Usually it is located both on the sides and on the front side of the router or at the bottom.
For many routers, it is possible to connect printers and smartphones. Can be connected external hard disk.
Depending on the type of router, there are special connectors for antennas. They are located on the sides of the device. Typically, the more antennas, the stronger the signal. On the back of the ASUS router, by default, there are:
- local ports;
- USB 2.0;
- performance indicators;
- power off and reset button;
- LAN and WAN ports;
- power connector.
 Another point is that the control panel and ports are not on the side, but on the back. As an addition, there are additional switches, for example, a button to turn off the LEDs or a USB 3.0 port.
In general, there are no complaints about ASUS router models. Everything is done in a modern and original style. As before, the usual square box is no longer in sight.
As for capabilities, routers usually have a dual-core processor with a frequency of 1 or 1.9 GHz built into them. From previous information it is known that such a chip supports not only USB technology, but also PCIe. Be sure to have a gigabit network switch. Some models use the SATA interface. RAM is 512 MB, flash memory is 256 MB. Support for two bands - 2.4 GHz and 5 GHz - can be done with either one or two processors. Having two processors is a more efficient option.
Connection and preparation for work
 Since all ASUS routers have similar ports and connectors, let’s figure out how to connect to an ASUS router. It's worth preparing in advance. And not only organize cables and other accessories, but also find out information about the type of connection used by your provider. For example, PPTP, PPPoE, L2TP use username and password authorization. This data is usually determined by the provider in the service agreement. Now specifically about the actions:
- Connect the power supply to the device connector, the indicator should light up. If not, press the router's power button.
- Take network cable– Ethernet connector – and connect it to the WAN port.
- Connect LAN cables to the ports and connect to a computer or other devices for Internet communication. When connecting smartphones and tablets, use Wi-Fi, the access point of which is visible to all devices by default.
- When you turn on Wi-Fi, the ASUS access point will appear on the screen of your smartphone or laptop. To connect to it, you do not need to enter the key, since it has not yet been installed (if the router was not configured by specialists).
These are the basic actions performed with every ASUS router. That is, you need to connect all the cables and connect via Wi-Fi. Next, proceed to setting up the router itself.
Settings
 For each network or wireless device - router - go to the control panel and configure the network. A browser and a special address are always used to log in.
Open the browser you are using and enter the IP address of the ASUS router in the address bar: 192.168.1.1. For models from other companies it is sometimes different; you can find out the IP in the instructions or on the Internet.
After logging in, a window will appear for entering your login and key. By default, admin is always entered in both fields. Press Enter and enter the ASUS router settings.
Just a note. Login information for the ASUS admin panel is located on the back of the device. If there is a Wi-Fi password, it can also be found there in the form of an 8-digit code (PIN Code).
In the main window, click the “Go” button to get to the classic interface with various parameters.
Automatic setup
Initially, the so-called quick setup is used. Here a couple of clicks are made and no special actions are required from the user. The ASUS RT router and other models are being configured.

If the provider uses the “Automatic IP” technology, all of the above will be done in a couple of clicks and you can already use the Internet. But there are other connection types, such as PPPoE, L2TP and PPTP. Let's consider how to deal with them.
Connecting to the Internet manually using the example of some providers
 Here the setup is as easy as in the first case. After the “Quick Setup Wizard” checks all the parameters and the presence of a connection, the items will be highlighted in the second step “Internet Setup”. We choose the one that is used by the provider, for example, PPPoE.
After selecting, you will need to enter a user name and key that will allow you to connect to the provider that issues this data and indicates it in the contract. If you need to change the codes for the Internet, it is recommended to do the following:
- In the main control panel window, go to the “Internet” section.
- Go to the "Connection" tab.
- Change settings.
"Dom.ru"
 Now let’s look at connecting to the network using the Dom.ru provider as an example. The settings below are relevant for most types of ASUS routers, as well as other companies:
- First you need to log into ASUS.
- Go to the “Internet” section (located on the left), and then click on the “Connection” tab.
- Dom.ru, like most other providers in the Russian Federation, uses the PPPoE connection type. Select it in the “WAN connection type” item.
- Check “Yes” next to the items “Enable WAN”, “Enable NAT”, “Enable UpnP”.
- Select the “Yes” checkbox next to “Obtain a WAN IP address automatically”, as well as “Connect to a DNS server automatically”.
- At the step where you set up your account, specify the username and password provided by the Dom.ru provider.
- Apply the changes and try to connect to the Internet.
For some providers, especially Rostelecom, it is acceptable to use “Dynamic IP” (abbreviation DHCP). In this case, Automatic IP is selected in the WAN connection type.
Check the “Yes” checkboxes next to the “Enable WAN”, “Enable NAT” and “Enable UPnP” options. And also “Connect to the DNS server automatically” also indicate “YES”.
 Rostelecom
- Go to the control panel of your ASUS router.
- In the “Internet” section in the “Connection” tab, select “WAN connection type” – PPPoE.
- In parameters account indicate the username and password provided in the Rostelecom agreement.
- Check “YES” in the “Obtain an IP address automatically” and “Connect to the DNS server automatically” options.
- Don’t forget to check “Yes” to enable WAN, NAT and UPnP.
 "Beeline"
When using the Beeline provider, you must use the L2TP connection type. Select it in the “WAN connection type” section.
Check “Yes” in the “Enable” WAN, NAT and UpnP parameters. Check the “Yes” checkboxes next to “Obtain a WAN IP address automatically” and “Connect to a DNS server automatically.” In your account settings, enter the login and code provided by Beeline.
In the “VPN server” line, enter tp.internet.beeline.ru. Apply the changes and make sure the Internet is working.
 NetByNet
- Go to the “Internet” section, to the “Connection” tab.
- WAN connection type – PPPoE.
- WAN, NAT and UPnP – “Yes”.
- Connect to the DNS server automatically – “Yes”.
- Use the login and code according to the agreement.
- Enter 1472 in the MTU field.
- Apply changes.
Backup connection via 3G, 4G
The working principle is that there will be two connections:
- basic from the provider;
- if the first one fails, the router will use backup solution, based on a 3G/4G USB modem.
In a home environment, this concept may not be useful, but in some companies the situation occurs.
It is worth noting that not all ASUS routers support connecting 3G or 4G modems. Here is a list of models capable of this: RT-N14U, RT-AC66U, RT-AC52U, RT-AC55U and others. Typically, all samples that have a dark firmware version support connecting modems.
The modem support of the router is checked on the official ASUS resource - https://www.asus.com/event/networks_3G4G_support/.
If the router is not yet connected, you should configure all the parameters and connect the cables in accordance with the description indicated at the beginning of the article. Continue according to plan:

After rebooting the device, a new wireless network related to the USB modem should appear.
 Wireless network in lately is very popular if you take your smartphone and check availability Wi-Fi networks anywhere in the city, there are almost always several access points.
Setting up a wifi router from ASUS is easy:
- In the control panel on the left, click on the “Wireless Network” section. The General tab contains basic Wi-Fi network settings.
- Choose frequency range 2.4 GHz or 5 GHz (the latter is not supported by all devices. Condition: the router and client must support this range). Name the network in the SSID field; if you want to hide your network, select the “Yes” checkbox. Wireless network mode, leave the channel width as is. If there are access points operating on the same channel, select the least busy one. Next – WPA – WPA2-PSK encryption, set the key.
These are the basic parameters, the configuration of which is a standard procedure for a beginner. For more flexible settings, go to the “Professional” tab. Here you can set the time when the radio module will be turned on or off. Set Wi-Fi settings when not in use; you can also enable access point isolation, which allows you to limit access to local network other devices.
To restrict connections to a personal wireless network of devices, use the “MAC Address Filter” tab. Here you can set the trusted addresses of well-known smartphones, laptops, and other gadgets. Outside devices will no longer be able to connect.
This is how you configure your ASUS Wi-Fi router.
Configuration in repeater (repeater), amplifier, adapter or access point mode
 For those who don’t know, a repeater is a device that allows you to increase the radius Wi-Fi signal. If the router is located far away, a repeater (repeater) can amplify the signal over a greater distance. A Wi-Fi router allows you to do this:
- On the left, select the “Administration” section, go to the “Operation Mode” tab.
- Select the “Repeater mode” option, click “Save”.
- A window will open where the access points are indicated. Connect to your network.
- Enter a password to authorize the access point.
- Make sure that the “Use default settings” checkbox is checked and click “Apply”.
- Wait for the process to complete.
By the way, now access to the router control panel will be provided at router.asus.com.
IPTV
 Setting up IPTV on an ASUS router is carried out by users who want to watch TV. The router is connected to the TV via a cable or connected via Wi-Fi, but initially the device is configured for this:
- Go to the router settings, section “Local network”.
- On the IPTV tab, open the “Select IPTV STB port” menu, click on the LAN port to which the set-top box is connected.
- Apply changes for IPTV.
IPv6 protocol
If your provider allows you to configure the IPv6 protocol, many ASUS routers have this opportunity, for example, it is available in the RT-N12VP model.
In the main window, in the “Advanced settings” section, there is the IPv6 parameter. By opening it, the user configures the necessary options.
Dynamic DNS
To configure this function, you need to go to the router, then go to the “Internet” or WAN section, open the DDNS tab.
Check “Yes” next to “Enable DDNS client”, enter the server and host name provided by the supplier. Click "Apply".
Security Settings
 Using a built-in firewall in ASUS devices protects your personal network from external attacks, such as viruses from the network and hacking. Necessary:
- Go to the "Firewall" section. On the “General” tab, check “Yes” next to “Enable firewall”.
- Select the “Enable Dos protection” option.
- Otherwise, leave the settings as they are, then select “Apply”.
 While in the control panel, select “Parental Controls” on the left. To enable the function, simply move the Enable Parental Control switch to the ON position.
From the drop-down menu below, find your own wireless network, click on the plus icon.
To edit, click the pencil icon, mark the date and time when the parental control function will be disabled. Click OK. Apply settings.
Setting up the printer
In this case, you need to connect the printer to the USB port of the ASUS router.
- Open Control Panel in Windows system, go to the “Devices and Printers” section (it’s easier to open the section through “Search”). Click the “Add Printer” button. In the window that opens, select “Add a local printer.”

- Next, check the “Create a new port” option and select Standard TCP/IP Port from the list.

- The next step involves entering the printer's IP address, the same as that of the router: 192.168.1.1. Enter the address in the “Name” and “Port name” fields. Uncheck the box “Poll the printer and select the driver automatically.”

- In the next window, select “Regular”, and in the drop-down menu – Generic Network Card.

- Install the printer driver. From the list, identify your model and click “Next”. Then - “Install from disk”, specify the path to the file with drivers.

- Once the printer is installed, you need to configure general access to him. Select the option “No sharing...”.

- Open the “Devices and Printers” window through “Start” and go to the properties of your printer. On the “Ports” tab, check the box next to the one that was created and click “Configure port”.

- In the parameters, select the LPR protocol and specify any name. Save changes.

 DLNA is a function that allows you to organize a media server with access to a TV or other media file device. Configuration in ASUS routers is carried out as follows:
- In the main window of the router, go to the “USB application” section.
- Click on the “File/Media Server” link.
- First, enable it by moving the checkbox to the ON position opposite the Enable DLNA Media Server item. Secondly, the name can be changed at will.
- "Apply."
On the " Network environment“You need to activate the “Allow sharing of resource” option. Use settings.
Now you can turn on DLNA on your TV, watch movies or listen to music.
 If your ASUS router supports VPN, you will see the “VPN server” section on the left. After going to it, you need to select “Yes” next to the phrase “Enable PPTP server” and apply the changes.
On the “More about VPN” tab, select LAN to VPN Client from the drop-down menu, and also check all the boxes in the MPPE Encryption area.
In the “Client IP address” section, enter the range and apply the changes.
Go back to the VPN server tab, enter your username and password, and then add them using the plus sign.
Setting up a torrent client on the router
If you have any problems downloading torrents, you can download Download Master using an ASUS router, for this:
- Open the interface, go to the “USB application” section.
- Select the Download Master link.
- Click on the “Add” or “Add” button and select the torrent file to download. Then – “Apply”, or “Apply”.
Possible malfunctions and ways to eliminate them
ASUS products are famous for their efficiency in both operation and service life, but there are problems with network access. Solutions for most problems are the same, for example:
- Update firmware.
- Restart the network.
- Check cable connections.
- Check whether the settings in the router and PC are correct.
If the official website for the ASUS router has the latest firmware, it is recommended to download it and “flash” the device in several ways.
 Via web interface
- Go to the device interface, then go to the “Administration” section.
- In the “Firmware Update” tab, click the “Select file” button and specify the path to the firmware.
- Click "Submit".
- Wait for the process to complete.
It is advisable to download the firmware on the company’s official website http://www.asus.com/support/. Enter your router model in the search field and select the Driver & Tools link.
In the OS drop-down menu, select Other, open the Firewall tab, and download the firmware.
Via mobile application
By downloading the ASUS Router App, ASUS Router for Andorid or iOS, you can control the router from your smartphone. All you need to do is connect to it via Wi-Fi.
By clicking on the “More” section (indicated by three dots), it is possible to update the firmware of the wireless device. Everything is done automatically.
Via USB device
Sometimes, after unsuccessful firmware or incorrect user actions, it is impossible to get into the web interface of the ASUS router, but you need to flash it somehow. The point is that you will have to use a USB-UART device, the legs of which will need to be soldered to the board, this method It is used only in cases where the router is completely out of order, and you also need to have the necessary knowledge in the field of electronics.
Resetting the router to factory settings
 Most effective way- up to factory. To do this, press the special Restore or Reset button on back side housings. If the button is recessed, use a needle or other thin object. Keep the button pressed for 10 seconds, when the indicator flashes, release, then wait 1-2 minutes.
Now access to the router will be carried out using the login and password – admin. It is also possible to restore ASUS router parameters from the interface:
- Go to the “Administration” section and the “Manage Settings” tab.
- Click the “Restore” button and wait for the process to complete.
Conclusion
Considering any new product from ASUS, we can say with confidence that all devices are made to last. A laptop, computer or router will “live” for a long time if used correctly.
Pros
Among the advantages of ASUS, users note the following:
- Lots of options appearance from minimalistic to pretentious.
- Easy setup, user friendly interface.
- Work stability.
- Basically the price is justified.
- Lots of different ports, connectors and functions.
Cons
The disadvantages are minor:
- super-bright LEDs on some models.
- rare failures.
Overall there are no cons. Many users complain that the router slows down the speed, but this does not always depend on the device.