Hello dear friends, I have long wanted to add this topic to my site and tell you how It is better and more correct to burn the disc.
How to burn files from a computer to disk
So, disc recording can be done in the standard way in Windows or using a special program. And now we will look at everything.
Method 1: How to burn a disc in Windows
1. Launch autorun.
When you insert the disk, a window should pop up that will prompt you to do the following:
- If there is no such window, then go to my computer and double-click on this disk with the left mouse button.

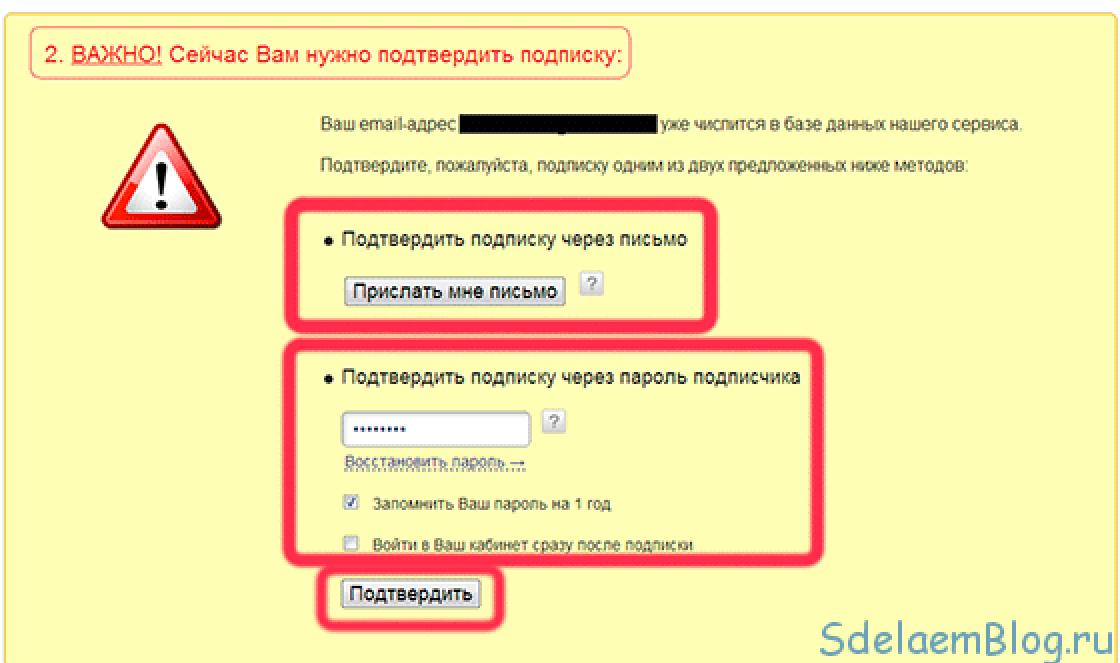
2. You must select a recording method this moment is very important :
You should now see a menu like this:

Now attention!
| Recording format | Recommended drives |
| A). Like a USB flash drive This format is intended for rewritable discs (CD-DVD-RW), do not use this format for regular discs, since your disc after recording may not be readable on other devices, especially if you want to record for audio or video players. And if you choose this format there's no way to go back!The only advantage is that you can use the disk as a flash drive, that is, you can delete at least one file at a time and you can also write at least one file to the disk. But please note, this is only for RW discs (rewritable discs). | CD-DVD-RW(R) |
| B). With CD-DVD player this format is intended for all drives and if you are not going to use the disk as a flash drive and you want your disk to be readable everywhere, select this item. | CD-DVD-R |
If you nevertheless chose the first option, a window will appear in which you will be asked for confirmation to format the disk for this recording type. You will not be able to revert the changes!
If you still agree, confirm and click yes.

3. Now choose what to record.
First way:
You can simply copy the file you want to burn and paste it onto the disk.


Second way:
Right-click on the selected file or folder and select send and select the drive.

4. And finally the recording!
We go to our disk and click burn to CD (burn disc).

A window will appear in which you need to select:
1. Disc title
2. Speed (the lower, the better)
3. By checking the box, the recording wizard will automatically close.

The entire disc is recorded!
Method 2: How to burn a disc using Nero micro
As you probably know, standard methods It's not always good, recording master Windows drives Although it copes well with its function, it still has few advantages. Now let's expand the recording capabilities with free program for burning Nero micro discs.
You can download nero micro for free, and the most important thing is that this is a micro version of nero, with free distribution.


1. Record any data.
2. Record music in various formats
3. Record video in various formats.
4. Useful feature- burn the disk image to a flash drive.
Here I will show an example of how to burn a regular disc to a CD. To do this:
Select CD with data. A window will open.

And here we add files.
You can add using the add button or drag and drop the required file into the window.

Here we choose:
1. Disk name
2. Recording speed (the lower the better).
3. Allow adding files (you can add to the disk if there is free space left), but the disk may not be readable on some devices.
Click record.
After burning, a window will appear indicating that the disc was successfully burned.
And in the end I will say that everyone has their own opinion on how to record a disc. But these methods have never failed me and The discs were successfully written all the time.
That's why I recommend them to you!
This article is intended exclusively for beginners...
Sound recording may be needed in many cases - when learning a language, recording audio greetings, even songs, and why not? You don't need a recording studio yet; to get started, a computer with installed operating system"Windows". Here we will look at two OS options: Windows 10 and Windows 7. As you understand, in all cases you will need a microphone connected to the computer or a built-in microphone. In order to make your own audio clip, first, record your voice on the computer. Here are instructions for those who do not have a special recording program.
Let's start with Windows 10, since most users already have this system installed, and the sound recording process is greatly simplified here. Click on the Windows button (formerly START, the small window in the lower left corner of the screen), click on voice recording. In the window that opens, click on the microphone icon and feel free to start talking, singing, shouting (if you really want to), demonstrate your abilities, knock, squeak the door, play the guitar - now it all depends on your imagination. You have as many as 3(!) buttons at your disposal: PAUSE, STOP AND MARK (checkbox). With the first two, I think everything is clear, but using the checkbox we can mark the desired place on the recording. By the way, a mark can also be added during playback.
And now Windows 7, because this system For various reasons, many more users have it installed.
Click the "start" button -> "programs" -> "accessories" -> "entertainment" -> "sound recording". The sound recording panel will appear. Click "file" -> "properties" -> "convert". Select CD quality (CD quality PCM 44,100 kHz; 16 bit; Stereo).
Click OK. Next is the “edit” button, “audio properties”, “sound recording” tab, “volume”. We put the bird on the microphone (microphone), set the volume slightly above the minimum - this will reduce the level of external noise (it is better to speak louder). You can choose the volume experimentally. Close the "recording level" window.
You have 1 minute to record your congratulatory commercial or any other video. We press the red button, and the recording starts.
At the end of a minute, recording will stop automatically, unless you stop it earlier, after which you can continue recording, and so on ad infinitum. Recording time for this file increases accordingly.
You can also record a blank minute, and then use the "edit" button to copy and paste it as many times as necessary to obtain the required recording time.
Of course it's not entirely convenient, but it's simplest program as part of "Windows" and it can become your starting point. If you want to get into sound recording more seriously, you need special program- sound editor, for example, Sony Sound Forge, WaveLab, GoldWave, Audacity. The latter, by the way, is distributed free of charge under the GNU license, and works perfectly under Windows. You can read more about working with it.
In the "edit" menu you can find the simplest editing tools. Entries can be joined or mixed, and deleted before or after the current position.
Turn on playback and listen. We are working on bugs. You can play with effects (echo, speed, sound reverse), but if you are going to edit the file yourself or with someone’s help, it is advisable that it be without effects.
To send a file by e-mail, it is better to save it in MP3 format (unless, of course, we are talking about high-quality music recordings). To do this, click “file” (file), “save as” (save as), in the window that appears at the bottom we find the format item ((format), click the “change” button.
In the “format” drop-down menu, select MPEG Layer-3, “attributes”: 128 kBit/s, 44,100 Hz, Stereo. At the same time, the sound quality remains acceptable, and the file size is reduced several times. If quality is critical, it is advisable to increase the attribute numbers; if not, decrease them; the file size will change accordingly.
A few words about recording formats
- MP3 - have good quality and small size.
- Ogg Vorbis - according to some estimates, the quality is slightly better than mp3 for the same file size, but there may be compatibility problems, since not all players support this standard.
- WAV - perfect sound quality at maximum settings, but also the maximum file size (sound recording without compression).
- FLAC is the same excellent quality as WAV, and is approximately 50% - 80% the size of a wav file, but most players require plugins to run a FLAC file.
- Ogg vorbis
Insert a blank CD-R or CD-RW disc into the drive and open this disc, when Windows 7 Explorer prompts you to format, select “With a CD DVD player”:
In the second window of the burning wizard, select the “Audio CD” type:

After that, copy the files, wav, mp3 or wma and paste them into the disc window. After copying the files, a Windows program window will open. Media Player" and in this window there will be a list of files to record. To start recording, click the “Start Recording” button:

Wait for the recording process to complete:

When recording is complete, the drive tray will open.
Note
Although it is possible to record an audio CD from MP3 or WMA files, you need to understand that in this case, although the disc format will be Audio-CD, the sound quality will correspond to the sound quality of the original MP3 or WMA files. So if you want to burn a really high-quality audio CD, you need to burn it from uncompressed sound files WAV format.
For best compatibility with consumer players, do not use for CD-RW recordings discs, but only CD-R.
Way Audio CD recordings, described in this article, is suitable only for those cases when the audio disc is planned to be played on a computer, car radio, portable player or boombox. But if you are a connoisseur of good music and you have good audio technology, then the approach to recording audio CDs should be completely different. Recording high-quality audio CDs is a rather complex topic that requires knowledge, specialized programs and equipment.