
Many probably wondered how to transfer Windows to a computer from another computer whose hardware is radically different from the hardware of the old computer.
An example is given for migrating Windows 8, and the same can be done with other versions of Windows starting with Windows 7.
And so, we will transfer using a utility from Microsoft called sysprep.
This utility allows you to create a customized Windows image along with installed programs, which can then be deployed on another computer, preferably with a similar architecture, but very often I had to deploy such an image on a computer with completely different components and everything went well. Yes, and in our situation, although motherboards were different manufacturers, but the processors were both from INTEL.
After the system is successfully deployed on another machine, you will only need to enter the activation key (that is, as with a normal installation of the system), otherwise Windows 8 will be installed, but will only work for 30 days. If activation fails, activate Windows 8 by phone, link to our article above.
Extensive information about the sysprep utility is available on the official Microsoft website, be sure to.
We launch command line on behalf of the administrator
and enter the command:

a window opens in which you can see the limit on the number of transfers of Windows to other computers. In our case, 1000.

Then we enter the command
C:\Windows\System32\Sysprep\Sysprep.exe

In the window that appears with the parameters, set everything as in the screenshot and click OK.

- Putting the system into OOBE mode - transfer mode operating system activated the next time the system is started.
- Preparation for use - all data that should not be copied with the image (security identifiers (SIDs), activation information, and so on) will be deleted from the system, but the installed software should transfer without problems.
Windows 8 takes a few minutes to prepare for transfer to my friend's computer. The computer turns off. dismantling from my system block hard drive and put it in its rightful place in my friend's system manager. We disconnect the computer of my friend from the Internet (below it is written why). We connect the cables and turn on his computer, everything is ready for transfer.
And so, if we now back up the prepared way Windows 8 in the Acronis True Image program or the Paragon program and save this image on DVDs or a portable USB hard drive, then you can successfully deploy this image to other computers, you can do without the Acronis program, use the Dism or ImageX tools built into the operating system, () the only thing you will need to do after installation is to enter the license key of the system or Windows will only work for 30 days and will ask for activation (everything is fair).
We turn on the computer, the BIOS should be set to boot priority from the hard disk. Immediately after switching on, the devices are being prepared.

You can activate Windows 8 after installation, click Next.

We accept the license agreement. Computer name.
Here attention friends! Microsoft itself advises to avoid conflict when transferring the system in this place, be sure to disconnect your computer from the Internet, and assign a new name to your computer, and also create a new user. Then, during the transfer, you will keep the old profile with all installed programs and some settings. If you remember, with a new Windows installation 8 we named our computer Makar-PK,

and created account Makar-77

select another name now, such as Fedot-PK. As a result, after migrating Windows 8, you will have two user profiles. The old Makar-77 profile with all programs and the Fedot-77 profile will be saved - it turns out to be temporary and is only needed to transfer Windows 8. Click Next.

Use default settings.

Select Sign in without a Microsoft account (if you previously signed in to your Windows 8 at Email, then you cannot enter it here, again, to avoid a conflict when transferring the system, and so that your old Makar-77 profile is not overwritten).

Create a new user, i.e. an additional local account different from the one that already exists in this system. For example, before transferring Windows 8, you logged in under the Makar-77 account, now in this window create the Username Fedot-77, then assign a password with confirmation and a hint. Ready.


Well it finally happens Windows boot 8. Naturally, the system is not activated until the Internet is connected, if you do not know how to activate it if available license key, read our article "How to activate Windows 8".
We entered the Fedot-77 account we just created,

there is not a single program here, an empty desktop, that is, a clean profile,

but I installed the programs and they have not gone away. Choose an account Makar-77

and we get into the configured operating system, where almost all the programs I installed are launched.

We go into the properties of the computer. We see all the information about the "new" components of the system unit.

Cloning is definitely not a new idea and there are quite a few methods and various ways, which can be used to move or clone hard drive or even clone an existing operating system Windows system on new HDD. Also, most of us have already upgraded our system to latest version Windows 8.1, which is the latest operating system from Microsoft. Windows 8.1 has gained so much popularity in a short time due to its performance and speed. A few days ago we thought about cloning our Windows 8.1 to a new hard drive, we just had to do backup. Good habit, by the way.
Cloning Windows 8.1 will ultimately help save a lot of time and effort as we don't have to install all applications and settings from scratch. We did some research on how to clone Windows 8.1 to a new hard drive and were completely shocked to see that there is no detailed guide. So, we have written this article here to fill this gap. Therefore, if you are looking for guidance on how to move an existing installed operating system to a new hard drive, including Windows 8.1, or more simply, if you want to clone windows 8.1 to a new hard drive, the full tutorial is written below.
Is it cloning worth a try?
Some of you may be asking why we clone Windows 8.1 to a new hard drive instead of choosing a fresh or clean install? Well, there are some technical advantages to cloning. hard drives. However, let's be simple on simple ground. Yes, a fresh or clean install takes much less time compared to the cloning process. But, if you decide to clone Windows 8.1 to new hard drive on which applications and tools are already installed, you will end up, in case clean install, you will save your time on installing each application. So, cloning is the only solution to make it fast and productive.
Basically, in new installation Windows 8.1 we need to install all major applications such as MS Office, browsers, email client applications, video players, PDF reader and dozens of other applications, and if we combine the installation time of these applications, it will be about 1 hour. But if you are going to clone Windows 8.1, it only takes a few minutes to get a working system. Once the cloning process is complete, you will be ready to use the same applications and preconfigured settings that you used on the original PC.
Can I use disk image cloning as a backup?
So, you want to know if there is such a solution or not? Once you've completed cloning Windows 8.1 to your new hard drive, you can use the same disk image to restore your system in the event of a disaster. You can use the Windows 8.1 disk image created in the image utility, which does the same thing with the iso file, and you have the key to restore your PC at any time. Quick and easy!
Method “Copy” and “Paste” will work instead of cloning?
We know that many of you feel the same way. You may ask why not copy and paste the entire drive to a new drive and clone Windows 8.1 because it really is a lot easier method, is not it?. Yes, you can do it, but we strongly do not recommend doing it, as it is not the correct way. OS on a new disk. In addition, Windows 8.1 can be installed boot record without the system's MBR and it won't boot. When you clone any partitions, application cloning should clone the MBR from the source hard drive and again from the target hard drive to eliminate the error process.
How much hard disk space is required?
This is very important point, pay attention to this because you have to make sure that the target hard drive must have enough space to accept the clone source. You can check the current OS in "My Computer" and select the destination hard drive location. As you can see in the image below, hard Windows disk 8.1, which we will clone, consumes 27 GB of space from a total of 48.7 GB of hard disk. This means that you must have at least 30 GB of space on the target disk where you are going to clone. It would be better to have more space at 50 GB to avoid any problems in the future. You can use this feature to manage disk and manage hard disk partitions, or you can even shrink or expand existing partition space.
What programs or applications can we use to clone Windows 8.1?
Finally, we are in the main topic of this article, how can we clone the Windows 8.1 operating system? As mentioned earlier, there are tools that can be used to clone a hard drive. You can use software Windows software or boot apps to fully clone Windows 8.1 to any other hard drive with the same hardware configuration.
AOMEI Backupper
AOMEI Backupper is a free tool that is ideal for hard drive cloning. We chose this app because this app is neat, clean and very straight forward and is free to download. With this tool, you can freely clone Windows 8.1 OS to a new hard drive within minutes. It comes with two great features called Partition Clone and Disk Clone. If you are just looking for partition cloning, then you can use the partition clone feature or you can use the clone disk option to clone an entire hard drive to another one. Unlike simple copy and paste, cloning will allow you to start your computer and all programs, usually without reinstalling the system and other applications. Cloning is easy additional function in AOMEI Backupper, and you can use this tool to perform operations Reserve copy And Windows recovery 8/8 .1.
How to use AOMEI Backupper?
To clone Windows 8.1 we have created some easy steps that you can follow:
Note: Make sure you have connected a second hard drive to the computer you want to clone Windows 8.1 to.
1 .Let's start with Windows partition 8.1 you want to clone, please download the AOMEI Backupper freeware software. After the installation is complete, open the Cloning section of this application, and start the cloning process. Here we are just discussing about the clone section, so click on the option Partition Cloning - Partition Clone.
2. In Clone Partition - Partition Clone, select the original partition you want to clone. We installed Windows 8.1 on our C: drive. So we clicked on the C: drive. Click the Next button.
3 .In the last step you have chosen the source partition and in this part you have to choose the destination partition where you want to clone the source operating system. Click on the Next button to go to the next step.
Note: Please delete all important data from the destination partition because this operation will overwrite all files.
4 .Here you will see the last window, which will display information about the source and target partition. You can click on the "Close" icon to cancel the operation, or click on Start Clone - Start Clone to start the cloning process.
5 .You can check the cloning progress and click on the Finish button when 100% is shown.
In the Utilities section of this application, you can create a bootable media, because this works better than cloning on a live system.
DriveClone
DriveClone is another tool that can be used to complete the same task as AOMEI Backupper can do. You can also use this tool to copy the entire contents of a partition to a new drive or SSD (Solid State Drive) in a few simple clicks. You can use the new drive to boot the system and use your applications as if you were using your regular hard drive. We did some research on the use and functionality of AOMEI Backupper and DriveClone and found that DriveClone performs better and is easier to use than AOMEI Backupper.
DriveClone is available for non-commercial use by users. Non-commercial versions for users are free to download and use. You can download it online!
By following the step by step method above, you can clone Windows 8.1 to any other hard drive in minutes without the hassle of installing every application and software over and over again. It will be more productive to clone your hard drive.
To use the operating system, you need space on which it will store files for work. Thus, you can start both from a hard drive and from a flash drive, from a disk. What to do when you need to transfer Windows with all the necessary files to another medium, without losing performance? In this case, we will consider the option of transferring the system to a second hard drive.
What is the transfer done with?
Of course, you won’t be able to transfer the system just like that, because copy / paste simply won’t work here. To perform this operation, you will need special software that will be launched from under DOS, that is, without starting the system itself at all - working only at the pre-boot stage. Yes, you can use a large list of algorithms with DOS commands, but it is much better to pay attention to programs with ready-made solutions.
Among them are Acronis, Seagate DiscWizard, Samsung Data Migration and others. Each of them is simple in its own way, has a different cost, or even can be shareware. We turned our attention to a program from Acronis - Acronis Disk Director, which can be downloaded from torrents along with license keys. Windows version 11 Home and higher will be great for Windows migration.
After downloading the program, install it and connect the second hard drive to your computer. The PC must, of course, be turned off, and after rebooting, launch the application. You don't need to do anything else with the disk. Then everything is done directly in Acronis Disk Director 11 Home.
Step by step instructions on how to transfer Windows 7, 8, 8.1, 10
The instructions fit everything. Windows versions that support Acronis Disk Director, i.e. starting with Windows 7. All actions are performed in the same way, there are no differences. Let's start moving the system to another hard drive:
- Let's say there are two disks. The first is the main one, the second is the additional one to which the system needs to be transferred. In the program window, we have Disk 2 and Disk 1;
- As shown in the screenshot, you need to right-click on the main disk and select "Clone base disk";
- In the next window that appears after clicking on the button "Clone…", you will be prompted to choose which drive you want to transfer Windows to. In our case, we transfer to Disk 1, select it, and then click "Further";

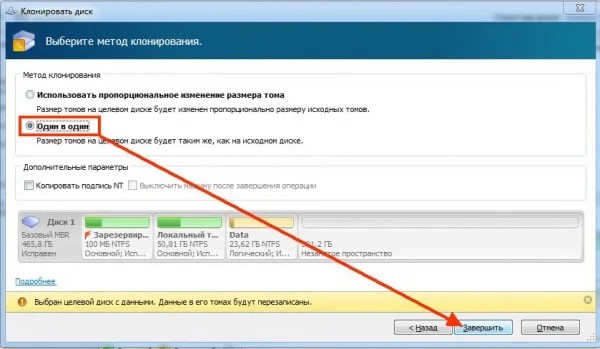
- Do not forget that after pressing "Further", you will need to put a tick or check mark in front of the item "One to One" in field "The Cloning Method" and then press "To complete";
- When this task is accepted by the program, a checkbox will be shown at the top with an option to apply pending operations. You need to click it with the left mouse button, and then click "Proceed";

- Don't worry, you will be prompted to confirm again what you want to do. Click "OK";

- When the reboot starts, the program will automatically start in DOS mode and will clone from one disk to another. This may take a long time, but your computer should be in view, just in case.


- When the whole operation is completed, a reboot will occur and you can start the application again. You will now see that the system has migrated correctly:

- To make sure everything is working properly - turn off the computer, disconnect the old hard drive and start the computer again - everything should work as before. We recommend that you format your old hard drive and use it as an additional drive.
- You can mark up the unallocated area that the program left during cloning in any way you like - to do this, check out
After buying a new HDD or SSD, the first question that arises is what to do with the operating system currently in use. Not many users have a need to install a clean OS, but on the contrary, they want to clone an existing system from an old disk to a new one.
So that the user who decides to upgrade the hard drive does not have to reinstall the operating system, there is the possibility of transferring it. In this case, the current user profile is saved, and in the future you can use Windows in the same way as before performing the procedure.
Usually, those who want to divide the OS itself and user files into two physical drives are interested in the transfer. After moving, the operating system will appear on the new hard drive, and remain on the old one. In the future, it can be removed from the old hard drive by formatting, or left as a second system.
First, the user needs to connect a new drive to the system unit and make sure that the PC has detected it (this is done through the BIOS or Explorer).
Method 1: AOMEI Partition Assistant Standard Edition
Unlike the previous two programs, Macrium Reflect cannot pre-allocate a free partition on the drive where the OS will be transferred. This means that user files from disk 2 will be deleted. Therefore, it is best to use a blank HDD.
- Click on the link "Clone this disk..." in the main window of the program.
- The Migration Wizard opens. At the top, select the HDD you want to clone from. By default, all drives can be selected, so uncheck those drives you don't want to use.
- Click the link at the bottom of the window "Select a disk to clone to..." and select the hard drive to which you want to clone.
- With Disk 2 selected, you can use the link with cloning options.
- Here you can configure the space that will be occupied by the system. By default, a partition with no free space will be created. We recommend adding at least 20-30 GB (or more) to the system partition for correct future updates and Windows needs. You can do this with knobs or by entering numbers.
- If desired, you can choose the drive letter yourself.
- The rest of the parameters do not need to be changed.
- In the next window, you can set up a cloning schedule, but we don't need it, so just click Next.
- A list of actions that will be performed with the drive will be displayed, click Finish.
- In the window with the offer to make restore points, agree or reject the offer.
- OS cloning will start and you will be notified when it is completed "Clone completed", indicating that the migration was successful.
- Now you can boot from the new drive, having previously made it the main one for booting in the BIOS. How to do this, see Method 1.


We talked about three ways to transfer the OS from one drive to another. As you can see, this is a very simple process and you won't usually run into any errors. After cloning Windows, you can check the drive for health by booting the computer from it. If there are no problems, you can remove the old HDD from the system unit or keep it as a spare.
When equipping a computer with a new hard drive or SSD, the user is unlikely to want to reinstall the operating system. In such a situation, it is possible to transfer Windows to another storage medium. Moreover, in addition to the operating system, it is possible to move all used components.
Paid or free programs which are easy to find on the World Wide Web. Some of them are able to interact with drives of certain manufacturers, for example, western digital or Samsung, the rest are perfect for a wide variety of models. Consider the simplest free options, the use of which does not require special training.
Acronis True Image WD Edition.
The Western Digital brand is very popular. If one of the disks located on your PC belongs to this brand, then the program Acronis True Image will be a great solution for moving Windows. It supports all existing versions of the 7 and 8 versions of the operating system, as well as XP, has a Russian version.
After you download and run the program, in the main window, find the "Disk Cloning" section. OS migration is available for an optional hard drive as well as an SSD.
The first step is to select a move mode. The program proposes to stop at automatic mode. In this case, all information from the source disk will be transferred to the target. If there were any files on the latter, they will be deleted, after which the disk will become bootable. That is, the OS will start from it.
After that, select the target and source disk, start the cloning process. The transfer of information can take quite a long time, since it depends on the speed of the device and the amount of information.
Seagate Disc Wizard.
This program can be called a complete analogue of the previous one. The only difference is that for it to work correctly, you must have at least one Seagate hard drive on your computer. The interface and sequence of actions when cloning Windows are completely similar. You can download it from the official website absolutely free.
Samsung Data Migration.
You can already understand by the name. that the program is designed to transfer data from any hard drive to a drive manufactured by Samsung. The process itself looks like a transfer wizard, the sequence of actions in which is performed in the form of steps. Given that the size of the SSD is somewhat smaller than that of modern hard drives, the developers have provided in the upgraded versions of the program the ability to transfer not all data, but only a certain part of it.
Macrium Reflect.
Macrium Reflect is absolutely free, but at the same time it allows you to clone all information from hard drives or a certain part of it, regardless of the manufacturer of the storage medium. After starting the program, in the main window, select the disk that you want to copy. In the next step, specify the drive to which you want to transfer the information. Further, the process will be carried out automatically.
Rate this article!


