And Apple developers have foreseen this: any iPhone owner is able to use the backup function and transfer important information to HDD PC. Initially, backup copies were created exclusively through the program ITunes, but now it has become possible to copy information to the "cloud" iCloud - if you have a fast Wi-Fi connection, this method is even more convenient. The article will tell you how to back up your iPhone via ITunes, Wi-Fi and one of the alternative file managers.
Apple technology is considered reliable, but it does not last forever. It is easy to imagine this situation: the iPhone, which served as a personal assistant in business for years, suddenly went out of order - it just stopped turning on. You can go to the store and buy a new "apple" gadget, but where can you get the information that was stored on the old one - phone numbers of business partners, suppliers, important notes? The answer is obvious: from backup... It is enough to connect new smartphone from a PC and download a copy - the information will be in place.
The user should be aware that not all information is stored in the backup copy - it includes:
- All photographs.
- Telephone directory plus call history.
- Notes - the content of the application of the same name.
- SMS (including iMessage).
- Calendars and scheduled events.
- Safari information (like bookmarks).
- Audio recordings made with a voice recorder.
- Desktop wallpaper.
- Settings for connecting the gadget to the global network (VPN, wireless access point).
- Application settings and achievements in games.
- The location of the shortcuts on the screen.
Not included in the backup:
- Music and video.
- Games and mobile applications.
Ringtones are saved only in the backup- iCloud copies.
Selecting information to back up due to weight- for example, a telephone directory and notes take up little memory space, but are of undoubted value to the user. Movies and musical compositions weigh a lot, but they can always be downloaded again, so it is impractical to make a backup.
Movies and music albums purchased from the iTunes Store, as well as applications purchased from the App Store, are assigned to a specific Apple ID, so you won't have to buy this data a second time if the gadget is lost or broken.
How to make a backup through iTunes?
Through the program ITunes backup copies are created in this way:
Step 1... Connect the smartphone with a cable to the PC and open ITunes.
Step 2... Go to the device control menu by clicking on the button with the smartphone image.
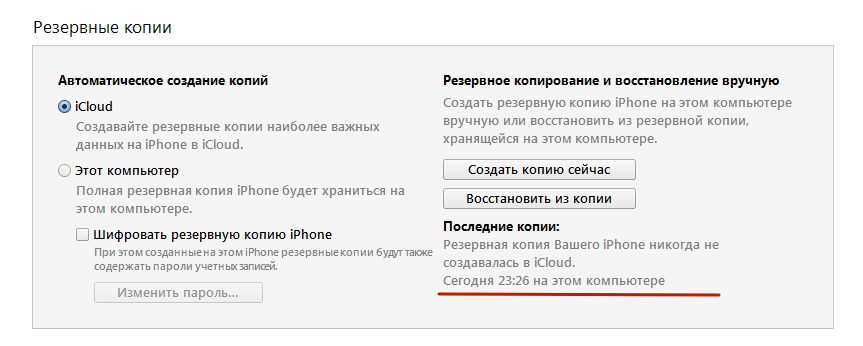
Step 3... Scroll down to the " Backups"And decide where you want to save the copy - on a PC or in iCloud.

Remember: in iCloud only 5 GB of space is available to you for free. If you intend to make prophylactic copies on a regular basis, it is better to choose a place of preservation " This computer».
Step 4... Encrypt the copy, if you deem it necessary - check the box next to “ Encrypt backup»And enter the password twice.

Then click " Set password».
Step 5... Click " Create a copy now».

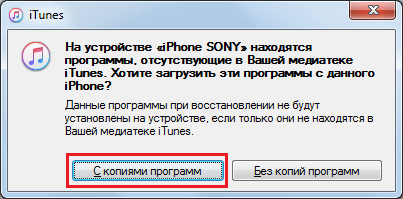
Step 6. iTunes will prompt you to transfer applications from the gadget to your library. If you prefer the option " With copies of programs", The process of creating a backup copy will take longer, however, in the future, download the programs again don't have to.
Step 7... Wait for all 4 steps of synchronization to complete. After that, you will see that in the " Latest copies»Is the current date and time, which means that the copy was successful.
Backups to personal computers are stored at the following addresses:
- On Mac - User / Libraries / Application Support / MobileSync / Backup /.
- On Windows 7/8 - Users / AppData / Roaming / Apple Computer / MobileSync / Backup /.
There is another way to create a backup copy - through the menu " File»Select« Devices» — « Create a backup».

With this method, copies are created simultaneously in iCloud and on the hard drive.
How to back up iPhone to iCloud?
To create a backup in iCloud no cable or PC required - just connect to Wi-Fi. A copy is made like this:
Step 1... V " Settings"Find the section" iCloud"And go to it.

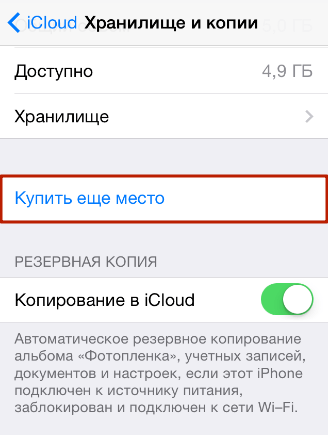
Step 2... Scroll down and go to the subsection " Storage and copies».

Step 3... Make sure that there is enough space in the "cloud" for backup - in the block " A place storage", There is an item" Available", Which indicates how much free memory is left.

In our example, 4.5 GB out of 5 GB are free.
Step 4... Find out how much one of your backups weighs approximately. To do this, go to the subsection " Storage"In the block" Storage».

It can be seen that the weight of one copy is 485 MB; about 2 more Mb in iCloud spent on data from instant messengers and wallets. Using simple calculations, we determine that there is enough space in the storage for about 9 more backups. We can also open a ready-made backup and analyze what type of data takes up the most memory.

In our copy, 482 out of 485 MB are taken with photos... It is necessary to carefully "sort out" the album and leave only the most important pictures - then it will be possible to significantly reduce the weight of one copy. You can exclude photos from the backup altogether - to do this, you need to switch the slider opposite “ camera roll»To the inactive position.

Step 5... If there is enough space in the "cloud", in the block " Backup copy "Activate the toggle switch opposite" Copy to iCloud».

Step 6... A confirmation window will appear - click " OK"; so you confirm that you want to start copying to iCloud.

Step 7... Click " Create a copy"And wait for the process to complete. Rejoice: the backup is ready and saved in the "cloud"!

Field " Create a copy»Will be inactive if the iPhone is not connected to a wireless network.
If there is a shortage of free space in iCloud you can buy it here, in the subsection “ Storage and copies"Via the button" Buy another place».
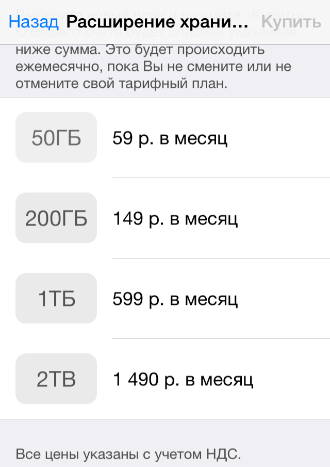
The prices are very democratic: 50 GB will be available for only 59 rubles a month, and for 1490 rubles as much as 2 TB is an abyss of information!
How to create a backup using the iTools alternative file manager?
Attitude to iTunes Apple technology users are ambiguous: official program to transfer files, it regularly "pleases" with problems and "bugs" and, in addition, is quite difficult to master - new iPhone owners, as a rule, tend to postpone acquaintance with iTunes"On the back burner." However, it is still somehow necessary to download data to the iPhone - many users turn to alternative file managers, which are simpler software. Such programs can do everything they can. iTunes, including - create backup copies.
iTools- The most convenient file manager for iPhone. Thanks to this program, it is possible to produce backup absolutely free- for comparison iPhone Backup Extractor(another well-known copy utility) costs $ 25. The advantage iTools front iTunes is that iTools allows you to create backups with video and music files. Download russified iTools can .
Backup via iTools is carried out like this:
Step 1... Connect the iPhone with a cable to the PC and run the utility.
Step 2... Go from the section " Device"In the section" Toolbox».

Step 3... In the block " Data Management"Select the item" Super backup».

Step 4... In the next window, define what data you would like to see in the backup.
iTools does not copy files like, say, notes and browser data.
Check the box you want, then click “ Next».

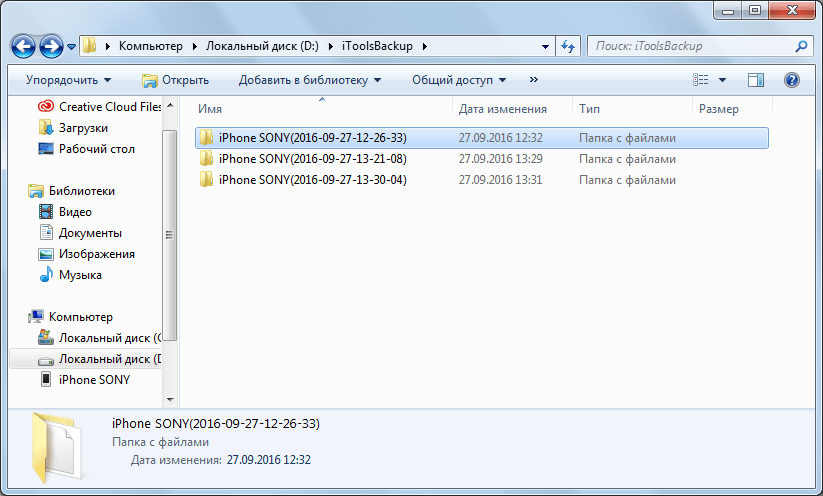
Step 5... The next window will appear where you can define the path of saving - this is done through the button " Browse". By default, the path is as follows: D: iToolsBackup.
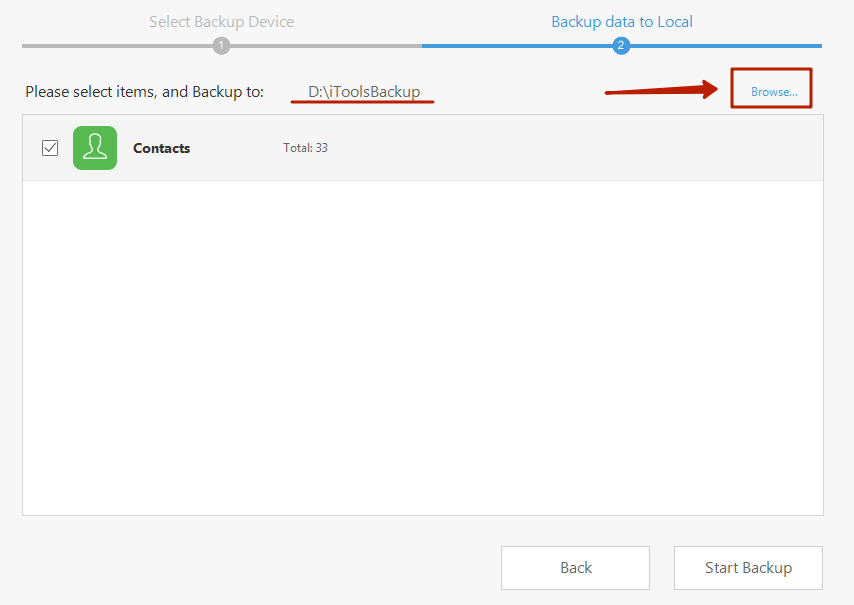
Step 6... Click " Start Backup"- this is how you start the backup process.

If the copy includes only “ Contacts"(As in our case), then its creation will take no more than a second. When saving heavy files (video or music), you will have to wait much longer. Signs of completion of the process - a value of 100% on the right and a check mark on the left.

Step 7... Click " Backup complete”And find the copy in the PC's memory.
If necessary, you can easily erase backups that have lost their relevance.
Erase copies from iCloud and from PC
Delete copies made after ITunes, of course, you can find files on your hard disk, however, it is easier to do this through the program itself.
Step 1... Go to the menu " Edit"And select" Settings»Or press CTRL +, (comma).

Step 2... In the next window go to " Devices».

You will see how many backup copies ITunes stored on the hard disk.
Step 3... Select the unnecessary copy and click on " Delete backup».
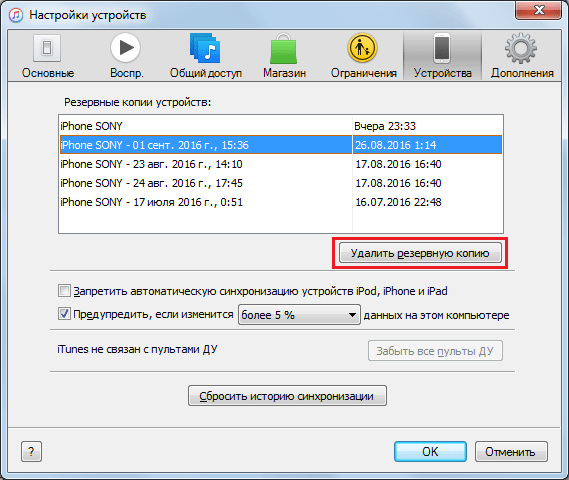
Step 4... Confirm that you really want to erase the backup - click " Delete».

Copies will be deleted permanently - you won't find them in the trash!
Erase backup from iCloud as follows:
Step 1... Take your gadget along the path " Settings» — « iCloud» — « Storage and copies"And go to" Storage».

Step 2... Go to " Properties»A copy that is no longer needed.

Step 3... On the next screen, scroll down to find “ Delete copy"And click on it.

Step 4... Confirm that you want to delete the backup data from iCloud and stop backing up.
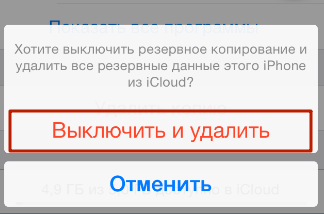
After that, you will notice that there has been a significant increase in free space in your "cloud".
Why is the backup not being created: possible problems?
When using software tools to create backups, users rarely encounter problems. If you cannot create a backup via ITunes, you need to take two measures: update iTunes before newest version(if some buttons are inactive) and check the memory status hard disk.
Back up to iCloud- on the contrary, the case is very problematic. If the iPhone says that copying is impossible, proceed as follows:
- Check if there is enough space in the "cloud" to create a backup.
- Check the quality Wi-Fi signal with the help of other applications - for example, see how quickly the pictures are loaded “ In contact with". If your download is slow, you might want to look for another Wi-Fi source.
- Sign out of your account iCloud and log back in.
- Delete contained in iCloud backups. How this is done was described earlier.
If there is still no result, reset the settings: follow the path " Settings» — « The main» — « Reset"And select" Reset all settings". You don't have to worry about personal data and content: after such a reset, they will remain where they were.
A big and inexplicable problem with saving data in iCloud is definitely present on iOS 9th version: backups are not created or deleted! Apple developers are aware of this problem and recommend that users update to at least iOS 9.3 - this is the only solution.
Conclusion
The user should choose the method of data backup based on his own needs and capabilities. For example, if a user wants to create a backup copy of his favorite movies, he has no choice but to start mastering an alternative file manager. iTools... If the USB cable from the iPhone broke long ago and went to waste, the owner of the smartphone does not have to go for a new one - he can create a backup via Wi-Fi.
Each of the methods of creating a backup copy of the iPhone ensures that the most important data the user can "resurrect", even if the Apple developers emphasize in every possible way that a full copy is obtained only when using iTunes.
The loss or breakdown of a smartphone is a problem associated not only with inevitable financial costs, but also with the loss of a large amount of personal data. It is impossible to restore all the accumulated post factum: the only way to resolve such a situation is to anticipate it.
The two most common ways to back up iPhone are by using special functions iTunes and iCloud. Each of them has its own disadvantages and advantages.
What is not included in the saved data
- What's not included in iTunes... If you lose your phone, you will lose music from the iTunes Store, apps from the Apple Store, and music, videos, and books downloaded from iTunes help(if you do not put one important checkbox, see below). You will also have to say goodbye to your Touch ID settings, Apple Pay settings, and data from the Activity, Health, and Keychain Access apps.
- What's not included in iCloud... Previously stored cloud data such as contacts, notes, calendars, and information will be lost. Also, as in the case above, you will have to say goodbye to the ID settings. All data not downloaded from the iTunes Store, Apple Store, or IBooks Store will be lost.
However, in both cases, the basic data will be saved, and you will be the judge of the best option.
Description of systems: features
- Maximum storage (upon purchase paid subscription) is 2 TB. Most users get along fine with the $ 1 (50 GB) tariff plan.
- Mandatory encryption is performed to enhance security.
- To create and use backups, access to Wi-Fi networks.
- No computer connection is required for data recovery.
- Saving in progress iPhone backup to computer(for some it is a plus, for others it is a minus).
- You can enable the encryption function (optional).
- There is no need to pay for additional data volume (free hard disk space is used).
IPhone Backup to iCloud

In the future, backups will be created automatically when the phone is charged and wi-fi is connected.
Recovering from an iCloud backup
To restore data on a new device, you just need to enter your Apple ID and password, after which the last backup saved in the cloud will valiantly migrate to the iPhone. If the device has already been configured, then it will be necessary to erase all the contents - this is the first and mandatory step. After that, follow the instructions that appear (in more detail in the article "") for setting up until the screen "Programs and data" appears; there you need to select "Recover from iCloud copy". Log in and select a suitable backup (note the date and size).
Perhaps, during the copying process, a window will appear about the need to install the current iOS - follow it. Next, you need to log into your Apple ID account, which will allow you to restore all purchased programs and materials. The duration of the procedure varies widely: recovery takes from five minutes to several hours.
IPhone Backup to iTunes
- Connect mobile device to your computer, then open iTunes and select your device.

- Further, on the tab overview, activate the checkbox this computer.
 Then, to create a backup, press create a copy now.
 If you want to save your information from the "Health", "Activity" programs, then select the "encrypt backup" option.
- And one more important point, to save all purchases (music, movies, applications, games), click file>devices>move purchases from iPhone.
 After copying is complete, you will be able to see the result of the process on the Browse screen in iTunes.
Data recovery via iTunes
Pay attention to the dates and sizes of the copies. Click "Recover" and wait until the data recovery procedure is completed.
Useful information
- In iCloud, the stored data can be partly generated by yourself; for example, if necessary, you can turn off the copying of programs that are not particularly important to you (go to the settings of your Apple ID account, select iCloud and in the list of programs using iCloud, turn off unnecessary ones.)
- If your iPhone is connected to power and to a Wi-Fi network, and its screen is locked, iTunes backups are created automatically (when the item is enabled in the settings).
- If iTunes doesn't see your device, make sure you have latest version software; in a critical event, try disconnecting all USB accessories other than the device.
A few words about alternatives and a conclusion
The above methods, based on iTunes and iCloud services, are not the only options for copying information. There are many programs focused on such activities, but in fact they do not surpass the above options. That is why it seems quite natural to "discard" them: we did not analyze such utilities in detail.
In order to ensure the maximum level of reliability, it is recommended to create copies in both iCloud and iTunes - then you can be sure that the information will be saved.
Good luck!
There is even more interesting and useful information on the Telegram channel @proyabloko. Subscribe, it will be interesting!
I will show you how to save a backup copy of your iPhone in iCloud, that is, on the Internet on the Apple server, so that in case of loss of your iPhone or if something happens on your computer, you will always have a backup of your iPhone “in the cloud”. Also, this method is definitely needed for those who do not have a computer, but only an iPhone.
Here's an excerpt from Apple's website and information on what's saved in the iCloud backup.
When registering with iCloud, you get 5 GB of free storage space for free... ICloud storage is used for iCloud Backup, iCloud Drive, iCloud Music Library beta, iCloud saved app and document data, and iCloud Mail messages (your @ icloud.com account).
If the storage is full, you can buy additional space. You can also manage storage by reducing the size of your iCloud backup, deleting photos, videos, or other files saved in iCloud.What is saved when you create an iCloud backup
iCloud automatically backs up information on your devices (iPhone, iPad and iPod touch) over Wi-Fi when they are turned on, locked, and connected to a power source. With an iCloud backup, you can quickly set up a new device and easily restore information to any of your old devices.When you create an iCloud backup, the following information is saved:
The history of your purchases (music, movies, TV shows, apps and books).ICloud backup contains information about purchases, but not the actual purchases... Restoring data from an iCloud backup automatically downloads purchased content from the iTunes Store, App Store, or iBooks Store. Certain types of content are not available for automatic download in all countries, and previous purchases that are no longer in the store or have been refunded may not be available.
Photo and video on iOS devices, unless Beta iCloud Music Library is turned on on an iOS 8.1 device. If the beta version of iCloud Music Library is enabled, your photos and videos are already backed up to iCloud, so they are not included in the iCloud Backup.
- Device settings
- Application data
- Home screen layout and app order
- IMessage, SMS and MMS messages
- Ringtones
- Visual Voicemail Messages
1. Turn on backup to iCloud
Go to Settings> iCloud.
After entering iCloud settings, scroll down and look for a backup.

Click on Backup.

When this iPhone is plugged in, locked, and connected to Wi-Fi, it automatically backs up data such as photo library, accounts, documents, Health data, HomeKit configuration, and settings.
Turn on iCloud Backup.

Start copying to iCloud. Your iPhone will no longer be automatically backed up to your computer when syncing with iTunes.
Click OK.

ICloud backup is enabled.

2. Create an iCloud backup
Now we can create a backup that will be stored on the Apple server. Click Create Backup.

The remaining time for the iCloud copy begins to be calculated.

And the backup of the iPhone to iCloud begins. This will take from 10 to 30 minutes, depending on the speed of your Wi-Fi and the workload of the Apple server.

After the iCloud backup is created, the time of the last backup will be indicated here.

3. Choose what to include in the iCloud backup
In Settings> iCloud, turn on the sliders on the items that you want to include in the iPhone backup that will be stored in iCloud. For example, you can enable mail, contacts and notes, then your contacts and numbers will be saved in an iCloud backup. And if you sweat your iPhone, then you can restore all your contacts from an iCloud backup.

You can also enable keychain.

To keep the keychain in an iCloud backup. ICloud Keychain stores passwords and credit card information you've saved so far on devices you've verified. The information is stored in an encrypted video and cannot be read by Apple.

4. Choose what will be stored in the iCloud backup
To see which applications save data in an iCloud backup, go to Settings> iCloud> Storage.

It displays how much space you have available to store your backup, how much is left. To see what is stored in your iPhone backup in iCloud, click on Storage.

The storage shows your devices (if you have more than one) and how much space they take up their backups in iCloud. Click on your iPhone to see which apps take up how much space.

Settings> iCloud> Storage> Storage> This iPhone shows how much apps are taking up in your iCloud backup.

You can disable those applications from which you do not want to be stored in your iCloud backup. You can also delete your iCloud backup here.

5. Buy space in iCloud
If 5 GB is not enough for you. to store your backup, this space can be increased up to 1 Terabyte. Go to Settings> iCloud> Storage. To increase the space in iCloud for your iPhone backups, go to Settings> iCloud> Storage and click Buy More Space.

By default, Apple gives you 5 GB. free to store your backups in iCloud.

But you can increase space and expand storage in iCloud (money will be debited from the account in the App Store):
- 20 GB., But it will cost 39 rubles per month
- 200 GB., But it will cost 149 rubles per month
- 500 GB, but it will cost 379 rubles per month
- 1 TB. (that's 1000 GB.), but it will cost 749 rubles per month

Also you can cancel tariff plan or reduce the amount of storage. You can do this on your device at any time. Contact Apple within 15 days of upgrading to a new plan for a refund. Partial refunds are possible in accordance with the established legislation.
This is if you change your mind about using a paid plan and decide to get your money back.

Let's say you want to increase your iCloud storage up to 20 GB. We choose 20 GB. and click Buy.

You must now be logged into the iTunes Store to make a purchase (money will be debited from the account in the App Store).
Enter your Apple iD password and click OK.

Purchasing iCloud storage space.

Purchase completed. You now have 20 GB available. iCloud storage... Click OK.

ICloud storage has been increased.
Surely, every more or less knowledgeable iOS user, realizing how difficult the process of restoring personal data (contacts, accounts, calendars) can sometimes be, first of all takes care of their reliable backup.
What is all this for?
You are holding a modern mobile device with a huge variety of functions. This device, be it iPhone or iPad, is designed to make your life easier. Throughout the day, you often refer to him: make calls, add new contacts, take important notes, use calendar reminders, save bookmarks in the browser or just play games. This is not all that your iOS device is capable of.
Over time, your iPhone or iPad becomes storage critical information that you have accumulated over many months or years. Hundreds of contacts, notes, customized calendars, bookmarks and game saves ... Isn't this information very dear to you?
Unfortunately, in our life there are also unpleasant surprises, because of which we are often forced to part with our devices.
So, the bitterness of losing a gadget will be even stronger if, along with it, you lose all personal data in the device, collected bit by bit over many months or years. Buying a new device is sometimes much easier than recovering precious personal data.
To prevent this from happening, and you reacted as calmly as possible to parting with your favorite device, you must periodically resort to backing up your personal data.
As we noted above, there is the preservation of personal data by creating backups. About that, we talked about in one of our articles, about saving data on a device with a jailbreak using a utility iLex Backup You can find out . Also, it can be very useful third party application, which has truly enormous potential.
How to back up to iCloud on iPhone, iPad, or iPod Touch
iCloud Is a standard cloud service available on all Apple devices with iOS 5 and higher. By using iCloud You can set up automatic saving of data for almost any application installed on an iOS device.
1.
Register your Apple ID. Apple account ID can be registered directly on the device or in iTunes. ...
2.
Open the standard app Settings on your iOS device and go to the section iCloud.

3.
Enter the details of your account(Apple ID) registered in pukte 1.
4.
Select item Backup copy.
 5.
Activate the item "".
5.
Activate the item "".
 The backup will be automatically created if the iOS device is connected to a power source and connected to a Wi-Fi network. Pressing the button Create a backup will result in an immediate backup.
You can view the created backup along the path Settings -> iCloud -> Storage -> To govern.

You can read how to choose the apps whose data is saved in the iCloud backup.
If you have not yet lost your personal data with your iPhone or when it breaks down, you are lucky! It's time to play it safe.
Many, including myself, at least once faced the loss of personal data: notes, calendar and reminders - when the device fails, is lost, or, most unpleasant,. Protecting yourself from such troubles is quite simple - with the help of iPhone / iPad backup.
There are several issues on the agenda:
IPhone / iPad Backup
An iPhone / iPad backup is a multi-file archive with encrypted user data stored in the device's memory.
The method of creating a backup is determined by:
- Content: iTunes and iCloud backups are different from each other. Looking ahead, I will say that it is more complete.
- Location: either or in the cloud.
Unfortunately or in part, the backup does not include all of the content iOS devices- Imagine how long it would take to backup everyone and the video, and how much such a copy would weigh! Apple, as always, left us no choice and therefore the iPhone backup contains a fixed set of data.
IPhone / iPad Backup Contents
- Camera roll: photos, screenshots, saved images and captured videos;
- Notes;
- Settings ;
- Contacts and call history;
- Calendar Events;
- Safari bookmarks, cookies, history, data autonomous work and currently open pages;
- Autocomplete for web pages;
- Cache / offline database of web programs;
- IMessage and SMS and MMS with attachments (images and videos);
- Audio recordings made with a voice recorder;
- Network settings: saved Wi-Fi hotspots, settings, network settings;
- Keychain Access: Account Passwords Email, Wi-Fi passwords and passwords entered on websites and in some programs;
- Information about installed on the iPhone / iPad and applications from the App Store;
- Parameters, settings and data of programs, including documents;
- In-app purchases;
- Game Center account;
- Wallpaper;
- Bookmarks of the program "Maps", search history and current location;
- Paired Bluetooth devices (if this data is restored to the same phone that was used to create the backup).
The list of what is not included in the iPhone / iPad copy is shorter and depends on the type of backup: iTunes or iCloud.
ITunes backup does not include
- from the iTunes Store;
- Games and programs and the App Store;
- Music, photos, videos and books,;
- Photos previously saved to iCloud, such as files from My Photo Stream and your iCloud Library.
- Touch ID settings;
- Data from Activity, Health, and Keychain Access (you must use iTunes backup encryption to back up this data).
An iCloud backup isn't as complete as iTunes, but it has everything most of us need.
What's not included in an iCloud backup
- Previously saved data to the cloud (for example, contacts, calendars, notes, files from the My Photo Stream album and iCloud library);
- Data stored in other cloud services (such as Gmail or Exchange);
- Information and Apple settings Pay;
- Touch ID settings;
- Content downloaded from sources other than the iTunes Store, App Store, or iBooks Store (such as imported MP3 files, videos, or CDs);
- Content downloaded using iTunes in the cloud and content from the App Store (If previously purchased content is still available from the iTunes Store, App Store, or iBooks Store, you can re-download it).
Methods to create iPhone / iPad backups
I'm sure you know no more than 2 ways to create iPhone backups, but there are at least 3 of them:
- On a computer using iTunes.
- On iPhone / iPad using iCloud.
- On a computer using third-party software, for example,.
ITunes backup
- Created on your local Windows or Mac computer in iTunes.
- Can be encrypted with a password (the encrypted copy stores data from the Activity, Health and Keychain applications).
- Generated automatically when iOS is updated or updated.
- Only one copy is created for each device within one iOS generation. For example, when backing up an iPhone running iOS 9.3.1, the previous copy is overwritten with the new one. The trick with changing the device name no longer works.
- For requires a connection of the device to a computer.
- You can restore data from a copy at any time.
How to back up iPhone / iPad using iTunes?
As a reminder, this is a local backup (stored on the hard drive of your Windows computer or Mac).

ICloud backup
- Created directly on iPhone and iPad.
- Stored in cloud storage(on Apple servers).
- Created automatically or manually.
- Automatically generated daily if:
- with Internet access,
- device screen.
- To restore data from an iCloud backup, you don't need to connect your device to your computer.
- Data recovery from iCloud copy is performed after recovery in iTunes and.
How to back up iCloud to iPhone / iPad?

The Create Backup button is grayed out if your device is not connected to a Wi-Fi network with Internet access.
How to back up iPhone / iPad using iMazing and the like?
iTunes is not the only one computer program with the iPhone / iPad backup function, in my work I use iMazing - almost a complete analogue of iTunes, only without the function of restoring and updating the device.

Interestingly, iMazing and iTunes backups are fully compatible: the iTunes copy is recognized in iMazing and vice versa - the iMazing copy is compatible with iTunes.
Also in iMazing, you can create a single-file iPhone / iPad backup, unlike iTunes, in which a backup copy is dozens of files encrypted using the cryptographic hashing algorithm (SHA-1). You can create as many such backups for each version.
To back up your iPhone / iPad using iMazing:
IPhone / iPad Auto Backup
If your iPhone / iPad is connected to a power source and a Wi-Fi network with Internet access, and its screen is locked, then iCloud backups are automatically created daily without your participation.

On the one hand, this is great because it saves us time, on the other hand, it can lead to the loss of contacts, calendar events or Safari bookmarks. For example, your iPhone is on a charge and connected to a Wi-Fi network, you have removed a contact and then locked the device by pressing the Power button. ICloud automatically creates a new backup without the contact you deleted, overwriting the old BEFORE deleting the data. As a result, you were left without contact, and, if not, your data would have been irretrievably deleted. Luckily, files in iCloud Drive, contacts, calendar, and Safari bookmarks can be recovered.
How do I manage iTunes and iCloud backups?
We have already discussed where the iTunes backup is stored by default and how to transfer it to another partition of the hard drive. Let's take a closer look at setting up backup to iCloud.
Let's assume you already have an iCloud backup of your iOS device. Information about the last copy is located in the menu "Settings -> iCloud -> Storage -> Manage -> Section" Backups "-> Your device name".

ICloud backup properties contain the following information:
- Date and time of the last copy.
- The size of the copy in megabytes.
- Backup options for applications installed on your device.

How to disable backup of a program / game on iPhone / iPad?
If you change your mind and want to enable data backup installed applications, turn on the appropriate switches in "Settings -> iCloud -> Storage -> Manage -> Section" Backups "-> Your device name -> List of" Backup options ".
Thus, you can flexibly configure the backup data of individual programs and reduce the size of the iCloud copy.
How do I delete an iTunes backup?
If you sold your iPhone / iPad, then its backup, saved on your local computer, is unnecessary for you and you can do it.

- If the value of your personal data is many times higher than the cost of the device itself, on which it is stored, or even priceless, you should set up a backup immediately after.
- If you forget to create backups manually, create conditions where iOS will create them automatically without your participation.
- An iTunes backup may become corrupted, for example, if the backup failed or failed.
- You can, and with it the iCloud copy.
Create 2 backups of one device at once (if you don't have money for iMazing): locally in iTunes and remotely in iCloud. Why?
According to the Probability Theory, the probability of coincidence of two events is always less than the probability of each of these events separately, which means that the chances of losing data when creating two copies are less.