In this article, we will show you step by step how you can configure the codec settings. K-Lite Codec Pack as deep and detailed as possible. There are two ways how to do it:
- Configuring the K-Lite Codec Pack during its installation on a computer
- Configuring the codec through the Start menu - programs - K-Lite Codec Pack - Configuration - fine-tuning its individual components, after installation on the computer.
We will analyze the first method in detail, since it is the simplest and does not require additional time.
Selecting the installation mode
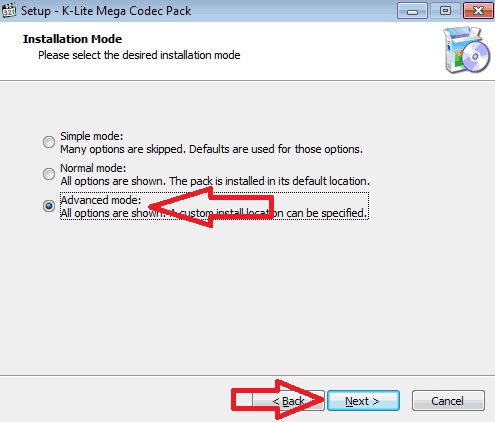
We launch the installation K-Lite file Codec Pack of the required build package. In the very first window of the K-Lite Codec Pack installation, select the "Advanced" setting item and click the "Next" button.

Next, the preferred programs and codecs for working with video files are selected. We leave everything as it is by default. That is Video Player Media Player Classic and video-audio codecs LAV and press the button next.

Choose a profile
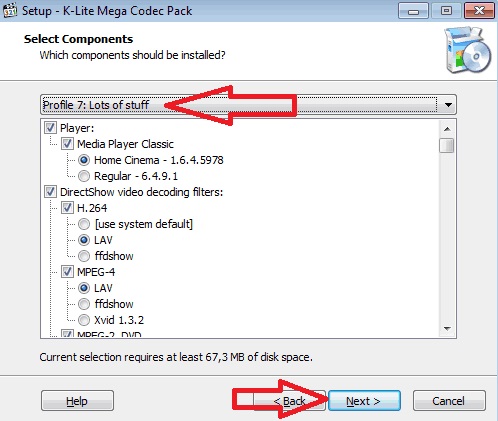
The current window will be one of the most important in configuring this K-Lite Codec Pack. Usually the default is "Profile1". Most users leave these settings as they are, as they are perfectly optimized. But if you still want to do full customization codec, then we definitely choose "Profile7".

How to configure K-Lite Codec Pack filters
In the current window of the K-Lite Codec Pack, we also select the video and audio filters we need "DirectShow video decoding filters". We can only choose a few filters: LAV or ffdshow? I choose the first one (I just liked it), although no one noticed a significant difference between them. Also at the very top you need to select the bit depth of your Windows - x64 or x86. Most modern computers have a 64-bit operating system installed. We press "Next".

How to set up an audio splitter K-Lite Codec Pack
In this window of the K-Lite Codec Pack, we lower the slider or mouse wheel below and see the section "DirectShow source filters" He is, by the way, also quite important! This so-called Splitter is used to select subtitles and audio tracks. But from the list offered to us, only Haali or LAV Splitter. We mark the items we need, as in the figure, we skip the others by default and click "Next".

Additional tasks and settings K-Lite Codec Pack
In the next window, we are prompted to select additional tasks and codec settings.
- If you need to install additional shortcuts to programs and utilities included in the K-Lite Codec Pack on your computer desktop, then you need to check all the checkboxes that are present in this window.
- If you want to reset all settings to the recommended ones, check the box "Reset all settings to their defaults". Note that this setting is already enabled by default.
- It is possible to enable video playback, exclusively from your white list. To do this, check the box "Restrict usage to whitelisted applications".
- If you want the video to be displayed in color mode RGB32 point must be noted "Force RGB32 output". In this case, the color palette will be more saturated, but at the same time, the load on the processor will increase.

In the current window, you need to select additional settings for the K-Lite Codec Pack components. Namely, the optimization of the settings of the codec components for Windows 7/8/10 operating systems and the frequency of checking for codec updates (week, month, quarter). The settings of the current window can be left by default, click "Next".

Setting in the hardware codec Hardware Acceleration
In this window, it is preferable to leave everything unchanged. The default decoding method settings of K-Lite Codec Pack on all operating systems are perfectly optimized for playing any video and audio files. Let's move on to the next window.

Renderer selection in K-Lite Codec Pack
Let's set up the renderer, i.e. a special program that is responsible for the correct acquisition of the image in the video. Here you can leave everything by default. We only recommend ticking the box. "Enable volume normalization» - in order to optimize the sound when playing on the player.

Selecting codec program languages
To install various language files, as well as the ability to switch between them, check the box "IPstall language files". We press "Next".

Below we get into the language settings menu. You are prompted to choose a primary and secondary language that will suit your preferences. By default, two languages \u200b\u200bare selected - Russian and English, but it is possible to install any third. You can also set the subtitle language here. Select and click "Next".

Selecting video and audio settings
At one of the final stages, you are offered to choose a video player (player), which we will use by default to play all video files. We choose Media Player Classic and KMPlayer, since we have it installed additionally. You can leave only Media Player Classic, which comes with the default K-Lite Codec Pack.

At the next stage of setting up the K-Lite Codec Pack, we will select the video and audio files that will be played on our player. We recommend that you note this menu all available file types. This can be done quickly special buttons, which are at the very bottom of the window - "select all video" and "select all audio". We press "Next".

In the current window, we make audio configuration settings, namely, we mark the audio output device that is used on your computer (ordinary two stereo speakers or a multi-channel output device, such as 6.1 or 7.1). Leave the rest of the settings unchanged and click Next. 
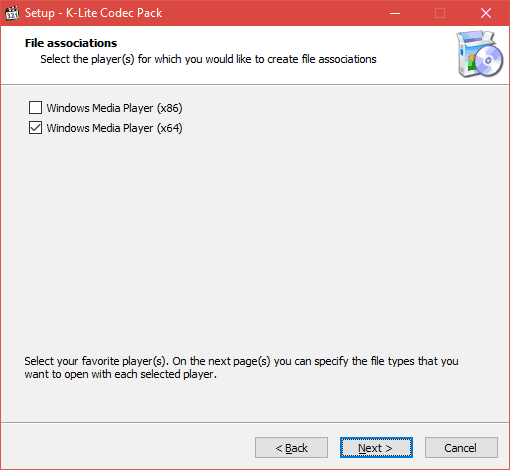
At the final stage of setting up the K-Lite Codec Pack, we select all possible video file formats for the association of Windows Explorer with the video player installed on your computer, i.e. the operating system will automatically open video files of a certain extension in the player by default. We mark them all with the “select all” button and click “Next”. 
At the last stage, we check all our settings, if you did something wrong, you can change it for each of the previously configured items by returning back to the desired menu with the “Back” button. If everything is correct, then press Install and install the K-Lite Codec Pack on your computer. This completes the installation, enjoy watching your favorite movies!

Codec is a program for to and dec coding (packing and unpacking) video and audio streams. The average user needs codecs to play compressed video or audio formats on a computer. The fact is that in most modern formats, such as mp3, mp4, compression is used. And when installing a clean operating system most compressed formats are not supported. Therefore, in order for playback to become possible, you need to install a codec. Most codecs slightly degrade the quality in order to significantly reduce the file size. But there are also lossless codecs - those that compress a file without quality loss.
K-Lite Codec Pack - what is it?
K-Lite Codec Pack is a set of the most popular and in-demand codecs in one package. By installing this package you will be able to watch almost any video and play any audio format.
Benefits of K-Lite Codec Pack
- The maximum set of codecs in one installer.
- Regular updates.
- The package includes one of the best players Media Player Classic - convenient, lightweight and fast.
- It comes in different configurations - Basic, Standart, Full and Mega (from the minimum set of codecs to the maximum).
Disadvantages of K-Lite Codec Pack
Sponsored software may be included in the installation package. If you install a codec pack without looking, you can install something you don't need. Read below for how to avoid this.
How to download K-Lite Codec Pack
Now about how to download the K-Lite Codec Pack correctly in order to download exactly it, and not something else by mistake.
1. Go to the official website:
http://www.codecguide.com/download_kl.htm
2. Click Download Mega :


How to install K-Lite Codec Pack without extra programs
1. Run the downloaded file:

Click Yes in the User Account Control window:

2. Slowly, click Next. If you see a window with a Decline button, click Decline!
So like here:
 And here:

If you have any problems with playing movies and video clips on a computer, then you can solve them using the K-Lite Codec Pack, which is distributed in several versions: Basic, Standard, Full and Mega. In this guide, we will walk through the installation process of K-Lite Codec Pack Mega, which includes components from all other packages.
Step 1 Installer
We launch the browser and go to the K-Lite Codec Pack Mega page. Click on the link to download the distribution:
Download and run the distribution.
Step 2. Preparation
At the very beginning, you will be asked to specify the installation type. Choose Advanced and press the button Next:


Step 3 Path and Components

Select all components in the option Player, if they are suddenly not affixed in advance. If you have a 64-bit OS installed, then you can leave the checkbox x64, and if 32-bit - x86. Click on Next:

You will then be prompted to create a K-Lite Codec Pack folder in the start menu for quick access. To cancel an action, check the checkbox Don't create a Start Menu folder. Click Next:

On the next screen, leave all the default settings:

Optionally, you can add player shortcuts Media Player Classic and K-Lite settings on desktop and taskbar:

Scroll down, disable options Show configuration tips And Show optional offer. Click Next:

Step 4Language Pack
In the window that appears, enable the option of language packs Install language files, if it is suddenly not active, and click on Next:

Step 5Hardware Acceleration
We leave the default settings for the H.264 codec and click Next:

The developers recommend changing these settings only if you are an advanced user and understand what these options are responsible for, which you can read about in more detail in the help (Help button in the lower left corner).
Step 6Language Settings
Further as the main language ( Primary language) leave the Russian ( Russian) or change at will, but as a secondary language ( secondary language) we are offered English ( English). It can also be changed at will:

The bottom options allow you to customize the output of subtitles. For example, if we select the 2nd checkbox, then subtitles will be displayed by default if the language of the audio track does not match the main one ( Primary language). Leave this option and click Next:

Step 7. Finishing
Here we can select those players for which the K-Lite Codec Pack settings will be active. We select our favorite video players, focusing on the bit depth of your OS (x86 is 32-bit, and x64 is 64-bit), and click Next:

In a new window, click on the button All video and click on Next:

If your settings for video file extensions are reset, and all audio formats are selected instead, then click on the button None and choose again All video.

You will then be asked to specify the types of video preview extensions that will be displayed in the standard explorer. Leave everything as default and click Next:

Click Install and wait until the installation of all components is completed:


Upon completion of the installation, click on the button Finish:

Weird situation: you installed a clean, fresh Windows on your computer, rolled up the drivers, settled yourself comfortably, looking forward to watching an interesting movie, but it doesn’t play? The same thing happens with music: the sound driver is installed, and there is silence in the headphones. Where can glitches come from if the system is completely new? I will reveal a secret: the problem is not in it at all and is solved very simply.
The reason for the problem is the lack of codecs - small but extremely important programs that are used to decode (and reverse encode) compressed digital audio and video of certain formats. Today we'll talk about how to install and update codecs in Windows in order to be able to listen and watch whatever we want.
When should codecs be installed?
Is it necessary to install codecs on the computer immediately after Windows installation and drivers? For some, yes, and for others, no. The fact is that codecs for many common video and sound formats are present in the system from the very beginning. And if you have no problems opening the desired content, you can leave everything as it is.If, however, when you try to play a video or music, you see the message " An error occurred while opening one or more files" or " File cannot be opened”, installing the missing codec will fix the situation.

The bulk of audio and video codecs are universal, that is, they can interact with different applications. For example, it is enough to install the codec into the system once MPEG Layer III, and all music players will be able to play sound content in the format mp3.
There are codecs that are used by a single program. Usually they are installed in Windows along with it, but in some cases the mission of finding and installing missing components is assigned to the user.
There are also situations when a multimedia file of a certain type is played only in one application, and the rest do not recognize it, although they should. The reason again lies in the lack of the required codec in the system. It's just that the program that reads this file has a codec inside it, and "competitors" can't get to it in any way.
Where can I get the necessary codecs?
There are only two main sources for replenishing the stock of Windows codecs:
- Official websites of the developers of the compression standard for a particular data type. This is a good option when one or two rarely used codecs are missing in the system.
- Batch builds of all major video and audio codecs. This option is more suitable for the case when the computer does not recognize many file formats.
The most popular source of the second type is batch assembly. K-Lite Codec Pack. More precisely, this is an application that not only installs, but also monitors codec updates and automatically downloads them as they are released.
K-Lite Codec Pack is free. The latest releases available on the official website contain components for 32-bit and 64-bit systems and support all versions of Windows from XP to Windows 10. In addition, as part of the packages (except for the minimum - basic) there is a universal media player for playing video and music files.
Today, 4 releases of the application are available on the Russian-language resource K-Lite Codec Pack:
- Basic - a basic package that includes only the most commonly used codecs.
- Standard - a regular package that is enough to play most common multimedia files.
- Full is a complete package of audio and video codecs with additional tools.
- Mega is the ultimate package with additional tools.
How to install K-Lite Codec Pack
The application supports several installation methods - from automatic to manual, where the user can configure almost every parameter.Consider installing the basic K-Lite Codec Pack in Expert (manual) mode, since it has the ability to load only the necessary components into the system and configure them according to your preferences.
Mode " Expert» select in the first window of the installation program.

Next, the installer prompts you to specify decoders for video and audio and preferred player applications for playing movies and music. And also - agree to link multimedia files to these applications (create associations).

Next, determine the installation location of the program.

The fourth step is to select the required assembly components. What you do not plan to use, do not mark.

After selecting the components, the program offers to configure their configuration.

Then - the method of hardware acceleration.


At the eighth stage, we select one of Windows versions Media Player which will be used.
Specify the types of files that will be opened in Windows Media Player by default.

Determine the configuration of the playback device.

We mark the file extensions for which a thumbnail will be created in Windows Explorer.

Check your settings and click " Install» to start installing codecs.

If you do not understand the essence of any parameter, leave it by default or follow the program's recommendations.
The choice of options in other K-Lite Codec Packs is somewhat more extensive, but the differences are not so global as to dwell on them separately. We were faced with the task of installing codecs in the system, and we successfully coped with it, and additional functions very few need it.
In order for Windows to start using the installed codecs according to your preferences, simply restart your computer.
Computer users, and especially moviegoers who like to watch movies, series, cartoons, etc. - encounter a problem when video files of a certain format are not played. The video player can play sound and not play video, or vice versa, play video without sound, and sometimes even give an error when opening files of certain formats. Also, this situation may occur with some audio files.
The problem is that the player and the system do not support this video encoding. Most often this happens when playing files of the format: *mkv, *mka, *flv, *mp4, *vob, *aac, etc. This is all solved by installing a codec pack.
In the case when you do not play the video, its image or sound, then you should use our instructions for installing codecs, which we will bring to your attention below.
First, we need to download the codec installer to a computer or laptop. As a codec pack, we recommend using the K-Lite Codec Pack - this is the best universal set of decompressors and utilities for playing special video and audio formats.
K-Lite also has competitors, the most famous of which are Vista Codec Package and Codecs. However, they did not win the love of users, and they are inferior in quality to K-Lite. K-Lite can be installed on any generation of operating Windows systems. In addition, there are other, less well-known codec packages, they are mostly collected by amateurs on software resources (websites, portals, forums and communities) ..
It is worth noting that starting from the 10th version of K-Lite, it includes both a version for 32-bit systems and for 64-bit ones. In previous versions, codecs for the 64-bit system were a separate add-on and installed over the installed 32-bit version.
To download the codec pack to your computer device, you must visit the official website of K-Lite - Codec Guide. There you will see that this installation package has several options:
- basic;
- standard;
- full;
- Mega.
After opening the K-Lite website, opposite the Mega version, on the right, click on "Download Mega".

On the next page, click "Mirror 1" or "Mirror 2", you can choose any of the two file-sharing resources on which the codec pack is loaded.

Depending on the selected link, you will need to start downloading the file, how to do it in the first and second cases is indicated in the picture.

Next, the browser itself will either start downloading the file to the default folder, or it will prompt you to choose a location to save it.
Installing the codec pack
Now let's directly touch on the process of installing the codec pack. We launch the downloaded file, and the installer window starts in front of us. In it, we need to click the "Next" button to continue the installation.

Then you will need to select the installation mode, of which three will be offered:
- Simple mode - Simple mode;
- Normal mode - Normal mode;
- Advanced mode - Advanced mode.
Next, you will be prompted to select the installation directory for the codec pack. The default is: system disk C, Program Files application folder (if the system is 64-bit, then codecs are installed in a folder labeled "x86"), in which the K-Lite Codec Pack folder will be created. We recommend that you leave the installation address unchanged and do not change anything. To continue the installation, click "Next".

The installer will now prompt you to select an option to configure settings. Here you need to select profile number 7 - "Lots of stuff". In profile editing, we recommend setting marks on the ffdshow parameter wherever possible, if you are not particularly versed in this. If you are more or less versed, you can choose between ffdshow and LAV. For other files (Other audio formats), set the value to "Prefer ffdshow over LAV".
Of particular note are the AVI and Matroska settings, where it is recommended to select the “Haali” option. For AAC, select - "LAV", for FLAC - "madFLAC". In general, setting up codecs is a separate topic, so we will not write a long manual for setting up each individual decoder, we only mentioned the main points.
When you have made the settings, click on "Next".
If necessary, you can install the "K-Lite Codec Pack" folder in the Start Menu. If you don’t need it, or if there are already a lot of them, then check the box “Don” t create a Start menu folder”, then click “Next”.

In the next window, you can select the settings for additional tasks and options. You can check the box next to "Reset all settings to their defaults". In other cases, if you understand what this or that item means, adjust to your preferences. Having set the necessary checkboxes, go to the next window by pressing the "Next" button.

In the hardware acceleration settings window, leave the default values. This mode allows you to configure hardware acceleration of the video decoding process by reducing the load from CPU due to the graphics (the one that is on the video card). Click "Next" to continue installation.

Now the installer will offer to associate certain files with the installed players. To get started, we recommend checking the box next to Media Player Classic, which is installed along with codecs. Also check the box next to Windows Media Player, which .
If other players are already installed on your computer, and you want to give them the ability to open files of a certain format, then we also check the box next to them. After selecting the players you are interested in, proceed further by clicking on “Next”.

In the following windows (there will be as many as there are players you want to configure), you will need to associate file formats with each player separately. Set the checkboxes next to each file format to entrust its launch to a specific player. This binding can always be changed by clicking on the file of the format you need with the right mouse button, and in the properties change the application that opens given format media file.
It's best to associate video formats with one video player, but if you have your own preferences, you can differentiate between them. It is better to entrust audio formats to the audio player, if it is not there, assign them to Windows Media Player, or install the music player separately (Winamp, Aimp, iTunes, etc.) in this case, you need to uncheck all the checkboxes from the audio section. To proceed to the audio device settings, click "Next".

In this window, you need to select the configuration of your audio device. If you have a laptop or 2 simple stereo speakers - choose 2.0, if 2 speakers and a subwoofer - 2.1, when there is an audio system - count the number of speakers + subwoofer and select the appropriate value. Click on "Next" to move on.

Since this package of codecs is assembled by specialists and is constantly updated, you won’t survive on enthusiasm alone, so the creators have built-in advertising in the installer. IN latest version it is proposed to install add-ons of the Yahoo! service. In order not to install anything extra - check the box "No thanks", the checkboxes will automatically be removed from the top items and the add-on will not be installed. Then we move on by pressing the usual button.

Here you will see a list of the settings you have selected. You can go back by clicking "Back" to make adjustments, or you can continue the process by clicking the "Install" button to install.

After all the actions performed, which are quite a lot, the direct installation process will begin.

After the installation of the codec pack is completed, a window will appear in which you can click the checkboxes to view the configuration of the decoders, as well as launch the settings manager (Tweaker tool) that was in the installation process, when choosing options for decoding various video formats.
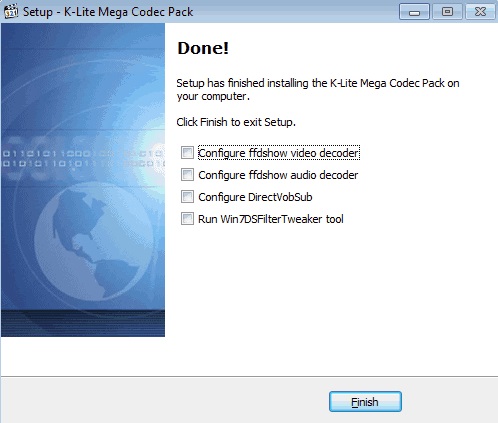
If you want to run the settings, check the last item and click the "Finish" button. If you launched Tweaker, then you will have a settings window, as in the photo below. After you make adjustments, click on the "Apply" button, then on "Exit".
If you did not check the boxes, then after clicking the “Finish” button, the settings window will immediately be closed.
Then we recommend that you restart your computer for the new settings to take effect. After that, the main formats of video and audio files will run on your computer without problems, taking into account the settings you have made.
This completes our guide. Before wishing you success in the process of installing codecs, we would like to remind you that before installing codecs, you need to install the codecs necessary for the operation of the system as a whole (especially for the video card and sound card). Good luck!