While MSI's GT series gaming laptops are known to be some of the most powerful and feature-packed models available on the market, not everyone knows that GT73, GT75 and GT83 series devices support 4K 3+1 multi-monitor configurations. Not every laptop offers such an opportunity. Moreover, these models allow you to play by displaying the image on several monitors at once in Surround mode!
Setting up a multi-monitor configuration
Configure the connection of three external monitors to a laptop using the built-in Windows tools or the Intel HD Graphics control panel is easy. The illustration below shows an example with three 4K monitors and a refresh rate of 60Hz. First you need to find out if the laptop has three video outputs, such as HDMI, mini-DisplayPort and Thunderbolt 3. In most cases, you will need mini-DisplayPort and Thunderbolt 3 to HDMI adapters to connect all monitors with HDMI cables. Then extended desktop mode is activated. There is only one drawback: in this case, only three external monitors will work, and the laptop's own screen will turn off.Activate the Surround mode in the NVIDIA Control Panel
You can also create a multi-monitor configuration in the NVIDIA Control Panel. To do this, go to the "Configuring SLI, Surround, PhysX technologies" section. If three external monitors are connected correctly, then it will be possible to combine them into one virtual monitor. The laptop's built-in display will not turn off.In this case, the panoramic picture has a resolution of 5760x1080, and the GT75VR Titan/SLI model is quite capable of handling it. In Surround mode, you can even connect three 4K monitors, but I think the resolution of 11520x2160 will be too heavy for games even for such a powerful laptop.
Enjoy the game with panoramic view! By the way, in this mode, you can take a lot of interesting screenshots. As for the speed of the game, it was about 45-55 frames per second at high (High) image quality settings.
Hi all! Today is a very interesting article about fine-tuning a video card for high performance in computer games. Friends will agree that after installing the video card driver, you once opened the “Nvidia Control Panel” and saw unfamiliar words there: DSR, shaders, CUDA, sync pulse, SSAA, FXAA and so on, decided not to climb there anymore. But nevertheless, it is possible and even necessary to understand all this, because performance directly depends on these settings. There is an erroneous opinion that everything in this tricky panel is configured correctly by default, unfortunately this is far from the case and experiments show that correct setting rewarded with a significant increaseframe rate.So get ready, we will understand streaming optimization, anisotropic filtering and triple buffering. As a result, you will not regret it and you will be rewarded in the form ofincrease FPS in games.
Setting up an Nvidia graphics card for gaming
The pace of development of game production is gaining more and more momentum every day, however, like the exchange rate of the main monetary unit in Russia, and therefore the relevance of optimizing the operation of hardware, software and the operating system has increased dramatically. It is not always possible to keep your steel stallion in good shape due to constant financial injections, so today we will talk about increasing the speed of a video card due to its detailed settings. In my articles, I have repeatedly written about the importance of installing a video driver, so I think it can be skipped. I'm sure all of you know perfectly well how to do this, and all of you have already installed it for a long time.
So, in order to get to the video driver control menu, right-click anywhere on the desktop and select "Nvidia Control Panel" from the menu that opens.
Then, in the window that opens, go to the "Manage 3D settings" tab.

Here we are with you and we will configure various parameters that affect the display of 3D images in games. It's not hard to see that to get the best performance from your graphics card, you'll have to cut the image a lot in terms of quality, so be prepared for that.
So the first paragraph CUDA - GPUs". Here is a list of video processors, one of which you can choose and it will be used by CUDA applications. CUDA (Compute Unified Device Architecture) is a parallel computing architecture used by all modern GPUs to increase computing performance.

The next paragraph " DSR - Smoothness” we skip because it is part of the “DSR - Degree” item setting, and in turn it needs to be turned off and now I will explain why.

DSR (Dynamic Super Resolution)- a technology that allows you to calculate a picture in games in a higher resolution, and then scales the result to the resolution of your monitor. In order for you to understand why this technology was invented at all and why we do not need it to get maximum performance, I will try to give an example. Surely you often noticed in games that small details, such as grass and foliage, very often flicker or ripple when moving. This is due to the fact that the lower the resolution, the smaller the number of sampling points for displaying fine details. DSR technology corrects this by increasing the number of points (the higher the resolution, the greater the number of sample points). I hope this will be clear. In conditions of maximum performance, this technology is not interesting to us because it consumes quite a lot of system resources. Well, with DSR technology disabled, smoothness adjustment, which I wrote about a little higher, becomes impossible. In general, we turn off and move on.
Next comes anisotropic filtering. Anisotropic Filtering - Algorithm computer graphics, created to improve the quality of textures that are tilted relative to the camera. That is, when using this technology, the textures in games become clearer. If we compare antiisotropic filtering with its predecessors, namely with bilinear and trilinear filtering, then anisotropic filtering is the most voracious in terms of video card memory consumption. This item has only one setting - the choice of filtration coefficient. It is not difficult to guess that this function must be disabled.

The next item is vertical sync pulse. This is the synchronization of the image with the monitor's refresh rate. If you enable this option, you can achieve the smoothest gameplay (tearing is removed when the camera turns sharply), but frame drops often occur below the monitor's refresh rate. To get the maximum number of frames per second, this option is best disabled.

Pre-trained personnel virtual reality . We are not interested in the function for virtual reality glasses, since VR is still far from the everyday use of ordinary gamers. We leave the default - use the 3D application setting.
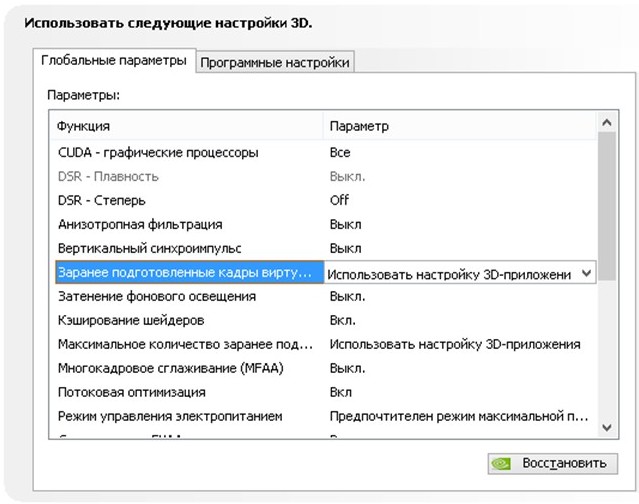
Background lighting shading. Makes scenes more realistic by softening the intensity of ambient lighting on surfaces that are obscured by nearby objects. The feature does not work in all games and is very resource intensive. Therefore, we take it down to the digital mother.

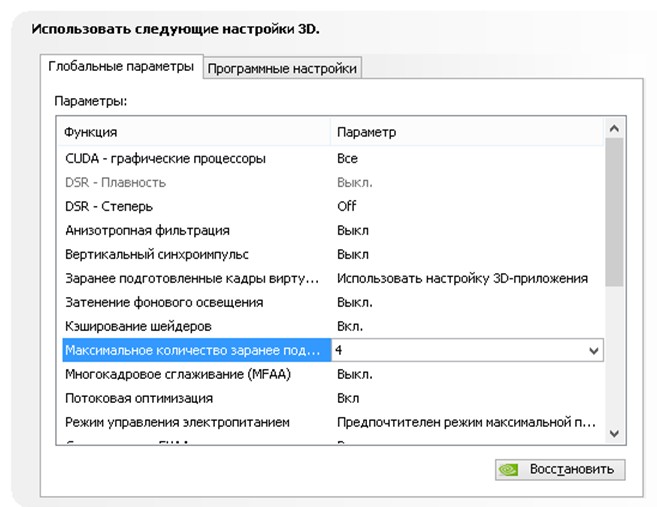
Shader caching. When this function is enabled CPU saves shaders compiled for the GPU to disk. If this shader is needed again, the GPU will take it directly from disk without forcing the CPU to recompile this shader. It is not difficult to guess that if you disable this option, the performance will drop.

Maximum number of pre-trained frames. The number of frames that the CPU can prepare before they are processed by the GPU. The higher the value, the better.
Multi-frame anti-aliasing (MFAA). One of the anti-aliasing technologies used to eliminate "jaggies" at the edges of images. Any anti-aliasing technology (SSAA, FXAA) is very demanding on the GPU (the only question is the degree of gluttony). Turn it off.

Stream optimization. By enabling this feature, an application can use multiple CPUs at once. In case the old application does not work correctly, try to set the "Auto" mode or disable this feature altogether.

Power management mode. There are two options - adaptive mode and maximum performance mode. During adaptive mode, power consumption depends directly on the degree of GPU utilization. This mode is mainly needed to reduce power consumption. During the maximum performance mode, as you might guess, the highest possible level of performance and power consumption is maintained, regardless of the degree of GPU load. We put the second one.

Antialiasing - FXAA, Antialiasing - gamma correction, Antialiasing - options, Antialiasing - transparency, Antialiasing - mode. I already wrote about smoothing a little higher. We turn everything off.

Triple buffering. A kind of double buffering; an image output method that avoids or reduces artifacts (image distortion). If to speak in simple terms, it increases performance. BUT! This thing works only in tandem with vertical sync, which, as you remember, we turned off before. Therefore, we also disable this parameter, it is useless for us.
Page 5 of 11
System Setup
Before you can enjoy playing games on Surround systems, you need to correctly perform one very important point- system setup. After connecting the "iron" component, the system must be turned on and configured from the NVIDIA Control Panel. The following shows how this is done.
In recent driver releases, NVIDIA has added several new sections to their Control Panel. There is now a general Configuration section in the 3D Settings block, which includes most of the options for configuring graphics. 3D Vision settings are placed in a separate block, which you can see in front of the video block.
Set up your SLI system will allow the menu, in the upper left corner of the window in the image above. In the same settings block, you can select a device for PhysX calculations in the upper right corner. Your actions are displayed in an icon at the bottom of the window so that you can visually understand the choice you have made. After the necessary settings are made, click the Configure button.

On the first window, we see a diagram that shows which ports should be connected on your video cards. The connection is accompanied by a dialog box (on the right) where you can select landscape or portrait mode. Also in this window you can drag numbers 1, 2 and 3 in order to change the location of the monitor and its associated output. This step will be important when the system chooses a middle monitor to display the center image.
The last setting makes it possible to adjust the picture so that in games there is no displacement along the borders of monitors.

Edge Adjustment allows you to compensate for the thickness of your monitors' bezels so that the image is continuous. The photo above shows what happens when edge correction is not enabled between two monitors. It is noticeable that the roadbed does not converge. After the NVIDIA drivers render the image of the road between the two monitors, you can use the window to change the number of address pixels "behind" the edges until the two images of the road line up. The installer then lets you install a new facet with an adjusted resolution that equals the number of horizontal pixels added plus the resolution of three monitors. So, for example, if you have three 1920 x 1200 monitors and 100 pixels of correction between each of them, the new resolution created will be 5960 x 1200 (1920 x 3 + 100 + 100).
Unfortunately, there is no indicator that shows on the screen the exact resolution created by the installer. But there is another section that displays these new settings, you can see it in the photo below. We also encountered another problem. Returning to the Bezel Correction menu for additional fine-tuning, we saw incorrect information being displayed on the screen, even though the system was set up properly. As a result, I had to restart the installation process from the beginning. We hope that the reason for this is in the beta versions of the drivers used, which will be fixed.

To see what resolution has been set, you need to call up the Change Resolution dialog box and be careful not to knock established resolution. Why? Permission violation will then make itself felt in games.
The length of this section will give you the false impression that NVIDIA installation is difficult, but it is not. We have to give credit to the company that the process is user-friendly and includes a few simple steps. The errors that we encountered are mainly related to the "dampness" of the drivers. The entire setup process is shown in the video below.
Embed Embed this video on your site
Sometimes when trying to access display settings on computers with NVIDIA graphics adapters installed, the user may receive a message stating that NVIDIA display settings are not available. Nothing can be changed at all. What to do in such a situation, read the material below.
NVIDIA Control Panel: NVIDIA display settings are not available. What is the reason?
The reason for this situation, most experts call problems with video card drivers. It is not surprising, because it is precisely such control software that ensures the connection of the graphics adapter with a computer monitor or laptop screen.
But why NVIDIA display settings are not available on a case-by-case basis can sometimes be quite difficult to determine, despite a known root cause. Drivers may be outdated, missing, or even corrupted. Depending on this, you can apply several effective solutions that will help fix the problem. The methods are quite simple, but in some cases it is necessary to take into account the specifics of the situation.
What to do if NVIDIA display settings are not available?
Let's start with the simplest. If a similar message at one “fine” moment appeared at system startup, but everything worked before, perhaps this is somehow related to failures in the OS itself. There is nothing easier than activating a system restore to a state where the problem did not exist.
The same applies to the situation when a notification is issued that the NVIDIA display settings are not available in Windows 10 or any other version of the OS after installing updates. It is quite possible that some of them were installed incorrectly or cause malfunctions in the operation of the operating system. In this case, in the programs and components section, you must remove the recently installed updates, sorting them by installation date. But you need to delete them one by one, rebooting the system and trying to access the settings. When failed update is found, a manual search should be set, and then the failed packet should be excluded from the list, after remembering or writing down its number.

Another completely banal reason is related to situations when two video cards (discrete and integrated) are installed on the computer. You can correct the situation in the "Task Manager", where the built-in adapter is disabled if it is used in this moment, or the NVIDIA card is activated.
Exactly the same actions for cases where the settings of the "Device Manager" had no effect can be performed in the BIOS settings, where from the list installed video cards Engagement is selected as the main NVIDIA.
Reinstalling and updating drivers
But let's assume that all the above methods did not work, and the system again displays a message that the NVIDIA display settings are not available. In such a situation, manual intervention by the user is required.

In order not to go far, try updating the adapter drivers in the same "Device Manager". If that doesn't work, uninstall the drivers or even the graphics card itself. It is possible that the drivers will be installed automatically when you reboot. In extreme cases, you can use installation disk with adapter drivers, if available. But the most a big problem is that drivers are not always removed this way, and the message that NVIDIA display settings are not available appears again and again.
Removing old drivers
In this case, you will need to remove all drivers and related software yourself using the Programs and Features section located in the Control Panel.

Also, to completely clean the system of unnecessary drivers, you can use the Display Driver Uninstaller utility (but it is only for drivers and does not remove additional programs).
After that, you should reboot the system and install all components again. To install the latest drivers, it is best to use automated utilities like Driver Booster, which will update the control software for absolutely all devices on the computer.
Specialized Drivers
Another option to fix the problem that NVIDIA display settings are not available concerns non-standard laptop models.

To get started, call the "Run" menu and enter the command msinfo32, and then find the exact name of the laptop model. Then refer to the manufacturer's official resource, search for drivers by model name and download the appropriate driver, then install it yourself.
Note: if the installer is in the form of an EXE file, use normal run as administrator. If this is an INF file, select the "Install" line via RMB. If the system reports that the driver cannot be installed this way, go to the Device Manager, select update the driver and specify the path to the saved INF file.
Some manufacturers offer users an online laptop test, after passing which a list of problems will be issued, as well as tips on how to fix them. And the graphics adapter driver can not be downloaded, but installed directly from the manufacturer's website.
Afterword
That's all that can be said about the elimination of the above problem. What tool to use? The question is rhetorical. In principle, you can immediately install an automated driver updater. If the problem is not with the drivers, but with additional software, you will have to get rid of it, and then reinstall it by downloading latest version from the NVIDIA website. However, those who have the skills to work with drivers can perform all the actions in manual mode.
Introduction
In the age of Full HD and fashionable 3D ... Combining a pair of monitors for someone simply becomes indispensable, the reasons are different, as usual, connected, for example, with the type of human activity, and fantastic, linking six monitors into one common resolution for a pleasant time transmission in the virtual world. Nvidia and AMD are promoting this technology to the masses in every possible way, such terms appear - Surround and Eyefinity. I want to give a short tour, namely, what is it - a multi-monitor system, how it works on different operating systems and what about the SLi mode.
Technical features of monitor connection modes in Windows environment XP
It was possible to combine two monitors through one video card before, during the reign of Windows XP. To take a specific example, when using cards from NVidia, it was necessary to install the appropriate video drivers with support for the nView function and have two monitors available, while there is no mention of the presence of screens with similar technical parameters.
The settings are quite simple, not requiring special attention to what is happening. Four options for the monitor operation mode will be available to us.
Many, like me, are interested in the modes: Dual View and Span, in fact, for which this is done.
Span- the displays are combined into one virtual screen, the desktop expands to both monitors, that is, the technical resolutions are added up. As a result, for two 19-inch monitors in total we get 2560x1024 pixels.

There remains a double impression, it seems to be more pleasant to play, but unfortunately it’s not more comfortable, the displays just share the silhouette or sight of a weapon with us, this applies to games from the 1st and 3rd person.

And without a doubt, this option will appeal to fans of strategies and various simulators of sports games.

This raises the question, if we have an SLi tandem, can we run the Span mode to give power at such a high resolution. I will answer, using the NVidia drivers in Windows XP it is not possible to do this, the team will be inactive.
dual view- own multi-display mode. Each monitor has its own resolution.
 |
Only Dual View allows us to make the existing SLI work on two monitors, since we play on one screen with its own resolution, that is, the presence of a second monitor and the desire to play at high resolutions will be clearly a failure and the second video card is not needed in the end.
Technical features of monitor connection modes in Windows 7 environment
Although we all get some opportunity, this requires switching to Microsoft Windows Vista\7 32-bit or 64-bit, have GPU NVIDIA GeForce 8 Series or higher.
Multiscreen SLi mode

Allows you to use two monitors on one GeForce video card in SLI mode. But there is one thing, games with support for multi-screen technology are required, such as World in Conflict, Supreme Commander Forged Alliance and Flight Simulator X, again fooling the younger brother, we actually get five games, and even then mostly tactical RPGs and strategies. Actually, the second monitor acts as a huge map of battlefields / locations. Undoubtedly a great feature for fans of online battles in the games listed above, but nothing more.
dual view- repeats the mode that was available to us in Windows XP.
NVidia Surround Mode (2D)
So I came to the most interesting thing, the launch of three displays with one common resolution. This case is only possible on Microsoft Windows 7 32-bit and 64-bit and the presence of two or more video cards starting from the GTX 2xx series level.
Building the system is quite simple, you need to have at least two adapters from the recommended list, also motherboard with support for SLi technology (but here I note that this is not so important, you can install modified NVidia drivers, the so-called SLi Patch)
One of the main problems is the selection of monitors, they must be with the same resolution, refresh rate and synchronization polarity.
Test bench, assembly feature
*
Motherboard
: MSI 790X-G45 (BIOS Version 2.5)
*
CPU
: AMD Phenom II X2 555 (Unlocked to Phenom II x4 B55)
*
Video cards: NVidia GTS450 MSI SLI 1Gb
*
RAM: Corsair CM2X1024-6400C4
*
SSD: Corsair Force F60
*
HDD: WD 320Gb
*
Power Supply: FSP Everest 600W 85Plus
Overclocking
Processor clock speed 3600 MHz, system bus frequency 225 MHz (225x17.5), memory controller frequency 2025 MHz (225x9), DDR2 frequency - 900 MHz (225x4.00), core voltage 1.42. V, DDR2 supply voltage - 1.8 V.

Video cards operate at frequencies: 920\1840\4100.
Three displays are: two monitors from Acer V193 and LG 1953S.

Idle assembly, connect monitors to DVI connectors on video cards and proceed to setup software NVIDIA.
After starting the system, you need to go to the Nvidia control panel, where another menu should open.

Next, the system checks the compatibility of the connected monitors, if everything is in order, you will be prompted to configure the displays.
The setting allows you to choose the orientation and identify the windows.

There are also so-called correction frames that allow you to adjust each value of the width of the displays independently.

After a minute of settings, I got this picture, with a resolution of 3840x1024 pixels.

Now I would like to test games with Nvidia SLi support.
Test Applications
fps measurements were carried out MSI program Afterburner 2.1.0, only average values were displayed on the graphs.
*
crysis
-Dx10; settings - High, AAx-off;
*
GTA 4
- Dx9; settings - Normal, AAx-off;
*
Lost Planet
-Dx10; settings - High, AA8x;
*
mafia 2
- Dx9; settings - High, AA4x;
*
Metro 2033
- Dx9; settings - Normal, AA4x;
Test results, game features

To be honest, it was not customary at first to see such a big picture and even more so to play, but it is a pleasure.

Especially in 3rd person games, two side monitors add perspective and viewing angle,

you seem to get into the game, the presence effect is guaranteed.

If we talk about fps, then the GTS450 did not show itself very badly, I personally do not find fault with the quality of the graphics, and I consider building a 3x1 system not a bad opportunity.

As you can see, the average fps is 30-40 fps. on medium / high settings, it's not for me to decide whether it's bad or worthy, but again, this is only the SLi mode, with a single one it's much worse here.

Alternative options
Go to the side of the "reds", the implementation of the term AMD Eyefinity looks more modest, not requiring two video cards. One has only to buy video accelerators of series - HD54хх\HD64xx and above. Of course, Eyefinity technology has its own pitfalls (associated with adapters and connectors), but still building a 3x1 system requires much less cost, but this is not about that.
Matrox Triplehead 2Go - allows you to combine three monitors through one analog interface. Definitely, first of all, this is a huge plus, now it doesn’t matter which video card we like, the use of SLi\Crossfire modes will add extra fps without any problems.
But, of course, there are no downsides. The use of analog interfaces may cause image distortion, especially when the signal is split across three monitors.
The maximum resolution supported by the device is 3840x1024 when three monitors have a resolution of 1280x1024.
Conclusion
I tried to dwell on the more commonly used types of connecting two or more monitors, show visual effects in the form of visual photographs and explain the problem associated with using an SLi tandem. Hope you enjoyed this tour.
Behind the scenes
NVidia GTS450 MSI SLI