Many users have experienced firsthand the benefits of gadgets in operating systems Windows Vista and Windows 7. In this article, we will look at gadgets that take temperature readings from the processor and video card sensors on the desktop. We will also tell you how to use these gadgets in Windows 8, 8.1 and Windows 10 operating systems.
Installing CPU and GPU Temperature Gadgets
To measure the temperature of the processor and video card on the Desktop, we need gadgets and. Both gadgets are distributed through http://addgadgets.com, where they can be downloaded for free. To install these applications on Windows 7, you just need to run the downloaded files. In our case, these are the files "All_CPU_Meter_V4.7.3" and "GPU_Meter_V2.4". The CPU temperature gadget looks like this.
And the widget for the video card looks like this.

The images show that these applications do not have temperature readings. In order for them to have temperature characteristics, you need a utility PC Meter. The archive with this utility can be downloaded from the same site as gadgets. After unpacking the archive, the utility can be launched immediately, since it does not require installation. To run the utility, use executable file PCMeterV0.4.exe.

Once launched, the utility will be embedded in the notification area.

The program is launched by clicking on its shortcut in the control area. The program settings are located in the menu " Options". In these options, the user can configure window minimization PC Meter, loading at system startup and support for the widgets in question.

To display the temperature in it is necessary to go to its options on the tab " Options».

On this tab in the line " Show CPU temperatures» it is necessary to set the parameter « ON (PC Meter)". To save the parameters, press the OK button. After this setting, you can see the temperature in the widget for the processor AMD processor A6-5400K which is 17 degrees for each core.

Also, the PC user in the options of this application is provided temperature unit selection and customization options sound alert for high CPU temperature. For the widget, also go to the tab " Options».

In line " Select Method» choose the parameter « PC Meter*". To save the settings, you must click the OK button, as for the previous widget. By setting these settings, we will see the temperature in the gadget AMD video cards Radeon HD 7540D which is 14 degrees.

Just like in the previous gadget, in this one on the tab " Options» you can set up a sound indicator that will alert you when the temperature is high GPU. On the tab " color”, which is present in both applications, you can customize the colors of the displayed lines in their windows.
The example shows that using these gadgets, the user will always know the thermal characteristics of the processor and video card, and will also be able to find out when they overheat.
Run All CPU Meter and GPU Meter in Windows 8 and 10
To run the gadgets discussed above, we need a utility 8GadgetPack. This utility is a collection of various widgets. A nice addition for the user is that he does not need to download the widgets discussed above, since they are already included in 8GadgetPack.
You can download the utility from its official website http://8gadgetpack.net. After installation, for example, in Windows 10, in the context menu you can see the item " Gadgets».

The design of the window with a set of widgets resembles the window from Windows 7 as much as possible.

Setting up and installing new widgets is the same as in the seven, so any PC user will figure it out.
If your computer is running Windows XP, you will not be able to use the program 8GadgetPack, because it is not supported in this version of the OS. To use widgets for XP on the desktop, we recommend using a free utility xwidget. For example, in xwidget you can find popular desktop monitoring application like MSI's Afterburner.
This program supports many widgets in which you can monitor the temperature in XP. Same xwidget can be used without problems both in the seven and in the ten.
Summing up
In this article, we got acquainted with widgets for monitoring temperature indicators CPU and video cards on the desktop. From the considered examples, it can be seen that any PC user can launch and configure widgets. You can study additional material to learn how to install others by clicking on the link.
We hope that this material will be useful for you and will allow you to easily monitor the system using the widgets discussed.
Related videos
Each person takes care of his health, because if he does not exist, then this is the beginning of the end, that is, death. And now the question. How well do you take care of the well-being of your loved ones and friends? Of course, great. But do you consider your faithful assistant - the computer - your friend? Few people know, but he needs care no worse than for pets, and repairs in some cases are more expensive than human treatment. In this article, we will tell you in detail that this is a CPU indicator, what it shows us, what it can tell you about and how to avoid the worst thing - its breakdown. This article is recommended for users of the Windows operating system, as the topic of desktop widgets of the above operating system will be affected.
What the CPU indicator shows
To fully understand the situation, you need to understand what is the processor itself? Initially, lamps were used as semiconductors, and quite impressive in size. For example, a block of an arithmetic logic unit could occupy approximately a room of 3 by 3 meters, which is quite large and costly not only in terms of area, but also in terms of the amount of energy consumed.
In the 60s, mankind took a huge step towards a brighter future - they came up with silicon-based semiconductors, but what's the catch? Imagine a light bulb that is a few atoms in size. Unrealistic, isn't it? But for a transistor in modern computers, this is literally commonplace, now humanity has not crossed the process technology to 7 nanometers, but in the future, scientists promise to reduce the size even more.
Let's say that we managed to put a billion light bulbs on the tip of a needle, but everyone knows that energy does not go anywhere, but only transforms, and this is how heat is obtained. Processors on transistors get incredibly hot, so if they are left without cooling, then the outcome is clear - this is the end.
Now it is more clear that the processor is heating up, but from what? Of course, from the load. We hope after this explanation you understand that this is a CPU indicator and how important it is. By the way, if the computer works at 100% for a very long time, then this indicates the instability of the operating system. In the next paragraph, we will solve this.
What to do if the processor is running at 100%
Many of us have recently heard news about a new cryptocurrency - bitcoin, but few people know that this promises problems if you are not ready for miner viruses - this is a kind of worms, but their fundamental advantage is that they do not give themselves away, they do not steal information from the computer, but only install a virtual currency mining program on your computer, and all the funds earned on your computer go to the scammer.

During mining, almost all system resources are involved, and as mentioned in the paragraph that this is a CPU indicator, the load increases the temperature of the processor, from which it can exit the working state.
How to deal with this? Easy and simple: use one of the modern antiviruses, as well as use Opera browser, because it has built-in protection against miner sites capable of similar actions as a virus.
Where to find the CPU indicator for Windows
If you are a user of the Windows 8, 9 or 10 operating system, you have definitely noticed that, unlike the 7th version, there is not something important - widgets, and this is exactly what the CPU indicator is. You will not find them on the official website, so there is only one thing left - to download the application from third-party developers. Fear not, there are many versions, so you are sure to find the right one for you, and you can also download additional and original widgets to monitor your system.

Finally
We hope that after reading this article, you understand that this is a CPU indicator, what it is for and how it works. If your processor performance is closer to 100%, then this is a clear sign of its overload, which entails overheating. It is also recommended to install good and high-quality cooling, preferably water.
A certain circle of users wants to follow technical specifications your computer. One of these indicators is the temperature of the processor. Especially its monitoring is important on older PCs or on devices whose settings are not balanced. In both the first and second cases, such computers often heat up, and therefore it is important to turn them off in time. You can monitor the temperature of the processor in Windows 7 using specially installed gadgets.
Unfortunately, in Windows 7, among the system monitoring gadgets, only the CPU load indicator is built in, and there is no similar tool for monitoring the processor temperature. Initially, it could be installed by downloading from the official Microsoft website. But later, since this company considered gadgets a source of system vulnerabilities, it was decided to completely abandon them. Now the tools that perform the function of temperature control for Windows 7 can only be downloaded from third-party sites. Next, we will talk in more detail about the various applications from this category.
All CPU Meter
Let's start the description of gadgets for monitoring the temperature of the processor with one of the most popular applications in this area - All CPU Meter.
- Going to the official website, download not only All CPU Meter itself, but also the PC Meter utility. If you do not install it, then the gadget will only show the load on the processor, but will not be able to display its temperature.
- After that go to "Explorer" to the directory where the downloaded objects are located, and extract the contents of both downloaded zip archives.
- Then run the unpacked gadget file.
- A window will open in which you need to confirm your actions by clicking "Install".
- The gadget will be installed, and its interface will be immediately opened. But you will only see information about the load on the CPU and on individual cores, as well as the percentage of loading random access memory and swap file. Temperature data will not be displayed.
- To fix this, hover over the All CPU Meter shell. A close button will be displayed. Click on it.
- Return to the directory where you unpacked the contents of the PCMeter.zip archive. Go inside the extracted folder and click on the EXE file that has the word "PCMeter" in its name.
- The utility will be installed in the background and displayed in the tray.
- Now right click on the plane "Desktop". Choose from the options provided "Gadgets".
- The gadgets window will open. Click on name All CPU Meter.
- The interface of the selected gadget opens. But we will not see the display of the processor temperature yet. Hover over the All CPU Meter shell. Control icons will appear to the right of it. Click the icon "Options", made in the form of a key.
- The settings window opens. Move to tab Options.
- The set of settings will be displayed. In field "Show CPU temperatures" select a value from the dropdown list "ON (PC Meter)". In field "Temperature Show In", which is located just below, from the drop-down list, you can select the temperature unit: degrees Celsius (default) or Fahrenheit. After all the necessary settings have been made, click OK.
- Now, opposite the number of each core in the gadget's interface, its current temperature will be displayed.


coretemp
The next CPU temperature gadget we'll look at is called CoreTemp.


It should be noted that information in the gadget will only be displayed as long as the CoreTemp program is running. When you exit the specified application, all data from the window will be lost. To resume their display, you will need to run the program again.

HWiNFOMonitor
The next gadget for detecting CPU temperature is called HWiNFOMonitor. Like the previous analogues, for correct functioning it requires the installation of the parent program.
- First of all, download and install the HWiNFO program on your computer.
- Then run the previously downloaded gadget file and in the window that opens, click "Install".
- After that, HWiNFOMonitor will start, but it will display an error. To set up correct operation, it is necessary to perform a number of manipulations through the HWiNFO program interface.
- Launch the HWiNFO program shell. Click in the horizontal menu Program and select from the drop down list "Settings".
- The settings window opens. Be sure to check the boxes next to the following:
- Minimize Sensors on Startup;
- Show Sensors on Startup;
- Minimize Main Windows on Startup.
Also make sure that opposite the parameter Shared Memory Support there was a checkmark. By default, unlike the previous settings, it is already installed, but it still does not hurt to check. Once you have ticked all the appropriate places, click OK.
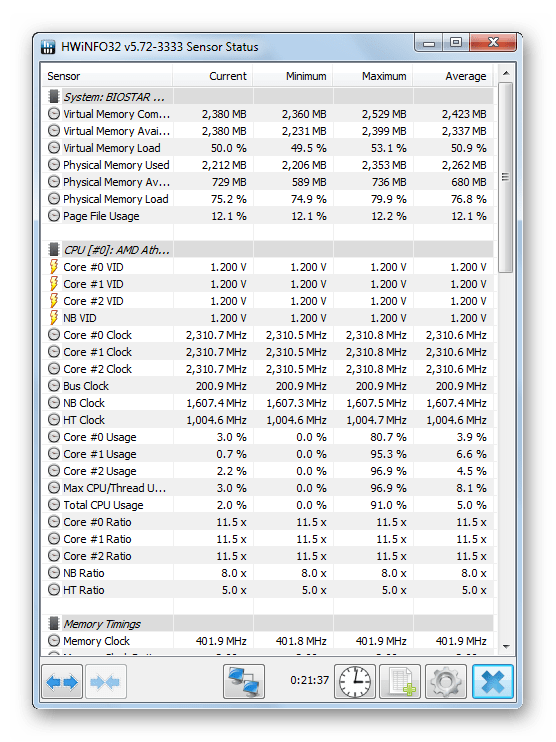
- Returning to the main program window, click on the button on the toolbar Sensors.
- After that, a window will open "Sensor Status".
- And the main thing for us is that a huge set of technical data for monitoring a computer will be displayed in the gadget's shell. Opposite point "CPU(tctl)" will just display the temperature of the processor.
- As with the analogs discussed above, during the operation of HWiNFOMonitor, in order to ensure the display of data, it is necessary that the parent program also works. In this case, HWiNFO. But we previously set the application settings in such a way that when you click on the standard minimize icon in the window "Sensor Status", it folds not on "Task bar", and to tray.
- In this form, the program can work and not interfere with you. Only the icon in the notification area will indicate its functioning.
- If you hover over the HWiNFOMonitor shell, a series of buttons will be displayed that allow you to close the gadget, drag it, or swipe additional settings. In particular, the last function will be available after clicking on the icon in the form of a mechanical key.
- The gadget settings window will open, where the user can change appearance its shells and other display options.


Despite the fact that Microsoft has stopped supporting gadgets, other software developers continue to release given type applications, including for displaying the temperature of the central processor. If you need a minimum set of displayed information, then turn your attention to All CPU Meter and CoreTemp. If, in addition to temperature data, you want to receive information about the state of the computer by many other parameters, then HWiNFOMonitor will suit you. A feature of all gadgets of this type is that the mother program must be running to display the temperature.
Dear readers, if you use Windows 10, then I think you wondered where are the usual gadgets (processor load indicator, clock, weather, etc.) in this operating system, as in Windows 7. I will answer you - they are not. The developers of Windows 10 decided not to install gadgets, as new app tiles have come to replace them. However, you can easily install familiar gadgets on Windows 10 thanks to special third-party programs.
Today we will look at two such programs that can add gadgets to windows 10. So let's go!
Windows Desktop Gadgets
This utility will return the gadgets to the new Windows 10 OS in the form in which they were in the "seven". Also everything is in Russian, with the same interface. You can download it at http://gadgetsrevived.com/download-sidebar/
We install the program and after we see the usual window of gadgets. Here we see all the gadgets, as in Windows 7 - clock, calendar, weather, puzzle and other original utilities.

By double-clicking on a gadget, you can bring it to Desktop,

To open the gadgets window, you need to right-click on the desktop and select Gadgets,

As you can see, everything is easy and simple. In a couple of clicks, the gadgets returned to the new operating system.
8GadgetPack
8GadgetPack is another free analogue, thanks to which you can return gadgets to the operating room Windows system 10. This utility is more functional than the one described above, but it is partially in Russian. Download from the site http://8gadgetpack.net/

Although the program is partially in Russian, I think it will not be difficult to figure it out. It has a much larger selection of gadgets, as they say for all occasions.
So, let's sum up. We have considered two programs that return Gadgets in Windows 10. One and the second program allows you to download other third-party gadgets for your desktop. But there is one caveat, not all gadgets will work, as the developers note. However, and standard set Gadgets are enough for most users.
If you have any questions - ask in the comments. All the best!