After the presentation of the Windows operating system in its seventh and then tenth variations, many owners of Apple devices wanted to install it on the iMac. Most easy way To cope with this task, use Boot Camp software. The application allows you to install a new operating system from “windows” as a second system.
Apple has also released drivers for quick installation of new applications. They are easy to use and even beginners can handle the installation.
However, there are users who cannot perform this operation in any way. Something happens to them all the time - the keys do not function, there is no sound and other interference. In this article, we will look at the basic steps for installing Windows on an iMac. How to carry out the process as comfortably as possible - read below.
Before moving on to the main topic of the conversation, let’s find out why one operating system is better than another. And in general, is it worth jumping from one solution to the second? Look at the differences and make the right decision for yourself.
- Apple's design is second to none. And you can hardly argue with this statement. The company spends on development appearance the same amount of time and money as it takes to “stuff” the devices. The details are treated with due attention. By the way, the hardware also looks neat, although no one sees it.
But Microsoft is not much inferior... A revolution has occurred with the Surface Studio all-in-one PC. It looks as cool as any computer from the Apple company. By the way, the tablets and laptops of this company are very impressive in terms of design. In addition, devices for Windows are created by many manufacturers. Many products with this operating room look strange or have an outdated design, but you can also find good options.
1 Gadgets on Mac operating systems are more expensive. And much more. Even if another Windows laptop has similar functionality and capabilities, the price difference will be very significant. Windows fans have nicknamed this phenomenon the “Apple” tax. The exception is anomalous variants. For example, there is the super expensive Surface Book or highly advertised products for gamers. The average solution will cost the buyer an average of $500. By comparison, the most budget laptop from the Air line costs at least $1,000. At the same time, a quite decent PC device can be purchased for $300. Here the decision is up to the individual user, or more precisely, his financial capabilities. 2 For gamers, Windows is much more comfortable. Game lovers will choose Windows, if only because it is easier to customize. Serious gamers are constantly disassembling and reassembling their devices to replace video cards and processors, adding RAM. Of course, they won't be satisfied with Mac black boxes. Even super cool MacBooks will become outdated in a couple of years, and you won’t be able to simply insert additional RAM into them. Many more toys do not install on Mac. This problem dates back to the 1990s and is still relevant today. When Jobs left Atari he probably lost interest in games. But in vain! 3 Technical support Mac is better(of course, if it actually exists in your region). If your device fails, you can always go to an Apple store near your home. A specialist will diagnose and repair it. Moreover, if the problem is minor, the repair will be completely free. But again it all depends on the presence of such a point in your city. If it is missing, you will have to rack your brains or run. With a PC, everything is easier in this regard. Some things can be repaired yourself, others can be entrusted to a familiar programmer. And if that doesn’t help, spare parts are available in any store. In large cities there are official Microsoft stores with services. So residents of megacities are lucky in this regard. There are still few such outlets, but the company is actively developing in this direction. 4 It's harder to catch a virus on a Mac. There are much fewer devices on this operating system (including due to their high price), so hackers are not so interested in creating spies and viruses for them. Although in recent years such “specialists” have been increasingly pressed, and they are becoming more attentive to narrower areas. Therefore, the Apple company is also not asleep and is taking measures to get ahead of the scammers. Every year, new security systems are introduced into iOS gadgets. 5 OSes look completely different. This is immediately noticeable. In Windows 10, they combined the comfort and friendliness of the seven with the promise of touch screen eights. And this idea was a success. You can jump between the tablet and regular desktop options. And the latter looks familiar - with a start element at the bottom. The tablet displays a list of software.So, most likely, you have decided. Now let’s take a step-by-step look at how to install Windows on an iMac.

Preparing to install Windows 7 on your iMac
Of course, we are talking not only about the seven, but also about any other version of this operating system - Windows 10 and others. Installing Windows 7 or Windows 10 is a serious operation that requires setting up the device on which it will be installed.
But first, let’s find out why the owner of an iOS device needs to install Windows 10. Especially considering that the developer deliberately moved away from “windows”. There can be a lot of reasons, for example:
- Not every program that is installed on a PC has an analogue for Mac. A typical example is “1C: Enterprise”.
- If you have just purchased an Apple gadget, you may be confused about its functions. Here everything is completely different. And the second operating system will return the user to a familiar environment and will not let him get confused until he gets used to the Mac.
For the operation, you will need the required distribution (a version of the version that you decided to install). You also need a disk with iMac OS X. Checking the free space on the disk is a mandatory stage of preliminary preparation. It must be at least 10 GB. Finally, the most important thing is Boot Camp.
Attention! PC installation is not possible for every model. So, nothing will work with iMac 17 and 20 inches. These are outdated products manufactured in 2006. With more modern products there should be no problems. If your model is unknown, check Apple's online resource for information.
Installing Windows 10 on iMac
From the instructions below you will learn how to install Windows on an Apple operating system. The installed PC is implemented into the iMac via Boot Camp, a set of software. This solution will be required when creating a partition for Windows and rebooting the installation system. Drivers will provide the functionality of the operating system and its interaction with the hardware component of the computer. It would be nice to automatically “refresh” the drivers.
Before installation, we update the operating system itself. For this purpose, go to the updates section on the Apple resource on the Internet. In addition, we create a backup so that if data is lost, we can restore it.
- Launch the Boot Camp assistant.
- Click on the continuation element and select the volume hard drive under a “fresh” operating system. To do this, we drag the partition between the names of the operating systems.
- We break it down into sections using the appropriate element. We are waiting for the operation to complete and float to the BootCamp table with the selected volume.
- We insert the disk with the PC distribution kit and click on start installation.
- We wait for the reboot to complete and select the previously specified disk for installation.
- Click on disk properties.
- Let's move on to formatting.
- We observe the installation itself - at this step the process will start. Here you will need to select the language and other parameters.

Note that after the appearance of the second operating system on the device, various kinds of problems often arise. And the most common one concerns sound. To correct the situation, you will need a disk with OS X. You need to place it in the drive and click on the next item in the pop-up window. The software is asked to accept the terms of the contracts, which is what needs to be done. Once the installation is complete, click on the Finish button.
This should be followed by another reboot, after which you can rest assured that your iMac has two operating systems. Before the operation, do not be lazy to think seriously and weigh all the advantages and disadvantages of such a decision. If you take hasty steps, you may lose personal information and content. And in the worst case, damage the “native” operating system. Objective arguments at the beginning of the article will help you make the right decision.
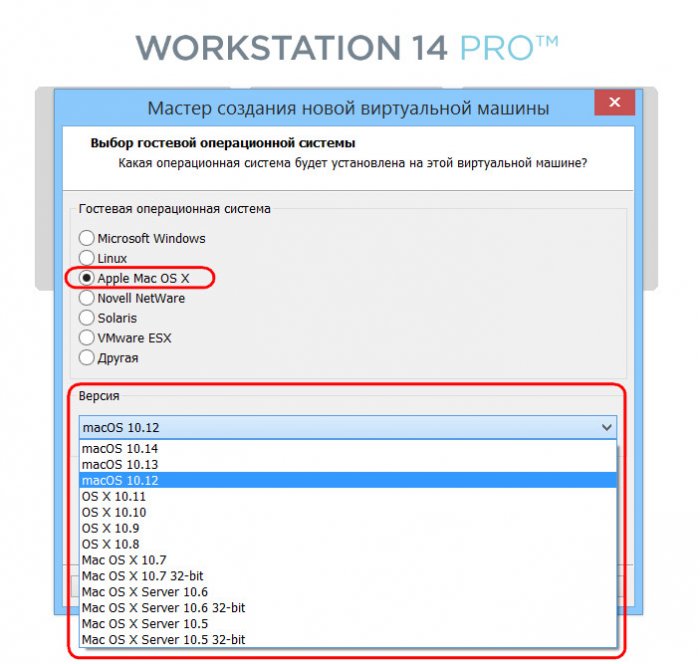
Consider buying an iMac or MacBook, but it took many years to get used to the specifics and functionality operating system Windows? Worried about how quickly you can get used to the Mac OS environment? Or perhaps you just want to explore Apple's operating system? For these purposes, it is not necessary to plunge into the dense jungle of the specifics of installing a Hackintosh PC if you are familiar with at least the basics of how VMware Workstation works. This hypervisor is the most in a simple way running Mac OS in a Windows environment. For this, there are ready-made virtual machines (VMs) on the network with the Apple system installed and configured. How to test Mac OS Sierra or High Sierra on VMware?
1. Ready-made Mac VMs for hypervisors
Ready-made VMs save us from a lot of hassle that we have to face when installing Macintosh on regular PCs and laptops. There is no need to install the Clover or Chameleon bootloader, search for kexts and special files like FakeSMC, or configure component emulation. There will be no need to wait for the system to install. All these efforts were taken on by the VM assemblers. We get ready virtual computer with already integrated guest OS add-ons and a user profile, which we can rename or delete if desired, creating another one.
Since Mac is officially prohibited from being installed on regular PCs and laptops, naturally, test builds of the operating system in the format of working hypervisor files will not be found on Apple’s official resources. But we can find them on Internet torrent trackers.
A VM with a Mac installed is essentially the same Hackintosh device. Lawyers and armchair experts on the topic can debate as much as they like about the existence of an offense under the conditions of using Macintosh on hypervisors, but this has nothing to do with the technical side of the issue. When working with a hypervisor, we, alas, will have to face problems with the functioning of virtual OSes and problems with Hackintosh devices, such as lack of smoothness of interface effects, periodic brakes, certain functions or specific equipment not working due to the lack of drivers, etc. For a VM with a Mac, there are the same processor restrictions as for a Hackintosh - you need an Intel-based computer, preferably with support for SSE4.2.
Ready-made VMs exist for both VirtualBox and VMware. The latter benefit from greater convenience of working with a virtual Mac: guest OS add-ons work stably in VMware products, and we can configure shared folders with the main Windows, as well as the screen resolution we need.
2. Sierra or High Sierra
At the time of writing, there are ready-made VMs with the current Mac OS online:
Sierra (10.12) - version dated September 20, 2016;
High Sierra (10.13) – version dated September 25, 2017.
And perhaps there is already a VM with the latest version of Mojave (10.14). But it is Sierra that is considered the most stable version, suitable for experiments on a PC. It is the Mac OS Sierra VM that we will download and configure to work with VMware. And then we’ll capture it in a snapshot and update it to High Sierra via App Store.
3. Downloading the VM
To download Mac OS Sierra VM files for VMware, go to RuTracker:
https://rutracker.org/forum/viewtopic.php?t=5287454
We add a distribution to the torrent client, and while it downloads the archive from the VM, we will perform some operation directly with the VMware hypervisor. In the description of the distribution, in the “Tablet” column, follow the link “VMware version 11 and higher.” If, of course, you have the current version of the hypervisor higher than 11 installed. Today the last one is the 14th.

4. VMware Unlocker for Mac Support
By following the link in the description of the torrent distribution, we download a certain archive called “unlocker210”. This is a VMware unlocker for Mac OS support. The fact is that VMware products do not natively support Macintosh as a guest OS. Actually, this unlocker210 is needed to solve this issue. Unpack the downloaded archive, find the win-install.cmd file in the folder and run it (important) as administrator.

Now VMware, among those supporting guest OSes, will be able to offer us Mac OS - any, up to the latest version 10.14.
5. Unpacking and setting up the VM
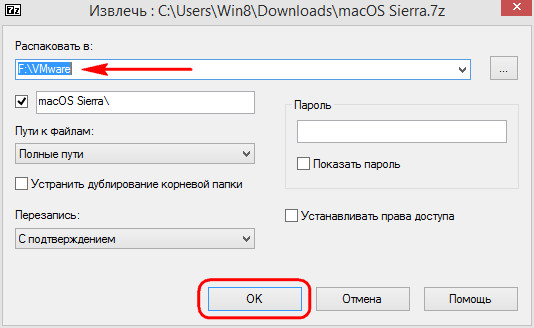
We unpack the archive downloaded by torrent using Total Commander or 7-Zip archiver.

We indicate the unpacking path, which is also the path for storing VM files.

If used latest version VMware products, we update the VM.


Click “Edit this virtual machine”, then “Finish”.

Now let's go to the VM settings.

We need the "Equipment" section. In the “Memory” tab, the collector set the volume RAM 2 GB. If the computer allows you to select more, select it.

The article gives detailed instructions how to install Windows 7 on MacBook.
Everyone is used to working with Windows, and when you buy a MacBook, you need to install it for the usual work with documents.
Installing Windows 7 on Macbook Air using Boot Camp
Installing Windows 7 on Macbook Air will not take much time. Installation requires a USB optical drive or 16 GB USB flash drive. Before installation, you need to check for software updates on your computer.
- Turn on your MacBook and launch Boot Camp.
- Uncheck the box at the top where you want to create a disk. Check the box if the installation will be carried out from an image.
- Use USB stick to save drivers and other information. All information on the drive will be deleted, so use an empty drive.
- Split the disk into two equal parts for the two operating systems.
- Connect a USB DVD drive and insert the Windows distribution into it.
- Wait while Boot Camp downloads the latest software from the Internet and reboots your computer.
- Install Windows following the instructions, select the suggested settings.
Windows installs in just over an hour. For those who don’t know how to start Boot Camp: on the desktop at the top, click the magnifying glass. In the search window write down the name of the application and click “Continue”.
Creating an image
If you have a disk to install the software, you need to create an image of it.
- Use an optical drive.
- Using Finder on your laptop, open Disk Utility.
- In the window that opens, select installation disk.
- Go to the “File” menu, “New image” and then click “DVD disc”.
- In “DVD/CD Wizard”, find “Image Format” and "Encryption". Check "No".
- Create a file name, enter a password and wait until the new image is created.
- When finished, disconnect the optical drive.
- Use Finder to find the new image.
- Rename the file name from .cdr to .iso.
- If you are using removable storage devices, make sure they appear as removable devices in the Finder.
- Connect the USB drive.
- After creation ISO image start installing the program.
Keyboard
After downloading the software, you can use the keyboard in several ways. Keys in different operating systems can perform different functions. Many keys on laptops with the Windows operating system have analogues on the Apple layout.
Formatting Windows OS
To format, use the installer, after being asked about the installation location, select the Boot Camp partition. Next, we begin formatting by selecting “Disk Setup”.
The new partition can be renamed, formatted, or deleted. Once two partitions are created, they cannot be resized. To resize, you will have to delete the partition and create the required partition again. To rename a partition, boot the operating system itself and rename the partition in it. Do not use other programs to resize the partition; this may cause problems.
Be careful! Deleting a partition results in loss of files.
Boot Camp app
The application consists of three sections:
- selecting a system to boot;
- setting up the keyboard operation;
- setting up the trackpad.
The first partition will allow you to boot one of two operating systems. Using the second section, you can control the functions of the F1 - F12 keys. In the third section, choose familiar gestures for working in any OS.
Starting Windows
On Macbook Air 11 or Macbook Pro When loading there is no choice of operating system, so to work in Windows 7, press Alt. A menu will appear in which you select the right system and download. If you do not press the Alt button when turning on, MacOS will start loading.
Uninstalling Windows
To uninstall, simply launch Boot Camp in OS X and select "Delete"". After removal OS X will take up all the space. It will take less than a minute for a previously installed operating system to be completely removed.
Software updates
Use App program Store to check for updates on your laptop. Select Update from the Updates section. In the application settings, set the parameters “Download recently released updates to background" Then updates will be carried out automatically. When it was established latest update, you can start installing Windows.
If you have an update disc, follow these steps:
- Boot your MacBook into MacOS.
- Connect the Windows update disk.
- Unzip and transfer the files to a USB drive.
- Reboot your laptop and turn it on installed version Windows.
- Perform the update using the installation program.
Driver
Some users have a question: “What is a driver?” A driver is a program without which the connected device will not work with the computer. At least once in their life, everyone has installed a laptop driver to operate a scanner or printer. Usually the OS already has drivers for different devices, but sometimes updates are needed, so check for updates. For example, for correct operation of audio systems, download for free realtek driver from the Internet.
Apple does not provide technical support for installing or restoring Windows OS. Consultation can be obtained by phone about the special Boot Camp assistant, its installation or recovery.
Even the most ardent OS X fans sometimes need to take advantage of the “enemy” Windows. There are different situations: from the need to use banking clients and corporate software to launching games. There are many ways to run applications written for Windows, using both third-party tools and proprietary Apple solutions.
Conventionally, they can be divided into three categories: full installation of Windows, use of virtual machines and software emulators Windows environment. Each option has its own advantages and disadvantages, so we will look at them all so that you can choose the one that is most convenient for you.
Installing Windows using Boot Camp
Especially for those unfortunates who are unable to break all ties with Windows, Apple created the “Boot Camp Assistant” utility, with which you can prepare your Mac for installing Windows and, in fact, install it. In this case, a separate partition is created on the disk, allowing both operating systems to work independently of each other.
You will need 50 GB of free space and a Windows boot disk. The installation process itself is very simple, you just need to follow the wizard's prompts and wait for completion. After the reboot, you will have a full-fledged Windows version just like on a regular PC. All you have to do is install the necessary applications or games - and you can use it. You can find out more about the requirements and supported versions.
Benefits of Boot Camp
- Performance. Since all the resources of the Mac are used by only one OS, we get maximum performance.
- Compatibility. Thanks to full-fledged Windows, full compatibility with any applications and games is ensured.
Disadvantages of Boot Camp
- Need to reboot. For Windows startup You will have to restart your Mac every time.
- Lack of integration. Windows does not support the HFS+ file system, which means you won’t be able to access OS X files from it, and vice versa.
Using virtual machines
This method has much in common with the previous one, but is slightly different in implementation. With it we also get a full-fledged OS, but it is installed not on real hardware, but on virtual one. Special software (virtual machine) emulates the hardware platform for running Windows, taking away some of the Mac's resources, and it turns out that one OS runs inside another.
Parallels Desktop
 parallels.com
 Perhaps the most popular virtual machine among Mac users. Parallels is regularly updated, always works with current versions OS X and Windows and has additional functions like a hybrid mode, when OS X and Windows interfaces are simultaneously displayed on the screen, and applications are launched regardless of their ownership. In addition, the program can launch Windows from Boot Camp partitions, which is convenient if you need to access any applications or data without rebooting.
The disadvantage of the program is that Parallels is not free. The junior version will cost you $79.99.
VMware Fusion
 vmware.com
 Another commercial solution for OS virtualization. The key feature of VMware Fusion is the sharing wizard, which allows you to transfer the entire environment from your Windows PC to a virtual machine and continue using applications on your Mac. Installed Windows shares a clipboard with OS X, as well as access to files and network resources. Its applications are fully integrated with OS X features (Spotlight, Mission Control, Exposé). In addition, it supports running Windows from the Boot Camp partition.
VMware Fusion costs 6,300 rubles, but before purchasing you can explore its capabilities in a free trial version.

If your plans do not include additional expenses for running Windows applications, then your choice is Oracle. Compared to paid analogues, it has much fewer capabilities, but is quite suitable for simple tasks. You shouldn't count on integration with OS X system functions, but basic things like a shared clipboard and access to network resources are available here. The free nature of VirtualBox fully justifies all of its limitations.
Benefits of virtual machines
- Simultaneous operation of two operating systems. You don't need to restart your Mac to run Windows apps.
- File sharing. Since Windows runs inside OS X, support is an issue file systems absent.
Disadvantages of Virtual Machines
- Poor performance. Because Mac resources are shared between the two operating systems, application performance is significantly slower, especially on older computers.
- Compatibility issues. Some applications (most often games) that require direct access to hardware may not work correctly or not work at all.
Using emulators
With emulators, everything is completely different than with virtual machines and Boot Camp. More precisely, they have something in common with virtual machines, only they do not emulate Windows as a whole, but only those of its software components that are necessary for the operation of the desired application. We will not have a full-fledged OS and access to its functions: we get a certain compatibility layer that allows us to run a Windows application directly in the OS X environment.
All emulators work on the same principle. The installation of the application is initialized via setup.exe, and then during its process the necessary launch parameters are configured and the necessary libraries are automatically loaded. After this, an application icon appears on Launchpad, which will work in the same way as all native OS X programs.
WineBottler
 winebottler.kronenberg.org
 This emulator can turn an .EXE file into an OS X compatible application. WineBottler also allows you to automatically load some already configured Windows applications. It is completely free and compatible with OS X El Capitan.
Wineskin

Another emulator, which, like the previous one, uses the Wine libraries to create ports. Compared to the previous solution, Wineskin has more settings and allows you to fine-tune the settings. We talked in detail about its setup and use in.
CrossOver

A commercial emulator whose development team has already adapted and configured many popular Windows applications and games for you. CrossOver has a friendly interface and eliminates the need to delve into settings and deal with possible errors. The only negative is that it is paid. The license costs $20.95, but there is a 14-day trial period.
Advantages of emulators
- No Windows license required. Emulators run applications through a compatibility layer, so a licensed copy of the OS is not needed.
- Performance. Again, due to saving resources, which are in virtual machines are spent on running a full-fledged Windows, we get higher performance compared to them.
Disadvantages of emulators
- Difficulty setting up. To use Windows applications, you first need to configure them, and this is not always easy, especially with games.
- Compatibility issues. In some cases, applications (usually resource-intensive) may not work correctly or not work at all.
What to choose
What to ultimately choose from such a variety? There is no clear answer to this question. In each specific case you need to build on your needs, but in general the recommendations are as follows.
- Boot Camp Suitable primarily for gamers, as well as those users who need maximum performance and compatibility with software. We reboot the Mac and we get a full-fledged Windows computer.
- Virtual machines will help out in cases where you need both OSs at the same time. We sacrifice performance, but avoid reboots and get good integration.
- Emulators Can only be recommended for simple tasks and infrequent use. For example, when you need to use a bank client a couple of times a month or occasionally feel nostalgic in your favorite game.
Choose the most suitable option for yourself, and in the comments tell us for what needs you use Windows applications on your Mac and how you launch them.
Since Apple's transition to Intel processors in 2006 Apple Mac remains the only device capable of running macOS and Windows simultaneously, as well as applications that support both systems. You can run Windows on any Mac device made since about 2006. In fact, it is possible to run Windows on older versions of Mac, but for the purity of the experiment we are focusing on the period of transition to Intel.
We'll look at two main methods: Boot Camp and virtualization, and explain the differences between them, as well as the pros and cons of each method.
Boot Camp Software vs Virtualization
There are several ways to run Windows on a Mac, for which you will need to purchase a licensed version of Windows. The easiest way is to simply log into Windows systems when you start your Mac computer.
This method is carried out using Boot Camp, a utility built into Mac OS X/macOS. He also offers better performance among all available methods.

Another option is virtualization. This method is somewhat more complicated and requires an external application such as Parallels Desktop or VMware Fusion. This means you can quickly switch from one system to another, but the computing power of your computers will be wasted on both Windows and Mac, resulting in lower performance. This is the main difference this method from Boot Camp, focusing only on Windows OS.

So, let's look at both methods in turn.
Boot Camp
If you are an Apple fan but are used to working on Windows, then one of the most common solutions is to use the Boot Camp method. You will need a USB drive with at least 16 GB of free space to add the necessary files for Boot Camp. Be sure to check for software updates to make sure macOS, Mac firmware, and Boot Camp Assistant are up to date.
You will also need at least 30GB of free space on your computer to provide room for the system. Boot Camp will take ISO file and will create an image of the system disk, which can later be used for installation purposes.
To freely switch between operating systems, hold down the key Alt (Option).

After you start Windows, the computer will redirect all resources to ensure the operation of this particular system. Thus, the performance, compared to the virtualization method, will be twice as high.
Here is a list of steps you need to take to run Windows 10 on your Mac:
- Download the disk image. Select 64-bit boot.

- Make sure macOS, your Mac firmware, and Boot Camp Assistant are up to date.
- Once you download the Windows 10 ISO (see above), open Boot Camp Assistant. Check the following boxes "Create an installation disk" and "Install Windows 10" (ignore that another Windows is listed).

- Connect the USB drive, find the Windows 10 ISO file using Boot Camp Assistant. Boot Camp will copy the Windows 10 ISO and all the system drivers you need to run it to a USB drive. After a while your USB drive will become bootable Windows disk 10.

- The next step is key, you will need to separate hard drive. This means setting aside an amount of space for your system. The recommended minimum is 20 GB, but 55 GB is best.

- After you have allocated the required space to the system, click on “Install”. Windows 10 will begin the installation process. Once this happens, Windows will reboot several times. It should reboot already in Windows system 10 so you can see the screen Windows settings, but it's okay if this happens on macOS. Don't forget that if you hold down the Option/Alt button for a while while restarting, you will be presented with a system selection menu.
- Next, enter your product key and select the partition Windows Boot Camp. Follow the installation procedure. After installation, MacOS will boot into Windows 10 on its own.

- Finally, you will need to install the Boot Camp drivers, which are located on your USB drive. Find them and run setup.exe to install.

Advice! It is stated that twenty gigabytes of hard disk space is enough for Windows 10 to function, but in reality, for the system to function correctly, you will definitely need

Virtualization
An alternative method, virtualization, makes it possible to create one virtual machine inside a second one. So Windows here runs as an application. But at the same time, resources are spent on both systems.
There are different virtualization software, in this case we will tell you about using VMware Fusion to run Windows 10 and macOS on your Mac, although the process is generally similar to other virtualization software such as Parallels.
So, the list of steps to run Windows on Mac using VMware Fusion:
- Once downloaded, the VMware Fusion disk image will be saved in the Default Downloads directory. Find it and double-click on the VMware.dmg file to begin the installation.

- Double-click the VMware Fusion icon to start the installation.

- After installation, launch the program. A window will open: “Library virtual machine" in which you can create a virtual machine. Now you can use Windows feature Easy Install for VMware Fusion for automatic Windows installations and VMware Tools on your virtual machine.
- In the Virtual Machine Library window, double-click New or select File > New. The new virtual machine assistant will launch.

- Click Continue or to go to the Operating System panel. Now in this window, select any system and version for your virtual machine. In the Name panel, enter a name for the virtual machine in the Save As field.

- On the panel virtual hard disk, come up with the maximum dimensions for it. The smallest possible size for Windows 10 is 1 GB, but Microsoft recommends leaving it at 2048 MB. You should install 4 processor cores for your virtual machine.

- In the Windows Easy Install panel, select Use Easy Install. Enter your name, password (optional), and Windows product key.

- "Name" must be the name under which your software is registered Windows software, not your Windows username.
- You will then be taken to the “Done” dialog. Next, start launching the virtual machine and installing the operating system. Mark your installation Windows media and select the option “Use operating system installation disk” if you are using a DVD, or “Use operating system installation image file” if it is a USB drive. In the latter case, you will still have to find the file on disk.
Finally, click "Done". VMware Fusion will install Windows. This will take a maximum of 45 minutes, and after completing this procedure, you will be able to boot into Windows from OS X at any time.

Video - How to install Windows on a Mac