
Corporate address Email And Google apps, such as Gmail, Calendar, Docs, or Drive can be used on Android devices And Apple iOS. By downloading the Gmail mobile app, you can:
- conduct business correspondence using a simple and convenient Gmail service, wherever you are;
- use your corporate email address and Google apps on Android and iOS devices;
- quickly view messages sorted by importance;
- look for information in the mail.
Gmail mobile app for iPhone or iPad
To quickly receive mail on your iPhone or iPad, use the Gmail mobile app, which takes advantage of the best features of a well-known web service. So, with its help, you can receive real-time alerts, search for information in your mailbox, and perform many other actions.
For more information and to download the Gmail mobile app, visit the Gmail App for iPhone and iPad Overview page.
Configuring third-party email clients that use the IMAP protocol
In addition to Android and iOS, Gmail can be set up on other mobile devices that use the IMAP protocol. For details on this, see Use Gmail with Outlook, Apple Mail, and other clients. See the IMAP client documentation for your mobile device for supported features and other details.
Choosing an email address
You can send and reply to emails from either your Gmail address or your corporate email address. To select the sender's address in the "From" field, use the function Send email from address: It allows you to change the display name in outgoing emails.
If you want to mobile applications Gmail, Calendar and others updated faster after making changes, use our tips.
Android
It will take some time before the new corporate email address appears on your mobile device. To speed up its appearance, use the following tips:
Restart your device. If after that the new address does not appear:
- Select Settings > Accounts > Add account.
- Add an account for your corporate email address.
iOS
If you're using the built-in iOS email client, update your profile with your new corporate email settings and sign in again.
How to update your profile
- Select Settings > Mail, addresses, calendars.
- Select an existing Gmail account and click Account.
- Replace the old email address with the new corporate email address.
- Click Ready.
How to delete an existing address profile
To delete an existing @gmail address profile in the Gmail for iOS app:
- Launch the Gmail app for iOS.
- Select Change.
- Delete your old Gmail address.
How to add a new corporate email profile
- Click Add account.
- Sign in with your corporate email address and your Gmail account password.
- Click Ready.
Third Party IMAP Email Clients
You may be using an IMAP email client on a different type of device.
Our man will not go into his pocket for a word, but for the mail - completely. No, this is not about an envelope with a letter taken out of a drawer and stuffed into a pocket, but about a smartphone, which is our personal “postman” in a modern version.
Many people think that Android phones allow, which is tied to Google account, and iPhones only work with a box that is associated with an Apple ID. And that other mail accounts need additional programs. In fact, the possibilities of gadgets are enough for everything. Let's talk about how to set up email on your phone to receive letters from all your accounts in one mailbox - built into the system.
Setting up mail in the Gmail app on Android
Adding and setting up a new account
Mail client « gmail”, pre-installed on Android phones, can be used to assemble letters from various mail services, except for those that do not support third-party applications, such as heavily protected ProtonMail and Tutanota. By default, it collects emails only addressed to the Google account associated with the device.
To connect a different email account to your Gmail client, do the following:
- Launch the application. If anyone does not know, his label is a white envelope with a red letter "M".
- Touch the hamburger button and open the side menu. To access the account management section, tap the triangle circled in the screenshot.

- Select " + Add account».

- Select the mail service you want to connect. For example, if Domain name the server where your mailbox is located, yandex.ru or ya.ru, choose Yandex; if gmail.com, choose Google, etc. If the desired service is not listed, your choice is " Another". We will analyze further actions using the example of the last option.

- Enter an email address. To set its default settings, click " Further". If you want to specify your settings, tap the " Manually».

- When choosing manual settings, the program will ask you to specify one of three options for the type of account. For personal mail, these are POP3 or IMAP protocols (you can find out what to choose from the instructions for users of your mail service). For mail on a corporate server - Exchange, unless otherwise used.

- Once again, enter the login or full address of the mailbox and password to enter it.

- In the next step, specify the incoming server. If the program did not determine it itself, you will have to refer to the manual of your mail service again.

- Next, write down the address of the outgoing message server and, if desired, enable automatic login into the system. Then you will not have to enter a password every time you access the mailbox.

- The basic setup is almost done. The point is small - to allow or prohibit the synchronization of the program with mail server. If allowed, set the synchronization frequency (default 15 minutes), as well as enable or disable notification of new letters and auto-download of attachments when the phone is connected to a Wi-Fi network.

- Account added. At the final step, you can change your name, which will be displayed in sent letters. By default, instead of the name, the account login is specified.
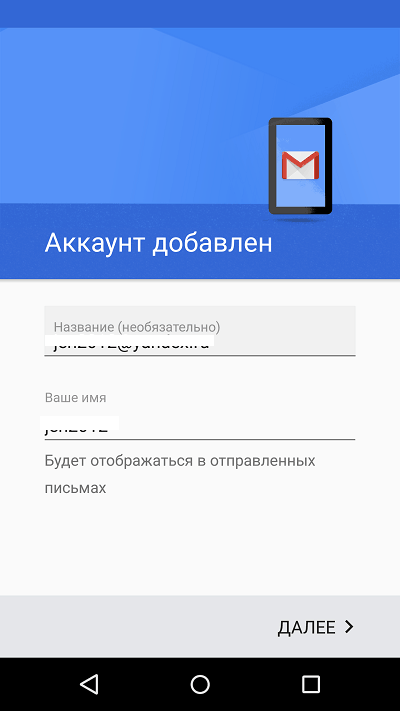
We can finish here, but if you want to customize the new box more finely, open the side menu in the application again, scroll down and tap the " Settings».

Select the account you want to edit.
The following options are available for editing:
- Account name (email address).
- Your name (the default is your account name).
- Signature in the letter.
- Associating an address with another Gmail account.
- Request to display images in emails (if the Internet connection is slow or is charged according to the amount of traffic, it is better to enable it).
- Synchronization with the mail server and its frequency (high frequency of synchronization increases the volume of traffic and accelerates the discharge of the phone's battery).
- Automatic download of attachments to emails when connected to Wi-Fi.
- New mail notifications.
- Sorting incoming mail by categories (unsorted letters, social networks, forums, promotions and notifications). Not supported by all mail services.
- Automatic reply to incoming emails. Not supported by all mail services.
- Auto-suggest quick replies. Not supported by all mail services.
- Select a ringtone to alert you to an incoming message.
- Adding labels.
- Vibrosingal to notify you of the receipt of a letter.
- Incoming and outgoing mail servers (username, address, port and encryption type) and more.

In exactly the same way in Gmail add Accounts other mail services. There are no restrictions on the number. Use manual settings, as described above, is usually not needed, except for connecting corporate or some exotic mail accounts. In other cases, the application chooses the optimal default settings.
How to Change or Delete Your Gmail Account
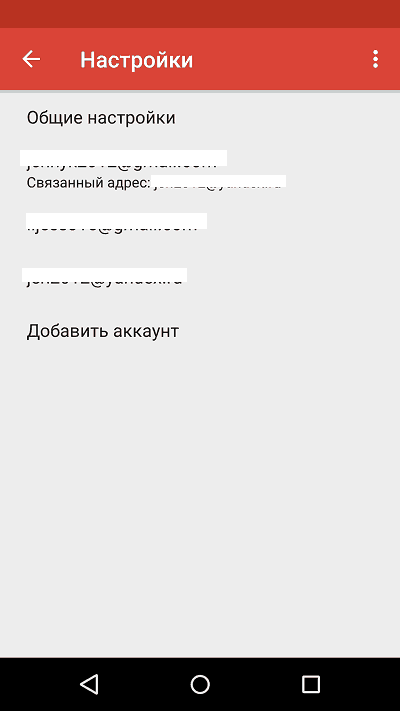
By default, Gmail displays correspondence from only one account - the one that is currently active. To check the mail of another, you need to make it active.
All connected accounts are displayed in the top field of the main application menu (hidden behind the hamburger button). To switch between them, just touch the desired tab. And to download messages from all your mails at the same time, select " All boxes».

To remove an account from the Gmail app, click on the triangle button in the main menu and open " Account Management».

Next, select the mail service and account you want to delete. On the next screen, highlight the desired address again and go to the menu hidden behind the "three dots" button (top right). Touch " Delete account».

Set up mail on iPhone and iPad
Connecting and setting up an account
Adding and setting up an email account on Apple mobile devices is no more labor intensive than on Android, but less intuitive in my opinion. And they are performed not in the mail section, but in " Accounts and passwords».
To use a different email account on your iPhone or iPad besides the one linked to your Apple ID, do the following:
- Tap in the list " Accounts» item « Add».

- Select the mail service where your mailbox is registered. If it is not in the suggested list, click " Other».

- Then select the section " mail" And " New account».

- Enter your account information: username (by default, the login of the mail account is substituted), email address, password and description (the latter, by default, matches the mailbox address). Touch the " Further».

- In the next window - IMAP, check " mail". Paragraph " Notes» is not required. Save the setting.
- Next, if you think the settings are sufficient, click " Ready". The new account will be added. If you want to edit parameters that are not displayed in this window, click " Additionally».

In section " Additionally» contains the following options:
- Box behavior. Allows you to assign or change the roles of some folders - drafts, sent, archive and deleted messages.
- The place to move unwanted letters is to the trash or archive box.
- The frequency of emptying the trash (complete destruction of deleted messages). The default is one week.
- Options for receiving incoming mail: use SSL encryption, select an authentication method, IMAP server port number, and IMAP path prefix.
- Whether to use S/MIME encryption. Disabled by default, supported by most but not all email services.

After closing the settings window, you will be taken to the section of the newly created account. By the way, here is the delete button.

Now the mail program built into the system will receive letters, including from this mailbox.
Setting up the mail application
The parameters of the built-in mail program are configured, as you probably already guessed, through the section " mail».
The following is collected here:
- Application integration with Siri and search engine.
- Ways to notify about incoming correspondence (ringtone and sticker). You can assign individual notification settings to each mailbox.
- Message list display: number of lines to display when viewing, labels, swipe options (right, left, with flag added, etc.), style and color of flags.
- Actions when reading a message (requesting confirmation of deleting a letter, downloading pictures).
- Sorting and processing correspondence: grouping by topic, collapsing read messages, the location of the last message (top or bottom), completing topics (showing a thread of letters that make up the same topic, even if they have been moved to other folders).
- The parameters of the message being created: sending a copy of the letter to yourself, marking addresses, indenting when inserting a quote, signatures - common or separate for each account and the default account from which new letters will be sent.

As you can see, the mail program on apple phones and tablets allows you to fully configure it for your own needs. Not everyone can boast of such functionality. third party application. Another plus in the treasury of mailers built into the system - both on Android and Apple - is the absence of advertising, which is stuffed with almost all free counterparts. So both programs are quite good.
Johnny MnemonicArticles and Lifehacks
Email, despite the emergence of other methods of communication, is still very popular, and this article will tell you how to set up Mail.ru mail on android.
Now there are many messengers, social networks and programs like Skype or Viber, which allow you to transfer not only text, but also audio and video information.
But email is still better suited for transferring important documents, bulk mailings, and business communications.
Set up using a standard mail program
The easiest way is to use the email application that comes standard with the Android operating system and is available to all users for free.You can find it by opening the application menu and selecting "Email" You will see two fields: "Email Address" and "Password". Once completed, click the "Next" button.
A window will open with a choice of protocol, "POP3" and "IMAP".
"POP3" allows you to reduce traffic consumption, since the user conducts all operations with letters on his computer. After downloading the letters, the server automatically deletes them from itself.
"IMAP" is more convenient, it stores letters on the server, this is useful if you plan to work with mail using several devices.
IMAP setup

- After selection, a window will open in which you will need to fill in the following fields:
IMAP server: imap.mail.ru;
Security Type: TLS/SSL;
Port: 993; - Select "Next" after filling out and enter the following details:
SMTP server: smtp.mail.ru,
Security Type: TLS/SSL;
Port: 465; - Click "Next", a window will open where you can configure such parameters as the frequency of checking messages, synchronization, and others.
POP3 mail protocol
- You need to enter the following data:
IMAP server: pop.mail.ru;
Security Type: TLS/SSL;
Port: 995; - Click "Next" after filling and enter the following data:
SMTP server: smtp.mail.ru,
Security Type: TLS/SSL;
Port: 465; - Click "Next", a window will open where you can configure such parameters as the frequency of checking the message, synchronization, and others.
- After filling it out, enter the name for your account and the name that will be indicated in the "FROM:" column when sending messages.
Internet mail, also called e-mail, has long been a part of everyday life, and much more messages arrive in a virtual mailbox than in a real one.
This type of mail became even more popular as soon as the Internet went beyond computers and firmly nestled in mobile devices. E-mail, compared to SMS, has a number of advantages.
To send every message across networks mobile operators it is necessary to pay n-th amount of money each time, and all that is needed to send letters on the Web is an Internet connection.
Each sent message is absolutely free, and you can add quite large files to it. This feature is indispensable for business representatives.
Various services that provide e-mail correspondence have also become popular. The leading Russian services include such services as Yandex, Mail and Gmail.
For users of Android smartphones and tablets, these brands have developed their own programs corresponding to the mail application type. Each of them has its own characteristics, and users do not know exactly how to configure certain applications, and often try to figure out how to install mail on android.
Before describing the specifics of setting up each of these services, it is necessary to mention the general steps.
To start the application from any service, you need to download mail to android. To do this, it is best to contact the developers' resources directly. Then it is installed on the device and launched. This is where the differences begin.
To set up mail mail on android, you need to perform the following steps:
- First you need to run it. In some cases, the devices themselves know how to configure, but otherwise you will need to do everything yourself.
- After turning it on, you need to either enter an existing box, or create a new one, for which you need to enter "Menu", "Accounts", "Menu" and click "Add account".
- Here you enter the name of the new mailbox and the required password. The protocol for communication with the server is selected (POP3 is most often used), and you can proceed directly to the configuration.
- The user, having opened the corresponding window, will be able to set the parameters according to which messages will be received and sent.
- You also need to make sure that the selected server through which the application will be processed corresponds to the protocol, for example, pop.mail.ru. If everything was done correctly, you can download messages from your other mailbox.
In fact, you should perform the same actions as for mail.ru applications, replacing only the mailbox domain name from Mail to Yandex. However, in the case of Google's proprietary application - Gmail, the situation is somewhat different.

Setting up Gmail is easy enough.
Since she herself operating system Android is created by the same developer. The platform and application are as close as possible to each other, and often the configuration is completely automatic.
Otherwise, you need to enable the IMAP protocol in the application settings, which will allow it to work with Outlook Express and Apple Mail and others.
And it will be possible to synchronize actions in different mail applications. You can continue the procedure by pressing the Home key and open the Gmail application.
You can view your accounts by pressing Your accounts and Next.
After logging in (or registering), you need to make sure that the settings data in the appropriate columns indicates:
- server:imap.gmail.com
- port: 993
- Security type: SSL (always)
- Outgoing mail server: smtp.gmail.com
- Port: 465
- Security type: SSL (always)
If everything is correct, then the application will work like clockwork, allowing you to access your mailbox through his mobile device provided that it is connected to the Internet.
Mail.Ru is one of the most popular mail services on the Internet. With the advent of smartphones, it became possible to use mail directly on the phone. However, on the same Android, setting up access to the box has some features. In this article, we will take a closer look at how Mail.Ru mail is configured on Android.
How to set up Mail.Ru mail on Android
First you need to find the Mail utility, which is standardly preinstalled on Android. Go to it, go to the "E-mail" item and click the "Menu" icon and then "Settings". In the upper left corner there will be an "Add Account" button. After that, the window "E-mail supports most popular services" will appear. There will be two lines to fill in. The first line is "Name". It must be entered completely according to the type [email protected] and the password from the mailbox.
The next window will prompt you to select an account type. There will be 3 options: POP3, IMAP, Exchange.
For better smoothness and speed of work, it is better to choose the second option. Consider the case where POP3 was chosen.
Here another window will appear where you will need to fill in the fields "POP3 Server". Here you need to enter pop.mail.ru. Next, "Port" - enter 995, "Security Type" - SSL / TLS, and in the last column "Delete messages from the server" you need to select "Never".
IMAP setup works in a similar way. Only in the "Port" column you need to enter 993, "IMAP Server" - respectively imap.mail.ru, "Security Type" is the same as in POP3. We leave everything else unchanged.
After installing the protocol, the last window will appear where you need to fill in the "SMTP Server" item, you need to enter smtp.mail.ru, "Security type" - SSL / TLS, and in the "Require login to account" item there should already be a checkmark. Everything else is already filled in.
After that, it remains only to click the "Next" button and enjoy all the benefits of an electronic box. Here it was described in detail how to set up Mail.Ru mail on your device. If it becomes necessary to add another account, you will need to do all of the above, only change the data in the "Password" and "Username" columns.
Setting up Mail.Ru mail on Android: Video
Possible problems when setting up the mail service
The Android system is not perfect. Sometimes, while working with mail on Android, a network error occurs. In such a situation, the first thing to do is to check the correctness of entering all the data. Next, see if the Internet is missing. If everything is fine, you need to reboot the device and try to enter everything again. In most cases, after such manipulations, everything starts working normally.
Email client for Android system: Video
Mail agent for using the Mail.Ru service
There is an official mail agent for Android from Mail.Ru. You can download it at Google Play link . The client is configured according to the algorithm described above. The application is characterized by smooth operation and stability. In addition, there are a huge variety of alternative clients. They are both paid and free, and differ in functionality. Which one to choose depends entirely on personal preference.
Thus, we saw that it is not difficult to install the Mail.Ru service, and instead of a standard client, you can use alternative ones.


